


First setup
Most of us know how, but this article is for the ones who never set up a fly reel from scratch. See which knots will work where and what type and amount of backing you most probably want. Start with this simple trout setup, and you can expand to other types.

Ready to go
|

Reel and spool
|
Many beginning and even a few seasoned fly anglers are unsure about how to set up a reel with backing, fly line and leader from scratch.
This article will take you step-by-step through this process, using simple and proven methods, which are suitable for almost any type of fishing.
The staff in a local flyshop will often equip a newly acquired reel with backing and fly line, and in many cases the angler will just leave it as it is for years, neglecting the operation of unspooling the line and respooling it to make sure it's properly arranged on the spool.
Beginners may get the aide of a friend, which is an excellent idea, making sure that the setup is adequately tuned and ready to be taken into the wild.
The list
The list of ingredients is very simple. I have chosen to illustrate this article with
- a newly acquired 5-6-weight reel
- a 5-weight Weight Forward line.
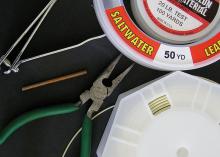
- a spool with 250 yards of compact 20 lbs. braided backing
- a simple three-section knotted leader
Read more about leaders and tippets in the end of this article.
You might also want to have a braided loop—a concept, which I will discuss later.
During this process I also utilized a small battery driven screwing machine (for unwinding surplus line, actually) and a couple of heavy objects to hold the spools while winding the lines.
Add to that pair of scissors, and you are ready to roll.
Reel type
There are three basic types of reels, which can influence the way you must start your journey.
- Fixed, non-detachable spool
- Detachable spool, closed cage
- Detachable spool, open cage
The reason this is interesting is that you have to consider how you "thread" the backing before tying it on the spool.
The easiest one is the open cage type. Detach the spool and tie on the backing as described below.
Next in ease is the closed cage type. Look at the reel before you remove the spool, and envision the way the line must travel through an opening in the cage. After having released the spool, you need to pass the backing through this opening the opposite way before attaching it.
On the fixed spool reel, you need to thread the backing through the right opening, pass it around the spool and back out the same way before tying the knots described below.

Choose hand
|
Deciding which hand to use on the reel
You can use most reels two ways: for left hand retrieve (the most common) and for right hand retrieve. How you switch the reel between the two differs from reel to reel. You can often change this yourself. See the instructions for the reel. In some cases it has to be done with special tools in a shop, and in a few cases it can't be done at all, but you have to buy your reel for the hand you want to use.
Most right handed fly anglers use the left hand to wind the line and vice versa for left handed anglers. We use the best hand to cast, and don't want to switch hands once a fish is hooked. But some anglers actually cast an wind with the same hand, and switch the rod over once a fish is hooked.
Remember to set your reel to the proper retrieve before spooling on line, and remember that the reel hangs under the rod when in use, and the orientation and adjustment should reflect this.
This will be the most common setup: Hold the reel in the reel foot with your casting hand and "reel in" with the other hand. The reel should be easy to turn when you reel in, and if the reel has a brake, it should only effect the movement of the spool when it turns the opposite way - as when giving off line.

Backing on spool
|

Ventilated spool
|
Tying the backing on the spool
The first knot we are tying is very simple. Pass the tag end of the backing around the spool axle the opposite direction that the spool will be wound when you retrieve line. Now tie a simple overhand knot around the standing end and tighten. Then tie another overhand knot on the tag end and pull the standing end until the two knots engage.
Mount the spool on the reel cage, ensuring that the backing passes the right way through the cage.
When you now start spooling the knots should have run down the line and tightened nicely around the spool axle.

Backing attached
|

Electric drill
|

Backing done
|
- fix the fly line with tape to the axle of the reel
- wind it on to the reel
- attach the backing to the fly line
- add as much backing as needed on the reel
- cut the rest of the backing
- take off all backing and the fly line
- reverse it and start spooling on the backing as mentioned in this description
Amount of backing
Now you place the spool with the backing in a way that allows it to turn, and start spooling the backing on the reel. This can easily be done by hand. It just takes some time. You can also use a tool such as the Smart Spooler. Make sure that the backing is tight and that it is evenly distributed on the spool.
Never pull the backing off the side of its factory spool. This will introduce twist into the backing.
And don't put too much backing on the spool. You usually won't need it unless you are going salmon fishing or bonefishing or want to take on tuna or jacks. 100 yards will suffice for most general purposes.
On small arbor reels with a small diameter axle you may need more to fill up the spool. You can also choose to use a thicker type of backing such as the older Dacron type.
You may by accident put a bit too much backing on (I did for the photos for this article...), which will make the fly line touch the outer bars when it's completely wound on the reel. And you don't want that to happen, because it won't show itself before you have finished spooling the fly line, in which case you will have to back up and restart the procedure after removing the surplus backing.

Package contents
|

Fly line ready
|
Preparing the fly line
Since I assume you have a Weight Forward line on your hands, you will have to locate the reel end of the line. Most lines are tagged with a small sticker to indicate this, but if you see no sticker, you will have to find it yourself.
The Weight Forward line is basically a thin line attached to a thick line, so you simply find the thin end.
The front end is thin too, but only for a short section. Then it tapers to a thick part.
You want the other end.
Some types of backing are hollow and allow for an attachment with a silicone sleeve. This can work quite well as long as you work the backing and silicone sleeve sufficiently far up the fly line.
Another option is using a braided loop on the fly line and a large loop on the backing.
In this case I have selected to tie the fly line onto the backing using a permanent knot. If you do not plan on changing your line often, a knot will do a fine job. But notice: It usually has to be cut off if you want to take the lines apart later.

Starting the Albright knot
|

Albright knot stage two
|

Finished Albright knot
|
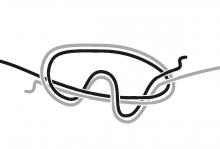
An Albright knot
So you have now arrived at your first major challenge: attaching the backing to the fly line. There are several ways of doing this, but I have chosen my own favorite method, the Albright knot. This is a very durable knot that's fairly easy to tie.
|
Albright knot - backing to fly line
|
So, step by step.
Bend the reel end of the fly line back for an inch or a couple of centimeters and pinch the line and tag parallel between your fingers, while you let about ½ inch or a centimeter of the loop protrude.
Now pass the tag end of the backing through the loop and pull a few inches through. Pinch the backing between your fingers too, and start winding the tag back over the two strands of fly line forming the loop. 6-8 turns will suffice, and having finished the last turn, you pass the tag of the backing the opposite way through the loop compared to the standing end of the backing.
You can now pull gently on both tag end and standing end to tighten the loops and work them towards the end of the loop on the fly line. As they get closer and tighter the lines crossing in the loop will lock tight and finally the coils of backing will be at the very end of the bent back fly line and so tight that the backing sometimes works itself into the coating of the fly line.
Trim the tag ends of the backing and the fly line and you're done.

First rounds
|

Spooling the fly line
|
Spooling again
You can now spool the fly line onto the reel. Again let the fly line spool turn, and don't pass it over the edge.
Distribute the line evenly over the full width of the reel, guiding it with your fingers.
If the reel fills up too much and the fly line touches the outer bars on the cage, you will have to back up a couple of steps. Remove the fly line, cut the Albright knot, remove some backing and start over from the Albright.
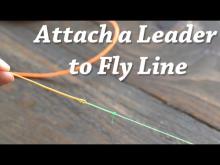
You are now ready to attach a leader.

Looped leader
|

Cut the loop off
|

A mess
|

Tightening the nail knot
|
|
Leader on flyline
|
Loop or knot
I have used both loops and knots for the attachment of leaders. Nowadays I use knots only. I prefer the stiffer link that it provides, and I also change leaders a lot more seldom than I used to. If you are a beginner and still uncertain about leader choice, if you know you will change leaders often (maybe because you fish deep over rocky bootom) or if you just want a more flexible setup, you may want to opt for a loop-to-loop connection.
The loop system facilitates leader changes, and if you want to change leaders often, that's the way you want to go.
You can mount a braided loop on the fly line, or make a permanent one by removing the coating and splicing an eye on the braided core. Threading a new leader with a loop onto that takes seconds.
If you want a firmer and stiffer connection, which many anglers prefer, you can attach the leader butt to the front end of the fly line with a nail knot as described above.

Done
|

Job well done
|
Addendum, August 2007
Leader and tippet
A lot of people have asked for more details about leaders and tippets, so I have decided to expand the article with a few more details on this.
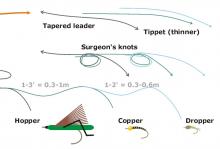
Let's cover the basics first: the leader and the tippet are the two terminal parts of the setup before your fly. The leader is attached to the front end of the fly line and the tippet is attached to that. Your fly is tied to the tippet.
The leader is a tapered piece of line - it's thicker towards the fly line and thinner towards the tippet and fly. The taper is obtained by using a tapered monofilament line, a tapered braided line (many thin lines "braided") or a so called poly leader, which essentially is made like a fly line: by coating a core. A last and very common type of leader is a knotted leader, where the taper is created by tying together several pieces of straight monofilament in ever decreasing diameters. The purpose of the leader is twofold:
1) To lead from the thick and clumsy fly line to a thin and delicate tip that can actually pass through the eye of the fly
2) To transfer power from the fly line to the fly in such a way that the last bit of movement is gone when the fly is delivered
So you attach a leader to the fly line as described above. Regarding length a rule of thumb could be that about 1½ times the length of your rod is is suitable. A 9-12' leader is always a good place to start with one hand rods. The leaders are usually either tagged with tippet sizes in X's (4X, 5X, 6X and so on) or with the type of fishing it's meant for: dry fly, nymph, salwater, steelhead, salmon or it can be labelled with the pound test in the tip like 2, 4, 6 lbs. and so on. Select the leader so that it suits the tippet you want to use. The tippet is actually just a piece of mono that you can change and extend as you change your fly, tie on new one and cut off little bit of line in the process. In stead of eating up your leader, you waste a bit of tippet, and once in a while you cut that off the leader and tie on some fresh tippet. In that way you can keep on fishing with the same length of leader and tippet.
So: attach a 9' leader to your fly line with a knot or a loop as described. Attach to that 1-2' of tippet in the same thickness or a bit thinnner than the tip of the leader. Use a surgeon's knot for that. And finally thread the whole thing through the eyes of your rod, tie your fly to the tippet and you are ready to fish.
More
After this serious coverage of setting up your gear, you might consider reading the two more lighthearted pieces on getting started: How to look good and How to act right. You can also consider browsing our whole beginner's section.
Read more about why you should register.
Related content


More content from the front page


Since you got this far …

The GFF money box
… I have a small favor to ask.
Long story short
Support the Global FlyFisher through several different channels, including PayPal.
Long story longer
The Global FlyFisher has been online since the mid-90's and has been free to access for everybody since day one – and will stay free for as long as I run it.
But that doesn't mean that it's free to run.
It costs money to drive a large site like this.
See more details about what you can do to help in this blog post.
Comments
Andy, The leader
Andy,
The leader is indeed the tapered line that attaches with the thick end to the fly line. But in order not to have to cut into the thin end of the leader every time you change your fly, you tie a bit of level mono to it - and that is your tippet and it's this bit you tie your fly to. This mono simply comes off spools and you cut it to length - typically a foot or two.
This bit gets changed more often than the leader itself. It's less expensive and if you make a small loop on your leader and tie the tippet onto that - or use a loop on the tippet too - you can change this bit endlessly without eating into the leader.
Martin
Help! I understand &
Help! I understand & have put on the backing & then the fly line no problem. Here is were I am confused! Is the tippet just straight monofilament line? The leader is the line that starts out fat and goes down to a very thin line that you tie your fly too. I have purchased the backing - fly line - and what above I called the leader I have been given a 8ft 6 inch Silver Stream fly-fishing rod that is made for 5/6 fly line. The reel is a Shkespeare model 1094. Thank you in advance for your help. Andy
Maybe its just me be
Maybe its just me being all fingers and thumbs, but I always find it easier to lay the line on the spool evenly when it is on the rod. You only need to mount the reel on the first section of the rod not the whole rod, and pass the line through the first eye. THis enables you to wind and guide the line onto the spool while applying sufficient tension to get it to lie evenly.
The assistance of a second person to hold the backing spool or fly line spool on a pencil or similar item, so that it can rotate freely and give line as you take it, ensures no tangles, birds nests, or spools of line unrolling across the floor while you have your hands full. There are of course gadgets you can buy for spooling and unspooling lines, but few of us unspool and store our lines off the reels as we theoretically should, so these are really a luxury, when you could spend the money on something likely to catch you more fish!!
Great information for all newcomers to the sport, and even not so newcomers, that have been doing it "their way", and not necessarily the right way.
GFF Team, Have you
GFF Team, Have you ever "discovered" website and thought this is way cool. That's how I felt today when I found your site, good job and keep it up! Thank you - I've sent your URL to a couple friends already.
Great article and gr
Great article and great site!
Jay, The silicone
Jay,
The silicone tubing and the braided tube that makes up the loops can fail. I have had it happen to me too. The diameter of the silicone tubing that slips over the braid has to be exactly large enough to be able to hold the braid and the fly line very firmly.
Glue isn't usually necessary, but can of course secure the connection - but on the other hand also make them inseparable, which is kind of contradictionary to the whole concept.
Make sure you have a silicone tube that can't slip and make sure it and the braid reaches far enough over the fly line to ensure a tight connection.
Martin
Thanks for this arti
Thanks for this article. I've been out fly fishing twice now using some 1970's gear that I got from my Dad. First time out it was his full setup (beige 70's line too!) and a friend sorted out the leader, tippet and fly.
In between times I went to a local fishing store to buy a new line some leaders and braided loops.
The guy inthe shop said he wasn't much of a fly fisherman and only had a limited range of gear for it.
Second time I went out I set up my own line, leader and tippet. Within the first 4 casts everything from the end of the line was lost! I assumed I'd messed up a knot until my friend found the whole set up on the bank. Intact.
The braided loop had come away, despite me tugging and testing it and it being secure. I tried another loop, same thing happened.
Is it possible that I got the wrong diameter loop? Are they the same size? Should I just superglue it on?
Cheers.
Adam, The system
Adam,
The system with one or two sliding rings and no thread or locking mechanism is quite common on light fly rods. You simply press the ring or rings onto the foot of the fly reel, and it will sit there. The load or pressure is usually small on these light rods, and the reel should be secure enough.
Martin
want to use my grand
want to use my grandfather's fly fishing rod and i don't see any nut that you spin to lock reel in place. it is a airex air glass rod light cat no. 221 in general do they make rods where the cork end of the rod just uses two press fit fittings to hold reel in place
Thankyou! From al
Thankyou!
From all the way over in australia!!
Finally a site that
Finally a site that makes it easy for us Fly Fishing newbies. Thanks so much for the info guys!
Awesome page for beg
Awesome page for beginners, much appreciated! You guys rock!
Hello all, I have b
Hello all,
I have been fishing a local water, that by all accounts is stuffed to the brim with fish but they are very very timid and tackle shy.
Any figure of 8 retrieves are ignored, I have watched trout inspect my fly on flourocarbon line 6lb from all angles before turning away... the water is so beautiful, its clean, well managed, but OH MY WORD! its incredibly hard to catch fish.
So what should I be thinking that I haven't already!
Such as weaker tippet & micro flies?
(larger fish to consider in the lake etc...)
I do like a challenge , but is there something I might be doing wrong? Or do I need a fresh approach?
The Lamson LP
Joe,
The Lamson LP reels are some of the first reels Lamson made and pretty hard to find information about. If they are constructed like the more recent Lamson reels they can be reversed by a shop with the right tool. Bill Archuleta of Archuleta's Reel Works might be able to help you with that information. His website is at archuletasreelworks.com.
Regarding the redfish I don't know for sure. I never fished for redfish, but judging from what I see on videos and read in articles, an 8 weight or a sturdy 7 weight will do unless you expect the really massive bulls, in which case rods up to 10-weights are mentioned.
I'd go for a lighter rod. You will be casting more than you will be fighting, and even lighter rods can handle a big fish if you happen to hook one.
Martin
I want to first off
I want to first off thank you for providing this free information for beginners to fly fishing such as myself. I just got a new Sage rod and a Lamson reel that was given to me by my mother in law,the reel is a Lamson LP3 and i was wondering if you could tell me if it was a left or right handed reel or if it is reversible; the reel is 15 yrs. old but was never used so i have a brand new old reel. Now for my last question - what size rod should i use for fishing for redfish on TX coast. Thanks in advance for your help.
Dear Martin, than
Dear Martin,
thanks for your answer. I confess I have done it your way the first time I had to put backing and flyline to my reel.
This article is indeed not a good advice for beginners; compared to all your other ideas and articles I have read with admiration of your wisdom and expertise.
Here is my easy way to add both lines - backing and flyline quickly and easy on a flyreel without any additional adjusting of the backing.
- Take the head of your flyline and fix it with some tape on the axle.
- Wind all the flyline on your flyreel and use the knot to fix the backing to the end of the flyline.
- Now fill the flyreel completely with the backing.
- Cut off the backing and use a drilling machine with an empty plastic reel of any angling line to spool off the lines of your fly reel. Always use some tape to fix the line to the axles.
- Now take a second empty plastic reel/spool and spool both lines with the help of the drilling machine on this reel.
- Now the end of the backing is available to be attached with a knot to the axle of the fly reel. Don't forget to add a piece of tape on the axle of your fly reel. This will help a lot if a big fish empties your reel completely.The tape will make sure that no slipping of the line on the axle is possible. I just have done it 3 times with my 12 year old son who had to give me a hand holding always the reel with the line on.
To spool off and fill the empty reel with backing and flyline takes 30 seconds. Most time is used to fill the flyreel twice by hand. The same way I use to fill my flyreels with shooting head , running line and backing.
I hope you will try my way and let me know your opinion
Best Regards of your admirer
Pit
Pit, I really won
Pit,
I really wonder what you mean by "not worth to be placed here"?
I totally disagree. Sure I wrote the article and may be a bit biased, but I find it more than worthy You have managed to judge our single most popular article ever unworthy. And it's the most commented and has the most positive comments. It's been read almost 60,000 times the last year and has over 80 comments of which yours is the first negative.
You complain that I can't tell you what exact amount of backing is needed for a reel and line, and ask me to offer a better way. Sure it's pretty silly to wind on too much and then unwind some and cut it off, but honestly... if it's such a big deal to cut and toss a bit of bacling, then tie it on to the remains you have on your bulk spool, and nothing is wasted. A knot on the backing is hardly going to be a big problem.
Your own suggestion with spooling on the fly line first and then measuring the backing is really fine, and can do the trick. Neat idea!
Whether it really saves a lot of frustration and a lot of time is another matter... I have spooled backing on dozens and dozens of reels and probably spooled some off again a few times, but never felt frustration or felt that I wasted my time. Your mileage may vary.
In the positive spirit of sharing things for free on the web I hereby pass your idea on to the couple of hundred or so people that read this article every day.
Martin
well, I am sorry to
well, I am sorry to say that I consider this article not worth to be placed here. Its silly not to find a way to know how much backing is needed, before cutting meter for meter the backing and the knot to find the needed length of backing. What to do if I have cut the backing too short? Cut the lines again and add 10 meters of backing? Then discovering after completing that the additional part of the backing was too long?
Please offer a better way. As a beginner I had this problem also. I fixed the flyline with tape to the axle of the reel and wound it on to the reel. Then I attached the backing to the fly line and add as much backing as needed on the reel. Then cut the rest of the backing , take off all line and start with the backing as mentioned in this description. This way is more easy and saves a lot of frustration and a lot of time and saves the rest of the backing for the next reel.
thight lines
pit
Brad, If you hold
Brad,
If you hold the rod with your left hand, the handle should be on the right side of the reel so that you can wind with your right hand. Looking at the reel from the handle side, it should wind the line in when turned clockwise and spin counterclockwise when you pull line off the reel. Remember that the reel hangs under the rod and the reel foot is up and that the line comes out from the underside of the reel. Any braking action should also happen when you pull line off the reel.
Martin
if i'm holding the r
if i'm holding the rod in my left hand the winder is on the right side of the reel which way is the reel suppose to spin?
benchy, If a reel
benchy,
If a reel has a ratchet sound in one direction only, it's usually when line leaves the reel. One some reels the ratchet is the only brake, and the brake should be there when fish takes line or when you strip off line before a cast. Many modern reels have brakes and sound separated and have the same sound in both directions.
Your reel seems more like it's a fairly simple reel with a combined ratchet and brake, and here you want the braking action when line is leaving the reel. If that's not the case now, you will need to turn the direction to left hand winding. If it's not obvious how that's done on your reel, you need to consult a manual (or a fly shop).
It might not be possible. Some reels are built to one direction and can't be changed. You simply buy the reel for the hand you use.
Your options depend on the reel brand and model,
Hope this helps.
Martin
Im completely new to
Im completely new to fly fishing....Ive just bought a fly reel, Im right handed so the winding handle is on the left....should the reel make the ratchet noise when im winding line in ( onto the spool ) and no noise when i pull line off the spool, this is what my reel does, there is a small lever that stiffens the ratchet up slightly which makes me think this would be to put a bit of tension on the line when a fish is on.....have i bought a left handed reel by mistake do you think haha
I have looked inside at the workings when the spool is removed and it does look like it can be reversed...I think
Hi martin you have g
Hi martin you have given me all the info I need, thanks very much ,i am much less confused now .
Thanks Again All the best for Xmas and the new year
What you mean
Steve,
What you mean by wfs6 is WF 6 sinking I guess, and that's a fly line. Not a leader.
The leader is what you tie on to that to taper it down and the tippet is what you tie to the leader to connect it to the fly.
So it's: backing -> flyline (wfs6) -> leader -> tippet -> fly.
The leader can be sinking, but the tippet is usually just straight mono.
20 lbs. backing would be fine for your setup.
The flies would vary in size and pattern depending on how, where and what you fish. You can sometimes use the same flies for salmon and trout, and fishing in Irish loughs they would actually be the same: classical wet flies of different kinds in fairly small size. But in many other waters they would differ.
Hope this helps
Martin
Thats great advise ,
Thats great advise , so my wfs6 leader would need a tippet to match , do the tippets come in floating sinking etc or are tippets governed by the leader. would you put a 20lb backing line on the reel.
The fly 's that i would need to use with the above leader would they be able to fish for both trout and salmon.
Thanks Martin
Steve, You can ea
Steve,
You can easlily combine a 7/9 wt reel with a 6/7 wt rod. It might be a little large, but that's just looks.
The line you need must fit your rod - 6 or 7 weight - no matter what you fish, trout, salmon or whatever. The line and rod must be the same weight.
And yes, you need backing. You need to fill the reel with something and also want some backing in case you hook something big. 100 yards or so will usually do, but your reel can probaly hold more due to its size.
The leader should reflect the thickness of your tippet and the tippet is decided by what flies you are going to use: small flies, thin tippet. Large flies, thick tippet.
Fishing loughs in Ireland may mean fishing several flies in a team, and for that you might find some inspiration in the article about the Diawl Bach.
Martin
Hi just starting out
Hi just starting out please advise..
I have bought a 7/9wt reel but bought wfs6 leader, my rod is a 9ft 6/7 wt. The reason my reel is 7/9 is because I want to go salmon fishing once i get some practice , what other lines would you suggest i need to get started . I need a backing line ? what yardage would you suggest, do I also need fly line , if so what wt do I need ,does it need to be the same as my leader, and then theres the tippet again do they come in wts if so what do you suggest . I will be mainly trout fishing but salmon may also be present as i will be fishing the loughs in ireland.
Jim, Thanks for y
Jim,
Thanks for your question. I added it to the Q&A.
See my reply here in a longer version here.
Martin
can I use a leader a
can I use a leader and not a tippet or do I have to use both?
Biran, Never mind
Biran,
Never mind simple comments! You are more than welcome to write as long as you please.
I'm glad you found this helpful, and happy that you caught your first fish.
And yes, I think you're hooked!
Martin
Thank you thank you
Thank you thank you thank you,I knew absolutly nothing about setting up a fly reel,or how to fish with one. Now I know.a little,but what little I know was enough to go fly fishing & have a great 1st day experience .I owe it all to you, I setup my per your xlint instructions, I tried the wetfly method at one of my favorite spots on the Mckenzie river.everything you mentioned in your article about the beginner fishing with wetflys happened to me.the good & the bad, I fished off the bank so I lost some flys in the trees,bushes,& rocks. Thank god for the white water my casting has plenty of room for improvment, but as long as I got it out in front of me she drifted down stream.I had lost 5 out of my 7 flies that I bought in a hr.or so & not a single strike. I ate lunch was a bit frustrated ,I hate getting skunked and usually won't go home until I catch something. So I grabbed my old faithful trout rod w/spinng reel. I brought it just in case,well I didn't get any bitesfor a long time.I finally caught one. Now knowing where they were I grabbed my fly rod. Within 15-20 min I caught 3 trout. They weren't the biggest fish,just like you said but I was so happy when I caught my 1st fish ever on a fly rod . I got 2 more in a few minutes , I didn't even know trout that small were allowed to find dinner for themselves. It didn't even matter to me, I was just so excited to be catching fish fly fishing. Then I lost my fly on a bush. I had one left,but will they go for this one? I casted out & BAM I got hit hard,my rod was actually bending,then she was jumping out of the water,it was so cool although it wasn't huge a good 12-13 incher it made my day. Short while later I caught one more a little smaller.I haven't had so much fun for who knows how long, I know I got carried away with this (what was suppose to be a simple comment) but I am still pumped & I owe it all to you & your great website.thanks again . P.S. guess what I am doing tomorrow? You got it & I am leaving the power bait &worms at home. Do ya think I am hooked?
Just feed back to th
Just feed back to the website author: am complete wet behind the ears novice. I've spent hours looking at websites of fly rigs. Not a single one has ever shown a picture or diagram or photo of a tippet and leader joined together. To the novice it looks like they're the same thing. On reading above article it's written they are not but still no picture or photo or diagram of finished section. Please please please show pictures as knots, after all, are to be looked at and to read about knots and rigs does not help the newcomer, it makes us want to give up. Thankyou in advance for reading this. P.S. couldn't find your email address to send this to you as per one of your recommendations, it's 'not in the contact us' section.
Don, I'm right ha
Don,
I'm right handed and use my right hand on the rod and my left hand on the reel. I prefer it this way since I cast with my right hand and don't need to switch in order to reel in line.
Some fly anglers like it the other way round: they cast with the right hand, and switch hands when they hook a fish and fight it with the left hand on the rod and reel line in with the right.
It's a personal choice.
Martin
Great, simple instru
Great, simple instruction! If I'm right-handed, do I reel with my left hand? Thanx.
Here's a tip. Take
Here's a tip. Take a rubber band and put it onto your rod tight enough to hold onto the grip. Then when you take your rod apart, slip the end of your leader under the rubber band so that you can find it easily next time.
learned alot from th
learned alot from this site
very well explained,
very well explained, thanks for this article! :)
David, I'm not su
David,
I'm not sure I understand your question, but I'll give it a shot anyway. The line comes out of the reel in such a way that it can easily pass through the guides on the rod. When the reel is mounted on the rod and you hold the rod correctly with the reel downwards, the line should come out of the reel on the underside in a forward direction. As you can see on this image.
Reel and rod
Hope I understand your question and that this helps
Martin
Im being a bit of an
Im being a bit of an idiot, but which part of the reel does the line come out of in regards to right angled underneath the reel. behind or in front?
dude, your info was
dude, your info was great. im a first time fly fisher and dont know a whole lot. your info helped so much!!!!
amazing info u have
amazing info u have here all set up and ready to fish, going for my first brown trout on a fly rod cant wait for a big bang, should b off the chart!!!! thanks again
Iain
excellent advice t
excellent advice
thanks
Eddie, You ask:
Eddie,
You ask:
1. How do I store my (9 foot, 2-piece) fly rod once I have tied all my knots - leader, tippet, etc?
What most fly anglers do is: cut off the fly close to the hook eye and put it in your fly box, wind the whole line, leader and tippet through the guides onto the reel leaving a small tag to grab the next time you use it and then take off the reel and break down the rod. Store the reel with the line on it in its pouch and the rod in a rod bag and maybe a tube.
2. If I take my fly rod apart, how do you suggest that I keep the lines from tangling (again, leader, tippet, etc)?
Unless you are moving a short distance from fishing spot to fishing spot, I strongly urge you to do as described above. A rod with all line mounted is difficult to handle and even though you only have one line, you can easily tangle anyway. For transport you might leave the line in the guides and the fly in a hook rest or one of the guides, and take the rod apart in two halves, "fold" them and lay them side by side. If you are careful and maybe tighten the line you might avoid tangles and can transport the rod in a trunk or on the back seat. Personally I prefer transporting the rod on the outside of the car in a rod holder, but that's another story.
Hope this helps.
Martin
Martin, Great artic
Martin,
Great article. very informative. I will bookmark this page for future reference.
2 questions that I can't seem to find answers for -
1. How do I store my (9 foot, 2-piece) fly rod once I have tied all my knots - leader, tippet, etc?
2. If I take my fly rod apart, how do you suggest that I keep the lines from tangling (again, leader, tippet, etc)?
Thanks for a most valuable article! I will go forward with a lot less apprehension (this will be my first time fly fishing).
Well, I read it and
Well, I read it and set up my new rod. Now it looks awsome and ready to go.
Thank you,
Ps: It was easy to follow and set up for a first timer
Nathan, The braid
Nathan,
The braided line is the backing.
The rubber like line is the fly line.
The monofilament is the leader.
Martin
Hi, thanks for the e
Hi, thanks for the easy set-up instructions. I am, however, confused about one thing. I have a braided nylon type line, and then a smooth rubber type line, and then a tapered monofillament. Which one is which??
wow great job with s
wow great job with setup process saves lots of looking in bits and pieces
hi when i spool up a
hi when i spool up a reele alot of the the line is goin crinkley or wavey how do i stop this.
I have been a keen c
I have been a keen coarse fisherman for many years, now beginner at fly-fishing. This is a fantastic and simple to understand article which has saved me a lot of questions and made it much easier to purchase my first reel, backing, line and tippet. Now I just need to practice my casting so I dont hook my shirt, trousers, lip, nostril, or anybody else close to me, aha !
Thank you so much fo
Thank you so much for this! :D
I 'm a new fly fishing and I was wondering what was that white line they have attached to my reel when I bought all the equipment. I thought that this was a beggininers line to test casting etc... So when I bought the fly line (WF 6 F), I removed more than half of that (100 yrds) white line, that I didn't know what it was. I tought it would be better if I attached the fly line in this white line so I left about 40 yards. When I read about the "backing line" in google searches, I used a Sliding Knot to connect again the backing line that i cought. So I have again about 100 yds of it. I hope it doesnt matter that about half way in the backing line there is a Knot. I finally used the Albright that you have above to connect the backing to the leader!
Thank you so much,
Happy new year!
Kostis
Chris, So nice to
Chris,
So nice to hear! It's great to know that the article has helped you get a good start.
Thanks for your feedback.
Martin
A few years later, a
A few years later, and still a great article. I was an absolute newbie to fly fishing, and as a younger guy in southern California, not a soul I knew, knew a thing about it or was interested. Took these tips, loaded my first reel. I have now used the info to load 4 reels, all different weights and rods. Pulled Golden trout out of the Kern, Cutthroats from North Idaho, Steelies from the lower Sacramento, And huge Rainbows out of the trinity alps/clear creek.
Great info to get you started. You will build your knowledge quickly, ye old' young fly fisherman. HA!
To Mike Foor ÷ mf
To Mike Foor ÷ mfoor÷at÷embarqmail.com You asked What does that coding mean? 4F, 5F, 6F etc up to and including 9F. 4 thru 9 is line type (f) stand for float you may see (s) for sink (st) for sink tip for example wf8f weight forward 8 is yur line type f the line will float
great info...thank y
great info...thank you
VERY INFORMATIVE MAR
VERY INFORMATIVE MARTIN! ! A+ I HAVE BEEN WANTING TO TRY FLY FISHING ,NOW I THINK I CAN SET UP MY OWN RIG ,I AM GOING TO TRY IT ! THANK YOU !
Great article! I
Great article!
I have never done any fly fishing but recently I was given a new (still in package from 15 years ago when it was bought) and empty fly reel. A friend at work said he had an unused fly rod which he would give me.
OK so now I have a rod and reel and have to rig it and learn to use it.
I went looking at fly lines today at an outdoor sporting goods shop. I noticed that the spools were marked with 4F, 5F, 6F etc up to and including 9F. What does that coding mean?
Thanks
Mike in OH - a beginner to be
Hey....Great info. T
Hey....Great info. Thank you so much brother. I was wondering, how do you decide what size backing to use with a 20lb weight leader for saltwater bass derby limitations by a rules committee? The rod and reel are 9/10 w and using Cortland Crystal PE Saltwater fly line WF-10-F.
Regards...
Tommy
One thing you forgot
One thing you forgot to mention in your excellent article is that trying to load a reel with playful cats in the house makes things much trickier!!! ;-)
great Job it's the f
great Job it's the first time I've understood setting up a line for fishing.
A first time fly fisherer,
Pat
I am developing a fl
I am developing a fly fishing reel, I'm looking for articles, books, more information on the history and progress of this equipment over the years, types of reels, models, concepts, manufacturers. Could help me by informing potential sources of research?
I echo the thanks on
I echo the thanks on this page. I have fished for bass for 24 years and just recently ventured off to buy a fly rod. Pretty intimidating, but this article helped me a lot!! I can't wait to practice at a local pond tomorrow before I head to the river next weekend. Thanks for the time you spent setting up this instructional site! Best I've found.
Great bit if info th
Great bit if info this, thanks a lot
This is such a good
This is such a good guide. i got my first fly rod for christmas and i have never had one before. I had no clue how to put these things together. haha. Now i just have to find out how to throw it without it popping so loud. :)
thanks alot for the help
great help
great help
Great work!! What is
Great work!! What is a tippet?
Absolutely brilliant
Absolutely brilliant!! Hadn't had the slightest clue to start with and thanks to the instruction I had it all done in 20 mins!!
Thanks...I and my bu
Thanks...I and my buddy Chad have been wasting leader for our entire fly fishing careers...(3 months). We are practicing at the Caney Fork River in TN for the big fish in the fall!
Thanks so very much.
Thanks so very much. I been away from fly fishing for 15 years. Your article was superbly done. A great course for beginners and people like me that need a refresher course.
Thank you VERY much
Thank you VERY much for this article. This is the most informative website I have found to help me with starting out. It was very helpfull!!
Nice and helpfull. O
Nice and helpfull. One thing that I do when spooling is I take a small piece of masking tape and use it to temporarily hold the end of the flyline on the reel, and then wind in the flyline. Then I tie on the backing and fill up the real. After that, I just unspool it neatly in the yard with the flyline on a clean rag, and tie on the end of the backing and spool it all back on nice and neat. The first time I spooled it the normal way and ended up having to remove a decent amount of backing because I had over filled the spool.
Hi Martin, Wonderful
Hi Martin, Wonderful article you have written, well done. I have bought a Blackwater telescopic spin & fly combo rod. No instructions receive to set for newbe like myselself. I would like to know what lenght of fly line shall I use, what line weight will be suitable for my rod? please help me to select leader and tippet. The instructions on the rod I found are "fly #6-7 line weight,spin 2-20g casting weight". My Fly reel is PPO622 Graphite Pro 7/8, spin reel is shakespeare Dynamite RD capicity 260m of 4lb. This means that more information for spin but not enough for fly reel set up.
Thanks for the easy
Thanks for the easy to follow instuctions, i've had my fly fishing kit for ages but hadn't discovered how to set it up!
thanks so much, i am
thanks so much, i am dario an italian fisherman, this has enlightend me very much. keep up the great job.
Can you teach me oth
Can you teach me other ways to put flys on, like different styles.....Please
bit confused here, w
bit confused here, which side should the reel be mounted on the rod for a right handed caster, ie the winding handle should be on the left or the right side of the rod
Larry, I just add
Larry,
I just added a last chapter on leaders and tippets. This should answer your question. For your 7ý' #4 rod I would recommend a 7-9' leader ending in a 4-5X tip and a foot of 4, 5 or 6X monofilament tippet. That will give you a pretty generally useful setup... hopefully.
Martin
I need help with lea
I need help with leader to fly line, how long is the leader, and where and what the heck is a tippet anyway and do i definately need one or can i just use a 2 to 6 lb leader. also, how long should the leader be. fly rod is a #4 7 1/2 ft.
thanks
Thanks for the work
Thanks for the work you put into your article. So far all I've heard of is Dacron and braided type backing.Why can't monofilement be used??
Frank C, You can
Frank C,
You can certainly use a braided leader! In that case you will need a loop at the end of your fly line to attach the loop on the leader to. These are easy to make either by splicing the fly line or by attaching a braided loop.
Martin
can you use a braide
can you use a braided leader? Like Power Pro or Suffix Braid in a really light gauge? I just got my first fly rod and will be setting it up tomorrow. I found your info quite useful, thanks.
I NEED TO KNOW THE B
I NEED TO KNOW THE BASICS ABOUT SETING UP A ROD. FROM THE LINE TO THE WEIGHTS, ETC. PLEASE HELP ME!
THANKS
JD
Jeff, There is no
Jeff,
There is no set rule for the length of leader, but 1-1.5 rod lengths is a good starting point. In your case a 9' leader will probably be a good choice. But you may need to vary this depending on your casting skills (bad=short leader) and how spooky the fish are (very spooky=longer leader). But if you start with a 9' tapered leader I think you're good.
And the tippet is the piece of line that you tie to the terminal end of your leader. Rather than tying the fly directly on the leader and cutting off a piece of that every time you change, you tie on a piece of straight monofilament in the pound test you want to fish. When you change your fly, this is the line you cut, and when you have shortened this tippet down too much, you change it and leave the leader (almost) intact.
Hope this helps. Enjoy your trip.
Martin
would you diagram th
would you diagram this out please for the novice. i have an opportunity to go to a really good location very shortly. i specifically need help with leader to fly line, how long is the leader, and where and what the heck is a tippet anyway and do i definately need one or can i just use a 4 to 6 lb leader. also, how long should the leader be. fly rod is a #4
7 1/2 ft.
thanks
Great job with this
Great job with this one. I am sure it will help anyone who is learning how to fly fish for the first time or those that haven't picked up their fly gear in decades.
This really helped m
This really helped me to prepare for a fishing trip with our scout troop and will help with the boys earning their flyfishing merit badge. Thanks for the help.
First article that t
First article that told a beginner like me how to set up my fly rod. Used simple terms and gave good instructions. Thank you.
While your flyline m
While your flyline might be a more subdued color so it doesn't scare fish, feel free to use the day-glo orange or yellow backing instead of the white backing that most vendors sale. If you ever have a fish that gets into the backing, you will need to see where your line is and what it's doing.
Phil, Great! Firs
Phil,
Great! First fish on a fly rod, huh? Can't be anything I did... it must have been your own persistence, which brought that fish to hand - in bad weather even. Congratulations.
And watch out for that very nasty germ Bacillus flyrodia, now! ;-)
Martin
Followed these instr
Followed these instructions and on my first outing on 5th October caught my first trout (2lb rainbow) on a dry fly in howling wind and rain. Thanks a lot, Martin.
tks a million, great
tks a million, great job! You are my 1st teacher on fly fishing!!!
Great article. Extre
Great article. Extremely helpful for beginners like me. Told me everything i needed to know.
Thanks!
Exactly what i was l
Exactly what i was looking for months! Great!!
man this is what i w
man this is what i was looking for cause I have had my rod for a year.i have alot of intrest in fly fishing but no one around here does it.....thank you
thx, very good and c
thx, very good and clear in detail
Great for us "newbie
Great for us "newbies."
Awsome set up articl
Awsome set up article. Very helpful when your just starting out and haven't got a clue.
Thanks,
Pat
Really helpful when
Really helpful when you've got 'all the gear and no idea'!!
Basic tackle setup.
I am just starting to Fly fish in India for Trout and small Mahseer. For the same I plan to buy a 4 piece 8'-6" (Line weight 5) and a Reel rated 5/6. To this I plan spool 20 lbs/ 100 yds of backing, WF-F 6 (I have been told to use 1 size heavier ?), and a 9' leader and Tippet. The problem is I don't know how to match the correct Leader / Tippet (in context to WF-F 5/6 Line) while keeping in mind the size range of Nymphs (mainly) and a few Dry Flies to be used. I am assuming they will be mainly #12/14 for trout and a few #6 for Mahseer.
Please advice on the correct way to choose the Leader and the Tippet. I have read somewhere that the Tippet should be chosen by dividing the Fly size by 3 viz. a #12 Fly/Nymph will have a 4X Tippet.
Leaders, tippets, fly sizes
Ashok,
You considerations makes a lot of sense and you seem to be on the right path already as far as I can see.
Regarding the line weight: yes, it's not a bad idea to use a line one class heavier than what the rod is made for, particularly when you are a beginner. It makes it easier to cast a shorter line, and modern rods can handle it with no problems. Once you master the casting, you can consider going down in line weight.
Regarding the tippet and leader, you start selecting the tippet. I never heard of your form, but it seems to make good sense. On this page http://globalflyfisher.com/leaders/formulas you will find a list (table 2) that might also help you. Tippet thickness depends on fly size and how spooky your fish are. It also depends on the conditions and the strength of fish and current. Too thin a tippet for strong and large fish makes little sense. They will simply break you off. Luckily strong current also makes the need for long and thin tippets less, simply because the turbulence helps to hide the line.
Once you have selected a tippet, buy or tie a leader to match - ending in the tippet size or one size thicker. A 7'-9' leader will probably be good in your case. It should be manageable, but still long enough to do some decently stealthy presentations. Tie a 2-3' tippet to that and you will be fine.
I hope this helps you.
Martin
Leader & Tippet
Thanks Martin for the reply and the link on Leader formula. A Question remains . In my 6X WF-F line I choose a choose a 4X or 5X tippet ? So I choose a similar rated Leader i.e. 4X / 5X. Or, my Weight 6 WF-F Line is to be matched with 4/5X Leader to which I may install a 4/5 X Tippet depending on the fly size. Will the Fly size influence the tippet (as explained in the link) but also the leader ? Do we have a Fly Line/Leader/ Tippet/ Fly ratio formula too ?
Ashok