


On a white background
This article is another photo article, this time teaching you how to get pictures of your gear or your flies on a clean, white background.


I will warn you in advance that this article will be a little nerdy.
This is about
getting a white background on your fly and gear images and getting things to "float" with few shadows and fading in to completely white.
We will be using the flash on a light background, and the method requires a separate flash or two and a camera with a flash shoe.
My setup
in this article consists of a softbox on a tripod, two flashes that can be fired wirelessly from the camera, a pair of pieces of white cardboard in A3 format bought in a bookstore, a few little gizmos I had lying around in the garage and some glue clamps.
You can buy fancy photo tables, but my advice is - as always - that you should use what you already have. The softbox I use measures 60x60 centimeters (24x24 inches) and I chose this size because it was the one I had lying around. A small softbox measuring 40x40 centimeters (16x16 inches) will do fine. If are going out to invest, buy the biggest you can afford. You can never get a large enough light. It must of course not be larger than what makes sense for the purpose.
The camera system I use, has the amazing capability that it can control the external flash units wirelessly via the built-in flash. If you do not have the wireless option, use normal sync cables. They work just as well.
The amount of light
from the flash can be adjusted by the light meter in the camera, also called TTL, or set manually, so the same amount of light is always emitted by the flash regardless of the ISO/aperture/shutter speed settings in the camera. For a white background I always use manual mode, since that makes it me the and not the camera the one who determines the amount of light to be sent out.


This camera and flash setup
can be quite expensive, but everything is relative and the joy of your hobby can not always be measured in money. Besides my fishing fever I am personally also infected with photoitis. This means that I have not been out to buy additional equipment. The gear I use in this guide is something I typically also use in other contexts. It's just the way it's set up, which is different from how I normally use the equipment. In this case our dining room is my studio, and the dining table acts as a workplace.
The most optimal
and flexible way to hold a softbox is by using a tripod with a boom. I am not in possession of such a thing, so I used the next best, which in my household consists of two light stands with a few Manfrotto super clamps holding a boom (read: a broomstick I had lying around in the garage).
A few gadgets can make life much easier, and when it comes to photo it's super clamps that does it for my part. These are some of the most brilliant photo accessories I have ever come across.
A super clamp is basically just a universal clamping device, that holds firmly onto any round, square or flat surface that the jaws will bite over. The super clamp also has a slot for a standard spigot, which is very convenient, as they are used on almost all photo lighting gear. Nevertheless, the applications are endless, and despite the unreasonably high price, I invested in a handful, which I almost always use when I shoot with artificial light.
The softbox
is mounted on the boom using a super clamp. One of the great benefits of the super clamp is that it is made so that you can tighten it incredibly hard, which means that everything stays where it should. You can crush a broomstick without any effort with a super clamp!
The main light is the flash in the softbox. Without it, all would just end up as an underexposed subject on a white background.
The background
consists of two pieces of cardboard. They are held by glue clamps. I found the stand in the garage. It was once a frame that held some wire baskets. Now it lives a life as a photo-technical device.
I have placed the second flash at the top of the background where it lights up the background. To make the light a little softer I use a diffuser or a bouncer, which sits on the flash. It could work without, but it does no damage, and comes with many external flash units, so you might as well use it.
The main function of this flash is to provide the light on background, and so much that it will remove all shadows and details on the background. The flash sits on a Gorillapod, which is balanced on a cardboard box that sits fairly high. Again - use what you have lying around.

Otherwise
the method is quite simple.


The moment
I press the shutter button on the camera, camera releases both flashes at the same time.
My starting point for the power of the flash should overexpose the background. It is typically 1/32 of full power. If the background is gray in the picture, I turn up the power. If it is white from the start, I turn down the power until I can see that the background is still completely white, but with minimum power of the flash. Your photo must be completely white when you have no subject in it.
Why not just set the flash to full power? You don't want that because if the light is stronger than necessary for the background exposure, the light will be reflected back into the lens, and it give the phenomenon known as lens flare. This phenomenon can come out in several forms, but it often means that the subject becomes cloudy and almost foggy. Some fashion magazines actually use this effect to create a special atmosphere in the pictures, but it only works in special situations and it is not an obvious choice for images of objects on a white background in my opinion.
After I have established
the setting of the backlight, I continue to main light. This time the aim is to get the subject exposed properly.
What is correct? Well, that's an individual judgment. As long as everything looks natural and has good texture and there's depth in the picture, I am satisfied.
The good thing about a setup that uses flash is that I always know that the white balance is on 5500 Kelvin. In other words, I set the white balance on my camera to 5500 Kelvin or "flash" and then all colors are as they should be.
Set your white balance on auto, and your camera will guess the color of your subject for each image. This automation works surprisingly well in most cases, but if you do not want to have to play a guessing game, set your white balance as it should from the start.
If the background is a different color than white, the white balance is almost certainly not set correctly by the camera. Basically, you should not experience color cast using the flash and Kelvin set to 5500 in the camera's white balance.
The whole process of finding the right strength of your flash and correct white balance in your camera may seem a little technical, but in practice, you can quickly see if it looks right and you can quickly adjust the different variables so it gives the desired results .
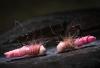
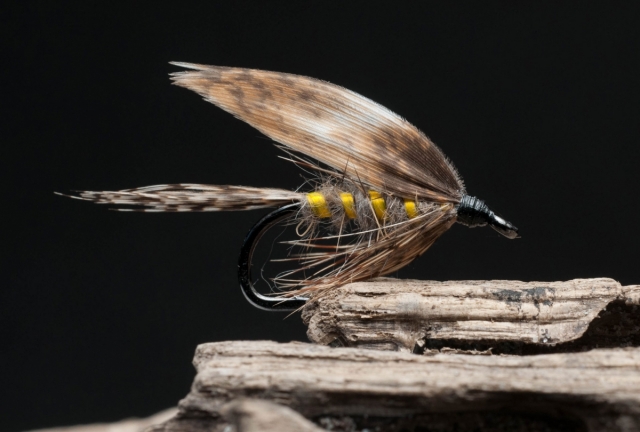
The images
on this page with white background were all taken as described in the article and are largely unprocessed.
Have fun.
Read more about why you should register.
Related content


More content from the front page


Since you got this far …

The GFF money box
… I have a small favor to ask.
Long story short
Support the Global FlyFisher through several different channels, including PayPal.
Long story longer
The Global FlyFisher has been online since the mid-90's and has been free to access for everybody since day one – and will stay free for as long as I run it.
But that doesn't mean that it's free to run.
It costs money to drive a large site like this.
See more details about what you can do to help in this blog post.
Comments
Great simple article
Great simple article!...Neat informations!...Will surely use those tips when taking pictures of my carvings.
Thank you Thomas.
Yves Laurent