
What's so exciting about a simple white marabou streamer? It doesn't have any exotic ingredients. No epoxy. No goggle eyes. No genetic hackle. You could tie a million of them for the cost of a gallon of milk. There are no fancy techniques in the tying, so everyone who can wrap thread can tie their own.

What's so exciting about a simple white marabou streamer? It doesn't have any exotic ingredients. No epoxy. No goggle eyes. No genetic hackle. You could tie a million of them for the cost of a gallon of milk. There are no fancy techniques in the tying, so everyone who can wrap thread can tie their own.
So what's the big deal?
They catch fish, that's what the big deal is.
One of the exciting things about the white marabou streamer is how visual the fishing is. Unless there is a nasty glare on the water, it is quite easy to track the fly when it's being fished. The white shows up well against the reflection of the a streamside and since I always fish it unweighted on a floating line, it never gets down very deep. The strikes are right at the surface, either leaving a big boil or a spray as the fish tries to return to its lie. More times than not, I can see the fish before the strike. I also get to see all the misses and follows as well, much more so that if you're blind casting a heavy fly that you can't see.
It's a very easy fly to fish. Being fairly small and unweighted, is a joy to cast even on light trout rods. I fish it in the classic down and across fashion, employing small erratic line strips if the water is a bit slow or smooth. In most riffles and runs, just letting the fly swing and allowing the current to work the marabou is more than sufficient. If I want to get the fly down a bit, I will cast across or slightly upstream and mend the line to keep tension off the fly until it's in the quarter downstream position.
Try to keep an eye on the fly at all times. For every solid hookup, I bet you'll get two bumps and two flashes from trout. To me, that's exciting fishing.
Here's the recipe of the fly as I tie and fish it
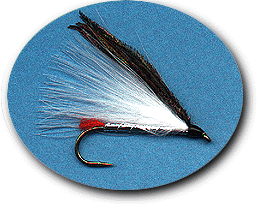
- Hook: 2xl or 3xl down eye, 6-8 (I like TMC 5263's)
- Tail and Underbody: Red sparkle yarn (I like Aunt Lydia's)
- Body: Silver Mylar Tinsel
- Rib: Oval Silver Tinsel
- Underwing: A very few strands of pearl Lite Brite
- Wing: White Marabou
- Topping: Peacock Herl
Now for some long winded tying instructions:
1. Start the thread at the head and wind to the bend and back, forming a foundation of thread on the hook shank.
2. Clip a rather long length of the red yarn from a skein or tangle. Tie one end in behind the eye (don't forget to leave room to tie in the wing and head) and wrap your thread back to the bend of the hook in smooth turns, taking the yarn with you. While doing so, sometimes it helps to hold the yarn toward you as you're wrapping, so the wraps of thread will force the yarn to the top of the hook shank as you're winding. You'll see what I mean when you try it. Also, now is the time to pay special attention to your thread wraps, because you are also forming the underbody for your tinsel. The smoother and better the thread wraps, with no bumps from the yarn, the better your tinsel body will look when you're done. You don't have to get crazy, this ain't a salmon fly, but keeping an eye on your thread work is a good habit to get into.
3. When you've wrapped the yarn back to the bend, tie in a length of oval tinsel and wind your thread carefully back to the head area. As this is the final layer before the tinsel, you should be paying double attention to your thread wraps, making them as smooth as possible. At this point, you can clip the tail to lenth. I clip it square (as opposed to an angled cut) leaving only a little stub maybe half the hook gap, maybe less. I just want a little spot of red showing in the rear of the fly, that's all.
4. With your thread back at the head of the fly, tie in a length of silver mylar tinsel. Some people find that cutting the tinsel off at a sharp angle to create a "point" helps them reduce bulk at the tie in point. Remember, with mylar, it's going to flip with your first wrap, so if you want a silver body, you tie the tinsel in with the silver side DOWN. Selecting a tinsel width that's appropriate for the size of the hook will make the tying much easier.
5. Wrap the tinsel to the end of the yarn underbody and back to the head in smooth and touching (but not overlapping) turns. Even if you have the luxury of a rotary vise, I find it better to wrap a mylar tinsel body by hand. I seem to have more control over where each wrap is going that way. Save the rotary feature for when you wind the rib. As you wind, keep an even and fairly heavy tension on the tinsel. When you've reached the head, tie off the tinsel on the bottom of the hook shank and trim the excess.
6. Wrap the oval tinsel forward over the mylar in an open spiral. Don't make the turns of tinsel *too* close together. Space them out a bit (but again - don't get crazy). Use a good tinsel that has a strong core and pull that tinsel tight as you wrap. This will help to keep it from slipping around when the fly is fished. When you get to the head area, tie off the tinsel under the hook shank and trim the excess. If you really want to limit your thread bulk, you can unwind just a few of the wraps you used to secure the mylar before tying off the oval tinsel. You'll then be using those same wraps to secure two materials, thus cutting your total number of
thread wraps about in half. This is another good habit to get into.
7. Pluck a few fibers from a package of pearl Lite Brite and try your best to get them straight and fairly controlled (it won't ever get perfect, so don't worry too much). The bundle should be no more than 2 or 3 fibers and should be double the length of the fly. Tie the middle of the bunch at the rear of the head area with one or two wraps, half extending over the hook eye and half extending over the body. Fold the "front" half back over the body and add another couple wraps, thus doubling the underwing and ensuring that it will never slip out of the thread wraps you've made. Trim any that extend much beyond the end of the tail.
8. Select a marabou feather that is very soft, whispy, and without a heavy stem. "Wooly Bugger" marabou tends to have blunt ends to each marabou barb, but they still fish ok. The best stuff is the "blood" feathers, as they have virtually no stem and each barb is quite thin. If you're gonna be tying a bunch of these in one sitting, it pays to select all your marabou feathers up front, thus saving you a big chunk of time for each fly. With marabou and hair wings, less is more. Select feathers that are fully, but not *too* full. It's not something that can easily be described in words, so you'll have to fake it and pay attention to how different wing densities work for you when you're out fishing.
9. Sort of bunch up the marabou feather in your fingers by stroking it from the butt to the tip. Measure this against the body for length and trim the feather. I like the tips of the marabou to reach the tail, sometimes just a smidge longer, but never past the very back edge of the bend. I find it much easier to trim the feather before I tie it in rather than trying to do so afterwards. I get a much neater head this way. Some people recommend lightly wetting the marabou with saliva to make handling it easier. I don't do that, but it's something to consider if you're having troubles.
10. If you are ever going to violate the purists' "no glue" rules in fly tying, now is the time. Marabou is not as slippery as, say, Squirrel Tail, but it can be a bit cranky at times. You can either secure the marabou with several very firm wraps of thread and hope for the best (usually good enough), or you can add a tiny drop of zap-a-gap to the head area where you're going to tie in the feather and have peace of mind. Your choice.
11. Select some peacock herl for the topping. Here you have some choices. I prefer to use prime herls from just below the eye of my full peacock tail feathers. I get them at a local craft store (artificial flower section) for a half a buck each, so I'm not stingy with them. These are really plush and just a couple will make a wonderful herl topping. They really come alive in the water. The tips of each herl taper down to a point, adding a classy touch to the fly. The tips also have much finer stems, so they move better in the water as well. Or you can just use strung herl. Whatever. Tie them in right on top of the windings used to secure the marabou wing and then trim off the butts.
12. At this point, everything is tied in and secured (hopefully), so all that is remaining is finishing the head. I like the heads on these flies not to be terribly large, but certainly proportionate to the fly. Always black. Strive for a smooth head that tapers nicely to form a cone or bullet shape. Whip finish and trim.
13. Apply a coat of thin penetrating head cement and let it dry overnight. Come back the next day and add a coat of something thick and glossy to finish the head. I think that a glass smooth glossy head adds a lot to a fly's appeal. To me, that is. Tying flies is at least as much about pleasing me as it is about pleasing the fish.
- Log in to post comments
