


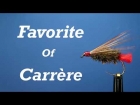
Pete's EZ Hopper
"...once they broke the surface film, the butts would tilt down and the head and shoulders would be the only part of the grasshopper above water. They neither rode high in the water, nor lay in a horizontal plane. My thought was to design a hopper that would duplicate that presentation."
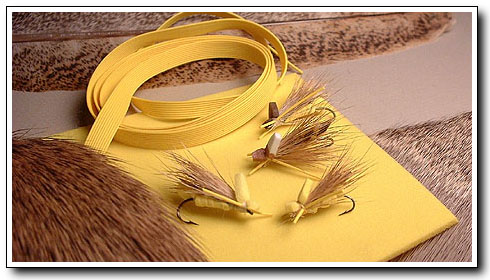
There are certainly plenty of hopper patterns out there, and no doubt plenty of mighty fine fish have been caught on each one. But like many fly tiers I like creating my own designs, much like a cook enjoys creating new recipes: often the ingredients and proportions are similar to bits and pieces of other recipes, but the result is different enough to feel a sense of creativity. I also enjoy simple recipes (whether they are for flies or food) that will satisfy those who are "feeding", but that are also easy to prepare. It is out of this mold that I assembled the ideas for "Pete's EZ Hopper".
As further background, I remember as a kid observing grasshoppers after I threw them in the water. At least in the bigger sizes, once they broke the surface film, the butts would tilt down and the head and shoulders would be the only part of the grasshopper above water. They neither rode high in the water, nor lay in a horizontal plane. My thought was to design a hopper that would duplicate that presentation, using traditional materials as well as the foam I have begun to favor for panic and bass poppers.
My ideas came from various sources. You may see some resemblance to Ed Shenk's famous LeTort Hopper. I have always been attracted to the visual simplicity of Mr. Shenk's pattern, as it floats low and tilted down in the butt just as I wanted. The idea of the wrapped foam body came from a foam Stimulator tied by Bill Hammons of Bakersfield, California. The shape of the foam head is original (or at least I haven't seen it before), but the basic tying idea is the same as one of the standard patterns for making a foam beetle! And finally, I first saw rubber legs on a Madame X, although I clip mine so they do not extend as far forward.
Materials
These instructions for preparing the basic materials are in the order in which they are applied to the hook:
- Foam for body: To prepare a thin strip of yellow foam for the body, you need to acquire a sheet of 1/16" (2mm) thick "fun foam". Numerous fly fishing catalogs carry a selection, but the best prices are at stores like Wal-Mart and Ben Franklin (about $.50 for an 8" x 12" sheet). You will need to slice off a foam strip about 1/16" wide. I do this by placing the foam on an old clipboard, holding down a metal straightedge on top of it for a guide, and cutting off a long slice by scoring the foam with a razor blade. An 8" slice will tie five or six hopper bodies! You can also prepare the foam with a sharp pair of straight nose scissors. Although the edge of the slice will be a little ragged, I doubt the fish will notice!
- Turkey Quill: This is used for the underwing, but you can use other feathers if you wish, or none at all. Many tiers use "Church Window" feathers from a Ring Neck Pheasant. I use a piece of Turkey Quill that is about 0.25" wide and about 1" long. I cut quite a few sections from the quill and spread a couple of drops of flexible cement (I use Dave's Flexament) over the top and bottom by pulling the quill section between my forefinger and thumb. Do this the day before, as it will need to dry overnight. This treatment allows the quill sections to bend when folded lengthwise over the body. An alternative I have heard about is backing the quill sections with clear packing tape, but I have not yet tried this. Finish preparing each quill section by using scissors to round the tips.
- Deer Hair: Many recipes call for stacking deer hair before tying it in. To keep things simple (although perhaps less aesthetically pleasing for some) I don't bother using a stacker, although I do realign a few of the longer hairs. This gives a more tapered appearance and less of the "paint brush" appearance that results from using a hair stacker. I am currently using a patch of bleached (light tan) Coastal Deer Hair.
- Foam head/wingpad: The foam head can be made from the same sheet of yellow foam from which the body strip was cut. But I like to use white foam, which I color green or tan with a waterproof marking pen. I leave a spot of white on the top, however, to help me locate the hopper on the water. From the edge of the foam sheet use your razor blade or a pair of sharp scissors to cut a rectangle about 0.25" x 0.5". I then use scissors to snip
and angle the corners so that when tied onto the hopper it will give the appearance of a head and wingpad. Once the corners of the rectangle are trimmed, the appearance is more like a diamond than a rectangle. - Rubber Legs: The rubber legs will be tied in on each side of the hopper. It is my feeling that they act like outriggers on the water, preventing the hopper from rolling from one side to the other. I use the simple Madame X style (a straight piece of leg material tied on each side of the head). If you want to get fancy, you can use a dark waterproof marking pen to make segments on the rubber legs. Some tiers may even want to knot the legs to give the appearance of leg joints. For this, a simple overhand knot can be used.
Pattern
In addition to the list of materials below you will need CA glue. Waterproof marking pens are optional.
| Hook: | TMC 2312, sizes 8 - 12. This hook is a slightly humped 2XL light wire hook with a straight eye. But any 2XL or 3XL hook should work fine. |
| Thread: | White or yellow Danville 3/0 |
| Tail: | Small loop of yellow closed cell foam |
| Body: | 1/16" wide strip of thin yellow closed cell foam, wrapped. |
| Underwing: | Slip of Turkey Quill treated with flexible cement, rounded at one end. |
| Wing: | Deer hair. |
| Head/Wingpad: | Diamond shaped foam piece, prepared from 0.25" x 0.5" rectangle of thin foam. |
| Legs: | Two short pieces of rubber leg material. I use white or yellow to help with visibility. |
Tying instructions
Cover the hook shank with a layer of thread, starting from behind the hook eye and finishing at the rear of the shank. Tie the 8" slice of thin yellow foam on top of the hook so that it creates a foam underbody over the rearmost two thirds of the shank. The loose end of the foam strip will be pointing to the left, away from the eye. Make a small (about 0.25") loop of foam for a tail by pulling the loose end of the foam forward and over the top. Tie the loop down with a few thread wraps at the tie in point.

Holding the foam out of the way, use open wraps to bring your thread forward over the compressed foam underbody. Wrap and spiral the foam strip over the shank and forward toward the eye, until the foam underbody has been covered. To minimize compression of the foam I do this so it is neither loose nor tight... just snug. Tie the foam down and snip off the excess for use on the next hopper. To keep the foam from unraveling, I usually throw on a half hitch before going to the next step.

Position the turkey quill section so that the rounded tip ends slightly past the bend of the hook. Fold the quill section lengthwise over the top half of the foam body. With your left hand, hold the base of the quill section securely in a semicircle around the hook shank at the tie-in point. Make a few tight wraps around the base of the quill section, employing the pinch technique. Snip off the excess, tie down the rough ends, and wrap a smooth platform over the front third of the hook for the deer hair wing.

The deer hair should be tied in on top similar to an Elk Hair Caddis. Cut a clump as thick as a wooden matchstick and position it so the tips extend a little further than the quill section. Hold the hair firmly with your left hand and tie down the butts. The butts will flare upward and outward. Wrap the thread through the flared butts a few times before trimming. Trim the butts as short as you can and place a drop or two of CA glue on the trimmed ends. Wrap them down tight to create a smooth thread platform for the foam head/wingpad.
The foam head should be applied on top of the deer hair with one third of the foam in front of the tie-in point and two thirds behind the tie-in point. The foam should be wide enough to fold over the sides of the shank as you tie it down, with the widest part of the foam placed over the tie-in point. This allows the foam to slightly cradle and control the flared deer hair. Wrap a few tight turns, and before going to the next step throw on a half hitch to keep the foam from expanding and loosening the wraps.

Attach the rubber legs to either side of the head. Once tied on, cut the legs to any length you want. I suggest keeping them a little long so that you can experiment at streamside. Tie off the pattern with two whip knots over the foam or several half hitches behind the eye. Either way, try to get the knots on the bottom of the hook. Trim the thread and put a couple of drops of CA glue on the knots and wraps that tied on the head and rubber legs.

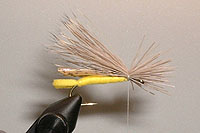
The finished fly, top view.

Color
After drafting these instructions I celebrated by spending Labor Day morning fishing for trout for the first time since the July 4th holiday. It was an overcast morning and the sun was lower than the last time I had fished this particular area. With both the water and air temperatures at 63F, it certainly felt like the beginning of a New England fall. The clouds were very dark and threatening, although they contained themselves throughout the morning. Because it had rained a little the day before, the water had that dark tea-color it so often does in New England after a rainfall. I am told that it has something to do with pine forests and tannic acid, but I don't really know the science of it all.
I took out one of the hoppers I had tied step-by-step while writing these instructions - one with a white foam head - and tied it on the end of a 4X tippet. Beginning at the foot of a shallow pool I began fan casting the area, moving a step or two upstream every so often. As I moved upstream into the head of the pool I realized that the white foam hopper head was perhaps not the right choice for these conditions. Because the head lays just on top of the water, its general appearance that day was not unlike any one of the millions of bubbles that were being sent downstream by the nice set of riffles feeding into the pool. I began to wish I had tied a couple of hoppers with yellow heads (a color suggestion I added to my directions when I returned home). Yellow provides nearly as much contrast against the tannin-stained water, but is easier to spot when floating in the bubble line.
Note: My teenage son tied the left-most hopper pictured with this article. This was his first attempt and it looks just perfect. To test my directions I asked him to tie it without my help, as I read the directions aloud to him. I wish to thank him for his editorial comments!
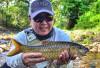
After working the pool for about 15-20 minutes, I recognized a slow take just as the hopper floated out of the tail of the riffle and into the head of the pool. I set the hook casually. It was such a soft take that I thought it was one of the little river chubs that are born to annoy trout fishers. But the fish surprised me by going deep with a few hard tugs, and then circled behind me tethered to about ten feet of my line and leader. As it coursed sideways I could see the beautiful bold dark spots of a brown trout. And not just a half-starved holdover! This was a very plump 12" trout. Although the take had been subtle, only the tip of the hopper's deer hair wing protruded from its mouth. Thank goodness for barbless hooks!
I caught one more trout that morning, slightly smaller but just as well fed. This one fell to a size 12 black foam beetle on which I had tied a plume of pink poly-yarn. I have never fished with pink before, but decided to try it after learning from a friend that he ties all of his parachutes in pink. I could see the pink poly-yarn beautifully against the dark water and white foam bubbles. I have purchased a sheet of pink foam and look forward to experimenting with it. At about $.50 per sheet you can afford to experiment with many colors. Remember that it is unlikely that the trout will care what color you use.
Read more about why you should register.
Related content


More content from the front page


Since you got this far …

The GFF money box
… I have a small favor to ask.
Long story short
Support the Global FlyFisher through several different channels, including PayPal.
Long story longer
The Global FlyFisher has been online since the mid-90's and has been free to access for everybody since day one – and will stay free for as long as I run it.
But that doesn't mean that it's free to run.
It costs money to drive a large site like this.
See more details about what you can do to help in this blog post.
Comments
Does anyone have the
Does anyone have the tying instructions for the "Fat Albert" pattern ? I have the material but I would like some instructions.
Thanks
Try slicing your foa
Try slicing your foam with a paper slicer - photo-cutter - "precision cutter". It works a treat, is quick and accurate.
Regards,
Les
Hello... Thanks for
Hello... Thanks for the directions and the recipe. I am new to flytieing. This is the first directions and recipe I have copied. I have a widowed aunt that has a hearing problem and she and I will be learning together. These written directions will be so helpful. Thanks again, from Charlie and aunt Betty.