


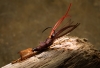


Steel Pin Shrimp
A scud pattern with 26 individual legs is no task if you make this small, ingenious tool out of wire.

Adding individual legs to a shrimp can be fiddly, particularly if you want to add a decent number. Gammarus shrimps, or scuds if you are in the US, have seven pairs of legs, plus six other pairs of appendages for swimming and circulating water over their gills. So, if you wanted to tie a full-on imitation with the correct number of abdominal legs and thoracic appendages you would need to attach a grand total of twenty-six.
One way is to sew on the legs with a needle and thread as in the Stich Up Shrimp. The Stitch Up method does require a bit of patience and a steady hand however, but there is another way to add lots of legs which is quick and easy. You just need a helping hand, or a tool to be precise. A bent pin in fact. The pin is fitted through the hook eye and held in the vice jaws under the hook providing an armature for winding a series of loops that will form the legs. The loops are fixed in place along the body with UV-resin and then cut along the pin. Each loop becomes a pair, and thirteen loops makes twenty-six legs/appendages.
Recent research has shown that contrary to popular belief, fish can actually count and have about the same ability as a six-month old human baby. They don’t actually do maths, but they can distinguish between a few and many, which is an advantage when deciding which of two shoals to join to hide from predators. Their discrimination level whether for other fish in a shoal, or presumably the legs on a shrimp, depends on the difference between two numbers.

They can tell the difference between 1 and 2, 2 and 3 or 3 and 4, but not between 4 and 5. The bigger the numbers the greater is the difference required for them to tell them apart, they can do 8 and 16, but distinguishing between 12 and 16, the same ratio as 3 and 4, is beyond them. So, if you are worrying about how many legs to add then the science says put on more than twelve. With the Steel Pin Shrimp method once you are set up adding more legs is just a matter of making more loops, so go for it, 12, 16, 20 or more, whatever takes your fancy.
What you actually use for the legs is up to you. Fly tying or sewing thread would work but the ends tend to fray blurring the effect of adding individual legs. I use micro flex floss which is half the thickness of the standard stuff and allows you to get lots of legs out of one strand.
To make the armature you will need some wire that is thin enough to pass through a hook eye, can be easily bent into shape and has enough strength to withstand the tension of the loops of material wound around it. I use 54mm long and 0.58mm diameter Flower Head pins, which are made for holding material in place for quilting and patchwork. If there is a sewing or craft shop near you may get them there, if not, they are available online. I got mine from Amazon for less than £2 for a pack of 36.

You’ll need a pair of fine tipped pliers to bend the pins to form the winding armature. I tie shrimps on curved hooks with a straight eye and a right-angle bend allows the pin to be fitted through the hook eye with the bent section underneath. I bend the other end so that it’s out of the way when I’m winding and fixing the loops. If you are using a down eye hook, you’ll need to adjust the bends in the needle to suit the hook. My vice jaws have grooves to hold large hooks and I set the jaws so that they clamp onto the end of the pin while the thicker hook sits in one of the grooves.
The starting point for the body of the Steel Pin Shrimp is the same as my Steel Shrimp, which is tied with steel bead chain to give internal structure and add a little weight to the body. The spaces between the beads along the back provide locations for winding the loops of flex floss that will form the legs.


6. Attach the flex floss to the pin with a couple of overhand knots. Wind the flex floss forward around the fly body and the pin under tension. Secure the end to the pin with a fly clip.

7. Apply UV-resin along the back and sides and cure to fix the leg loops in place.

8. Cut the flex floss along the pin, remove the pin and reattach the tying thread.

9. Fold the organza over the body, tie in and remove the waste end. Whip finish and remove the thread. Colour the head with an olive marker pen.

10. Add a second layer of UV-varnish to form the final shrimp shape.

Finished shrimp (with 24 legs).

Related articles


Read more about why you should register.
Related content


More content from the front page


Since you got this far …

The GFF money box
… I have a small favor to ask.
Long story short
Support the Global FlyFisher through several different channels, including PayPal.
Long story longer
The Global FlyFisher has been online since the mid-90's and has been free to access for everybody since day one – and will stay free for as long as I run it.
But that doesn't mean that it's free to run.
It costs money to drive a large site like this.
See more details about what you can do to help in this blog post.