
Strike indicators aren't just flyfishing bobbers; they do much more, if you know the secrets! Learn how to make and use them from GFF partner Steve Schweitzer.
SOME FOR YOUR FRIENDS TOO
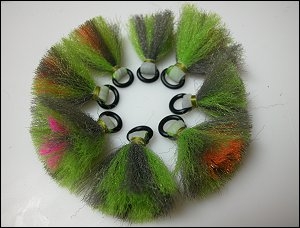
A full set of strike indicators, using the tying methods below, will last for years. You might as well give some to your friends while you're at it.
I fish strike indicators almost every time I nymph. You might think that's an abolishment to the pure form of flyfishing. Well, it can be if you are using strike indicators merely as a bobber, which isn't a bad reason in itself. But there's so much more they can do!
Fishing strike indicators
Let's start by reviewing three basic ways to use strike indicators.
1. Get Depth-Charged
I use strike indicators to help depth-set my nymph rig. For this reason alone, I want a strike indicator that is easy to move up and down the leader and would keep the depth I prefer. In other words, it won't slip toward the fly every time I cast. I also design my leaders to fit the use of strike indicators. For more on leaders and leader construction, see my article entitled Hyper-Compleat Principles of Leader Design and the downloadable companion software, Leadercalc.
2. Avoid the Vortex
I often use a strike indicator when I dry fly fish over choppy, white water. The indicator helps keep the leader afloat around the butt section, avoiding that treacherous leader dunking that fast water can present. It also allows me to more easily locate my dry fly in fast, white, roily water. I've found that leaders with smaller butt sections and longer whispy tippets are best for fishing this type of water.
3. "See" the Fish Attack
It's no secret that strike indicators are the flyfisherman's version of a panfish bobber. But how you use it will make or break your success. Simply attaching a big ball of brightly colored yarn to your leader isn't
going to make you a better nymph fisherman. You must learn where to place the strike indicator and how to read its' movement to help you "see" the fish strike.
Strike Indicator Placement
= Fishing Depth + 2 or 3 feet
Take two basic things into consideration when choosing where to place a strike indicator. First, the depth at which fish are feeding and secondly, the speed of the current. The faster the current, the higher to place the indicator. The deeper the fish, the higher to place the indicator. This only makes sense. I do not believe in nor follow the commonly reiterated rule-of-thumb where the leader must be 2x-3x as long as the depth in which you fish. This is absurd...if I am fishing a deep pocket of 5 feet or so with a moderate current, just where do you think your fly will drift using a 15-foot leader? Your guess is as good as mine! You must gain control of a nymph rig to be effective; a well-placed strike indicator will help you do that. I estimate the depth to fish, add 2 or 3 feet and place the indicator on the leader at that point. Then, I use a combination of weighted flies and split-shot to get the leader to sink faster.
Reading Strike Indicator Movement
Form a Loop-to-Loop Connection
Form a loop with the butt section of the leader. Insert the loop through the O-ring on the indicator, bringing the loop over and around the top of the yarn. Pull the loop taught against the O-ring and throat of the indicator. More on this issue...
Concentrate on two movements to distinguish being snagged from "seeing" a fish take. A snag looks oh-so-close to a real take. And to make things worse, subtle takes are not very distinguishable from touching the bottom. However, being snagged stops the strike indicator from moving, whereas a fish take many times makes the indicator move in an abnormal direction. This distinction is ever-so subtle and takes time on the water to distinguish. Another way to tell a real take is the angle in which the indicator goes under. A real take will oftentimes go more directly downward, whereas being snagged/dragged will drag the indicator backwards, against the flow of water, at a subtle angle. Just practice and play with the position of the indicator to get the right depth...and, learn to spot the flash of a feeding fish's mouth. If you fish to that sentinel, you won't need indicators!
STRIKE THIS
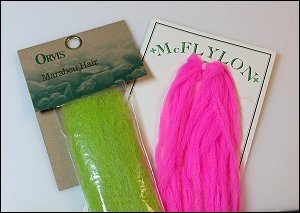
Orvis' Marabou Hair or McFlyFoam's McFlylon is the author's two favorite choices for making strike indicators.
Making strike indicators
Yarn selection
Not all yarn is created equal. Don't bother with wool, cotton or most soft acrylic yarns...unless of course you like making pretty sponges. Some wirey acrylic yarn is marginally OK, but most is soft and merely unacceptable. The best yarn to use is poly yarn. There are many different deniers of poly yarn, some unsuitably
heavy for making strike indicators. I have found that craft poly yarn has the right denier, or fiber thickness, to help trap air and resist trapping water, ill-reported as "absorbing" water. Taking the yarn concept even one step further reveals a few flytying products are actually excellent materials to make indicators. I prefer Orvis' Marabou Hair or McFlylon as the all-around best material in which to craft an indicator. The denier is perfect, the density of the fibers is perfect and the fibers are irregularly crinkled, breaking up the uniformity in which straight hanks of poly or yarn may have.
Discussion of color choice
I prefer strike indicators that mimic what floats down the river naturally: moss, weeds, leaves, etc. I have seen too many times fish deliberately moving out of the path of my rig well before the leader gets into sight of the fish. After changing to smaller tippet and ensuring a drag-free drift, I surmised my big fuzzy fluorescent pink glo-bug yarn strike indicator actually acted as a beacon that something unnatural was about to come. I don't use bright colored strike indicators any more. So, choosing the colors for strike indicator yarn hasn't been difficult. I prefer a mix of grey and bright green to mimic most of the plant debris that floats down rivers I fish in the Rockies. I know others that prefer tan, brown or dark olive, but those can be more difficult to see in marginal light.
OH BOY
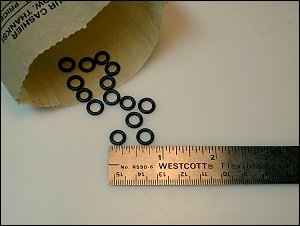
O-rings are commonly found in any hardware store and are the "glue" that holds a strike indicator together.
I'M A FRAYED KNOT...
Notice the fraying yarn clogging the loop. This fraying will increase over time, preventing prolonged use of an indicator. Surgical glove rubber will solve this problem.
Making night-vision indicators
There are times, however, where adding some fluorescent colored yarn makes perfect sense. Twilight hours either in the morning or late in the evening prove to be the most difficult times to see an indicator. Adding a bright color in the middle of the indicator will help you see the drift, but will hide the "beacon" from the fish. I have found using yellow or orange yarn is great for advancing morning light or shaded fishing runs while orange or pink is great for declining evening light. You'll notice I like orange yarn to cover all lighting situations.
Choosing o-rings
The O-ring is essentially the "glue" that holds the whole contraption together and keeps the indicator on the leader. With that said, it's essential to pick the right size. An O-ring that is too small will lock up on the leader and disallow moving the indicator around. An O-ring that is too big will slide too easily and may force the leader to fold over on itself. Look for O-rings between 5/16" OD (~8mm) for smaller indicators and 3/8" (~10mm) for larger indicators. Any hardware or home improvement store will carry O-rings this small.
One other key ingredient
A Global Fly Fisher EXCLUSIVE!
Developed in the secret Fly Flyfishing Labs at The Global FlyFisher!
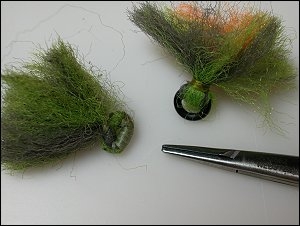
You'll notice that strike indicators will fray over time, almost to the point of becoming unuseful. The picture to the right displays how used indicators (L:tied with thread, no O-ring; R: tied with O-ring, no yarn protection) will fray with just a few times of use. Enter the surgical glove. With just a small slip of elastic rubber snipped from a surgical glove, you can craft a protective cover for the yarn. This little trick will make your indicators last almost all fishing season. You most likely will never see this feature in any flyshop strike indicator. I have also found that it helps prevent the indicator from slipping on the leader. You'll find that taking a moment to tie in this extra material will pay off many times over.
 |
 |
| SIMPLICITY The materials are simple. Yarn, elastic rubber and an O-ring (not pictured). |
READY TO TIE A slip of surgical glove rubber, an O-ring, two strands of Orvis Marabou Hair, some twilight vision yarn and sturdy 6/0 thread. |
The Detailed Steps
Follow the steps below to create your own durable strike indicator. Prep the strike indicator yarn by cutting approximately 9" (23cm) lengths of yarn. You'll need two 9" hanks for each strike indicator, plus a 2" strip of visible yarn if you choose to make your strike indicator more visible in twilight situations. For the two main 9" hanks of yarn, use the same color or mix colors as shown in the tying steps.
1
|
2
|
3
|
| Using the 9" hanks of yarn, double and fold over twice. Cut a 2" section of bright yarn, if a twilight indicator is to be tied. Lay the bright yarn on top of the folded sections. | Slide an O-ring over the jaws of a pair of forceps. | Clip and secure the folded prepared sections of yarn at one end. |
4
|
5
|
6
|
| Slide the O-ring off the forceps. and to the middle of the folded yarn. | Now, unclip the forceps. and fold the yarn over, hinging on the O-ring. ENSURE THE BRIGHT YARN IS IN THE MIDDLE of the folded yarn bunch. Re-clip the forceps. above the O-ring to hold everything in place. | Slip a 2" piece of surgical glove rubber through the O-ring, centered. |
7
|
8
|
9
|
| Hold the ends of the rubber slip back towards the top of the indicator yarn. HINT: if you find this step difficult, you may find it easier to apply a few wraps of thread around the yarn above the O-ring (as pictured in Step 8) before adding the slip of rubber. | Be generous when wrapping the thread around the yarn and slip of rubber. Tie off as close to the O-ring as possible. Whip finish and apply a drop of tying cement if it makes you feel more secure about the wrap./td> | The nearly-finished strike indicator should look something like this. Stretch the tag ends of the rubber slip and trim to the wraps of tying thread. |
10
|
11
|
12
|
| Firmly grab the ends of the yarn and pinch in a tight, compact fashion. Trim the yarn to remove the folded loop tops and to even things out. | A finished strike indicator (with twilight vision yarn) is ready to fish! | Notice how the brightly colored yarn cannot be seen by the fish when the strike indicator is floating in the water, but can be seen by you! |


HINT: Dab a few drops of dry fly floatant or rub tying wax on the indicator to help it float higher and longer without sinking.
Attaching the indicator to the leader
A couple of questions ticked in. The subject is covered in the article, but a GFF visitor supplied an excellent answer.
 Drawing By Martin Joergensen
Question
by Arthur Smith
The article entitled "Strike Indicator Scientology" is exceptional, I really appreciate Steve Schweitzer and GFF sharing this valuable information. Also, I've never fished these type of indicators and am almost embarrassed to ask how they are fixed to the leader? Adding this information to the article would really be the icing on the cake. Tight Lines...
Question
by Michael Ericsson
Very green angler wondering how to attach o-ring style strike indicators to my leader?
Answer
by Kieth
If you have ever done a loop to loop with butt section and leader to from a square knot this is essentially the same thing. Simply form a loop in your leader by doubling the line on itself take the strike indicator with the o-ring facing up and slide the o-ring over the loop in your leader in the general area you would like the indicator positioned. Now flip the indicator through the leader and pull. The leader and the o-ring should be looped to looped and form a square knot. You can slide the indicator up and down depending on where you would like it. If you are using the polypro yarn type of indicator you should consider using some gink (a dry fly paste called Gehrkes Gink) this will help the yarn float.
Good luck,
Keith
World Wide Angler Fly Shop
Anchorage, Alaska
- Log in to post comments
