
Does anyone remember the early to mid 90's? The rage in the US, at least among tyers of trout flies, was Polish woven nymphs. Fast forward to the dawn of the new century and these articles and flies have all but disappeared? Were they a fad? What happened?
Does anyone remember the early to mid 90's? The rage in the US, at least among tyers of trout flies, was Polish woven nymphs. It seemed that everyone and their brother was running out to the local craft shop searching for crochet hooks, or complaining about cramps in their hands from tying one too many overhand knots. The goal? A nymph that was a) heavy, b) slim, c) had a segmented look, and d) had an interesting dorsal/ventral color separation. This was the hot topic for a couple years in the US. Every magazine published
an article or two on the topic, and woven "Polish" nymphs graced every catalog.
Fast forward to the dawn of the new century and these articles and flies have all but disappeared? Were they a fad? What happened?

Czech nymphs. Do they look buggy, or what?
I believe the heart of the reason is that most folks may have learned to *tie* these Polish woven nymphs, but did not learn to *fish* them. As with most fishing flies, Polish woven nymphs and the angling techniques used to fish them evolved to solve certain problems, not the least of which was the fact that these were immensely
popular in match fishing competitions where no weight was allowed on the leader. Combine the no-split-shot rule and the swift currents common in that area of Europe, the anglers devised a way to get their flies down to the fish quickly and effectively. Thus - Polish nymphing and Polish woven nymphs. They worked then - and I'm quite sure they work now as well.
Are we following the same path with Czech nymphs? They seem to be the rage these days. They are in every catalog, and articles (like this, ha!) are popping up all over the place. Tie them or not - but if you do - please take the time to learn how, where, and when to fish them before tossing them off as yet another fad. If nothing else - check out the results of some recent international competitions where fellas from Eastern Europe kicked some serious butt using flies similar to what is tied here.
As with any style, change the materials to suit your needs. Some authentic (i.e. tied in the Czech Republic) nymphs sport such diverse materials as latex taken from surgical gloves, eel skin, and even sausage casings. Once again, we see where fly tyers are an inventive, if odd, bunch of folks. Don't believe me? Check out some of the cat gut nymphs on the web. Given that, all Czech nymphs adhere to a few simple principles:
- They are heavy
- They are slim
- They sport some sort of shellback, usually darker in color than the abdomen
- They are tied on a curved "grub" style hook
The fly in the demonstration below was dressed as such:
| Hook: | Partridge K4A, #8 |
| Underbody: | Adhesive backed lead tape |
| Thread: | Danville Flymaster 6/0, White |
| Shellback: | Olive scud back, trimmed to 1/8" |
| Ribbing: | Flat gold holographic tinsel and 5x mono tippet |
| Abdomen: | Scintilla dubbing, golden olive |
| Thorax: | Squirrel dubbing, dark olive |
| Marking pen: | Edding 142 (dark brown) |
Step 1
Cut a strip of adhesive backed lead about 1/16th inch wide and about 3 inches long.
TYING TIP:
Visit your local golf pro shop for a lifetime supply of adhesive backed lead tape.

Step 2
Strip the paper backing off the lead and start the wraps partially down the bend of the hooks. Wrap toward the eye in touching but not overlapping turns, much like you would do with tinsel.

Step 3
Wrap a second layer of lead tape partially over the first - not extending all the way to either end. For larger hook sizes, a third layer of lead tape can be added without disturbing the fly's proportions.
TYING TIP:
There is no need to risk your scissors to snip of the waste ends of the lead. A thumbnail is more than sufficient to break the tape.

Step 4
Attach your thread and wrap over the lead underbody. What you want is a weighted underbody that is slim and tapers smoothly and evenly to the hook shank. Don't crowd the eye.

Step 5
Trim a point in the end of a piece of shellback material so that, once tied in, the material stradles the hook with equal portions of the material on each side.
TYING TIP:
Buy the wider material and trim to suit fly size.

Step 6
Wrap back over the shellback material deep into the bend of the hook. It helps to stretch the material as you go, again to keep the underbody as slim as possible. Once again - try to maintain symmetry with respect to the hook shank.

Step 7
Once the shellback material is tied in, you can tie in your ribbing material.
TYING TIP:
Holographic gold tinsel is a terrific ribbing material for any nymph, not just these Czech nymphs. Now - I can't prove it brings in more fish - but Lord knows I've caught lots of fish with holo gold tinsel ribbed nymphs.

Step 8
For most Czech nymphs, there are two ribs. One that is goes underneath the shellback, and one that goes over the shellback to create the segmentation. A bit of tippet material is the perfect choice, since it can be wrapped with strong pressure yet practically disappears in the final fly. Pick a size that is thin yet strong. 5x seems about right.

Step 9
Tie the monofilament rib on the far side of the hook. This will allow you to complete almost a ful turn before the ribbing crossed over the fly, allowing for a proportionally correct first segment.

Step 10
All sorts of things can be used for the abdomen of a Czech nymph, as long as it supports the goal of a slim finished fly. In this case, I'm using a bit of synthetic dubbing in a light olive color. This is Scintilla in Golden Olive.

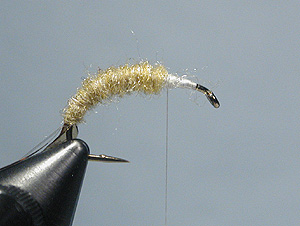
Step 11
Dub the abdomen such that 2/3's to 3/4's of the body is covered. Since the underbody of the fly already has a tapered shape, there is not need to intentionally taper the dubbing amount on your thread. Try to maintain a consistent sparse amount of dubbing, avoiding lumps and bumps in the body.
Step 12
For the throrax, a spikey dubbing that has a contrasting color will not only help you create the illusion of movement and legs, but many caddis and other underwater critters are darker in the throrax/head area. In this case, I'm using a bit of dark olive squirrel, which dubs beautifully and lends itself to "picking".

Step 13
No need for bulk. Wrap the thorax to approximately the same thickness as the abdomen, wrapping the dubbing right to the back of the hook eye.

Step 14
Bring your ribbing tinsel forward in an open spiral. Take care not to space the wraps too closely. The rib is just an accent - a bit of sparkle and flash in an otherwise drab fly.

Step 15
Bring the tinsel all the way to the hook eye and tie off.

Step 16
Fold the shellback material forward over the back of the nymph, taking care to keep it centered. Stretch it enough such that it folks over the edge of the body, but not so much that it loses much of its width.

Step 17
Tie off the shellback and check again for position before trimming off the tag ends. Once the tag ends are trimmed, it would be difficult to untie and correct a misaligned shellback. Slight adjustments are possible, but a wholesale re-do would be difficult.

Step 18
Stretch the shellback material and clip off the tag end. By stretching, there is very little material left once trimmed and thus not much to cover with thread.
TYING TIP:
Firm wraps, and plenty of them, will keep this slippery material in place when it is tied on. Being stretched, it wants to shrink back. Firm thread will hold it.

Step 19
Begin to wind the monofilament ribbing forward, taking care to keep the wraps somewhat in the middle of the flat tinsel wraps. If you wrap softly then pull up strongly on the near side (assuming right handed tyer), there is less chance of shifting the shellback than if you wrapped over the shellback with high tension.

Step 20
Tie off the monofilament securely. It is slippery stuff, so maintain tension on the ribbing and the thread as you are tying it off.
TYING TIP:
Don't use your favorite delicate scissors to snip off the monofilament. Side trimming pliers would be great, but a heavy duty pair of shears is fine.
Step 21
Wrap a neat head and whip finish. Relax, you're almost done.

Step 22
With a bodkin or needle, pick at the thorax to free up some of the guard hairs, offering the illusion of legs.
TYING TIP:
A little goes a long way. You don't want to break the ribbing or clean out all the dubbing. Just loosen a few guard hairs so they stick out nicely.
Step 23
In many respects, this fly is was completed in the previous step. However, if you want to dress it up a bit, get a waterpoof permanent marker such as that shown in the photo and take a deep breath.
TYING TIP:
Not all markers work on all materials. The Edding brand in the photo is from the UK. Chartpak markers in the US are also good.

Step 24
Since I used white thread, the first step of course is to color the head to a rich dark brown.
TYING TIP:
Before you hit the fly with your marker, use a scrap piece of material to make sure the color is good and that the marker doesn't bead up or wipe off.

Step 25
You can also color the top of the thorax, since this area is usually darker on many bottom dwelling insects.

Finished
If you were so inclined, you could color the entire dorsal surface with the marker, not only highlighting the segmentation created by the monofilament ribbing, but also giving the finished fly a dark top over a light bottom which is so common in this stage of an insect's life.

- Log in to post comments
