
I've developed a habit instilled in me by my salmonfly tying mentors. When evaluating the salmon fly dressings of others, I look at the floss work first. It is a key characteristic that determines and shows the skills of the cream of the crop.
Improving Your Skills

Ive developed a habit instilled in me by my salmonfly tying mentors. When evaluating the salmon fly dressings of others, I look at the floss work first. It is a key characteristic that determines and shows the skills of the cream of the crop. While each intricsate step of creating a salmon fly requires undaunting attention to detail, applying silk floss correctly is oftentimes overlooked and under-taught. Even in T.E. Pryce-Tannatt's classic book, "How to Dress Salmon Flies", he only dedicates 2 paragraphs to the subject.
I have been fortunate enough to have been mentored and scrutinized by some fantastic tyers over the years. They each pursue salmon fly perfection like no other. This article is largely a re-capsulation of what they have shared with me. Their mentoring
was not in the form of teaching a technique but more so in what to look for
what is right and what is wrong. I reckoned they shared with
me the concepts of what flat floss work should look like; figuring that I would manage some how to apply the floss in my own manner. Well, I did, and this article explains my technique further: the bodkin needle technique. But lets first discuss the material at hand: silk.
Floss Fundamentals
There are many flosses on the market. Nylon, Dacron, Polyester, Silk, one-strand, two-strand, four-strand, twisted two-strand, etc. For purposes of this article we will focus on tying with classic silkworm silk
the natural stuff.
Two stand out as the preferred choices in salmonfly tying. Pearsalls tying silk, a twisted 2-pair silk floss is great for smaller applications and predominently wet fly tying. The color and consistency of the dyes are impeccable and dont vary from batch to batch. The range of colors to choose is diverse and covers most all eccentric tastes in classic salmon fly tying. the silk comes in smaller 10-meter
spools.
A floss silk body should be quite smooth, free from all bumps or irregularities, and should taper very gradually from butt to head
T.E. Pryce-Tannatt
page 152, "How to Dress Salmon Flies
But, my preferred silk choice is manufactured in the Orient (company not known
better yet, Im not able to read the writing on the box!). The silk comes on approximately 4-inch cardboard tubes and is somewhat flattened already. The colors are extremely vibrant and consistent, the most vibrant Ive ever seen in any dyed material. In fact, you will have a hard time in matching other dyed materials like seals fur dubbing and swan shoulder to the exquisite colors available to you. The drawback: at nearly $8 US per tube, the cost of obtaining the basic colors (12 or so) can run up the tab in a hurry. The company offers a color selection chart available for about $10 that includes actual samples from all 77 colors. If you are at all serious about the quality and color of the silk floss you use in salmon flies,
it is best to get yourself a copy of the color card.

Opening my box of Japanese silks reveals a few colors I have selected to tie salmonfly bodies.
Handling Silk Floss
True silk floss will pick up and show the slightest of skin oils and dirt. Both of which mar the gorgeous sheen and rich colors that natural silk floss embodies. The cure: thoroughly wash your hands with an alcohol-based cleanser like the anti-bacterial soaps now on the market. Rinse your hands thoroughly and pat dry with a clean towel. Avoid picking up too much towel lint.
If your hands are rough and dry, a piece of 300-400 grit emory paper can be used to "sand" away the dry parts of your finger tips. This will help alleviate the possibility of having a small dry patch of skin catch the silk floss; if you use your bare hands. Dont ever use hand cream to sooth your dry hands if you are about to tie with silk!
Finally, as a precautionary measure, I always use a silk glove on the hand that touches the silk as I wrap. Silk on silk is the best route for protecting the fragile nature of natural silk floss. Dont use hackle pliers either. If they are metal-on-metal clasps, they will most certainly shear some of the fibers of the silk and cause little stray silk fibers to form. These are those telltale microstrands that stick out like a sore thumb on silk bodies that arent carefully applied. Also, dont even use rubber-padded hackle pliers. They dont allow you to flatten the silk out like you could if you were just using your hands. Bottom line: just use your hands!

A burnished thread base provides a very flat and smooth surface to cover with silk floss.
The Telltale Base
Under all that pretty floss you lay on a hook are wraps of thread and maybe even some foundation material used to create a progressive taper. If these wraps arent flat theyll most definitely show up through the thin wrap of fine silk. The first step of ensuring flat underwrappings is to untwist the roped bias that all thread exhibits.
(See Martin Joergensens article on Thread Control for a further explanation)
Spinning your bobbin counter-clockwise will flatten the thread and allow greater control in application.
The rule of thumb for flat floss is to cover the entire silk-bound area with flat thread wraps first. Pay strict attention to wrapping the thread. Ensure each wrap touches the previous but does not overlap it. Assuming you started at the oval tinsel wraps at the tag, move
forward to the eye of the hook covering the silk-destined section of the shank with the thread base. You may want to go over the area several times to build up a slight taper as called for in some classic salmon patterns. Finally, even after youve taken precise caution in ensuring flat thread wraps, there always seems to be a few minor lumps to work out. If youre really good, it will take a magnifying lens to detect these, but they are there and silk will magnify those minor nuances later on. Using a very smooth bodkin needle, free of glue fragments and burrs, rub it gently back and forth over the thread base to smooth it out one last time. This step is called burnishing. Take as long as necessary on this whole step; for it is sure that your time and efforts will be rewarded in flawless floss application later.

Start the floss at the ending point and wrap back to the tinsel tag. This avoids a tie-in build-up at the tag. It is difficult
to hide this bump.
Starting the Silk Floss on the Hook Shank
Because hiding your starting point is essential to leaving a flat trace of properly laid silk, lets talk about where to start silk wraps. Lets use the tag wrap for conversation starters. The tag wrap is one of the most common elements of all salmon flies. The most common error is to start your floss right after the tinsel wraps and work up from there. Doing this forces you to cover up the tied in tag of floss on the back side of the fly. Most certainly a bump will result. Instead, tie the silk in just forward of the ending point of the silk and wrap back to the tag, then forward again. Tie off where you started your floss. The bump at the tie off point is usually covered by another material, thus it isnt essential to worry about this.
Now Ive presented some fundamental chores necessary to laying flat floss, lets get on with the key point to this article!

Using the bodkin method, pre-flatten the floss as much as possible prior to each wrap.
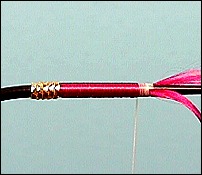
The final product is a consistantly flat silk floss body. Taking some additional care, one can burnish the floss sightly to achieve an even smoother application. The photo above shows floss that has not been burnished.
Applying Silk Using A Bodkin
Even if you have laid the perfect foundation, you can still mess up the floss. Ive developed a method that aids in flattening the floss prior to applying it to the hook shank: The bodkin needle method.Heres how it works.The first step to success is to tie in the floss at the starting point on the hook shank in a relatively flattened state to begin with. The best way to achieve this is to tie it in at a 45 degree angle in the direction you wish to wrap it. To achieve a relatively flat wrap as the tie in point, use the thread-wrap trap method to secure the beginning tag of the floss.. The thread-wrap trap method is nothing more than moving the material to be tied in under an existing wrap of thread instead of adding another wrap of thread to capture the material on the hook.
Once the silk is tied on securely and flat, the job of applying consecutively thin flat wraps over the hook shank is aided by using a bodkin. On the backside turn of each wrap, utilize a clean and de-burred bodkin needle to help flatten out the floss. Accomplish this by sliding the bodkin needle up and down the backside wrap of floss to flatten it AND at the same time bringing the wrap under the hook shank and over the top, completing one revolution. Repeat this step for each wrap until youve reached the backward end of the flossed area and do the same moving forward to the tie in point. Basically each wrap has a pre-flattened floss segment prior to wrap-in via the aid of a bodkin needle. I use the bodkin needle to help lay the flattened silk for each wrap on the hook shank. Some folks can wrap silk without the aid of any tools but I find it easier to use this method.
The Flat Scoop On Flat Silk Bodies
As you can see, Ive devoted more time in this article discussing the importance of the underbody and shank preparation than in discussing the actual application of silk floss. Its because the underbody is the most critical element in assuring flattering flat floss. Take the time in preparing the base and you will be rewarded with flatter floss bodies.
- Log in to post comments
