
I'll warn you now; the hopper is my favorite pattern. It's big, I can see it, it's fun to cast and present it with a plop, I have fun tying them and the fish just adore the big, juicy, summer delight.
Late Summer is Hopper Time...Get Ready!

I'll warn you now; the hopper is my favorite pattern. It's big, I can see it, it's fun to cast and present it with a plop, I have fun tying them and the fish just adore the big, juicy, summer delight. It's perfect for my less-than-perfect casting habits. The pattern presented in this article is non-typical in my cache of fly patterns, however. This one uses a glued-on, pre-shaped foam body. Hence, the thesis of this article.
I've experimented with a couple of dozen different hopper and cricket patterns, all of which will catch trout. But this one, my adaptation from a pattern that George Cik (true inventor of the Brassie) gave me, is one that I can tie readily and with minimal materials. Plus, the darn thing just plain floats well. It looks real and outlasts those pesky little toothed 24" summer browns. Not that I know, I've never caught a brown that big on a hopper, but I've had a hopper last a whole season of bluegill
fishing. Granted it looked tattered and water-weary, but that's the goal, isn't it?!
How A Trout Sees A Hopper
I once attended a fly show where Dave Whitlock was presenting his slide-show and studies on hoppers and hopper imitations. That's all I needed to spark the artistic inventor in me. Dave's Hopper uses a deerhair body. That's fine until the body absorbs water and sinks lower and lower with each cast. I started thinking how I could incorporate a better material; one that would last longer, farther, better. Dave taught me a few very important observations of summer hoppers.
One: how they float in the water
and
Two: what color is the hopper; on the underside.
A trout sees three distinct features about a hopper floating by. The trout notices the general outline of the fly, thus the long body and back legs become an important feature to mimic. Secondly, the trout notices the underbody color. A bright green underbody, like those of some commercially tied hoppers certainly doesn't match the pale yellow color of the ones I see in late summer. More over, the ones I see have a green-grey topside, they aren't pale yellow all-around. The third thing that trout consider is how the hopper floats in the water. This observation was the most single important fact Dave Whitlock imparted upon me. Hoppers don't ride high in the water. Hoppers don't ride under the surface film. Think for a moment, if you were floating down a river, waiting to be someone's lunch, how would you float? Head up (so you could breath) and body submerged. That's how a hopper floats. It's butt and abdomen is submerged and the thorax/head is above water. It's this observation that led me to modifying the Foam Hopper fly accordingly.
Anatomy of A Hopper
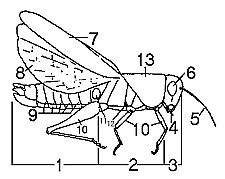
1. abdomen
2. thorax
3. head
4. mouthparts
5. antenna
6. compound eyes
7. front wings
8. hind wings
9. abdominal spiricals
10. legs
11. tympanum
12. thoracic spiracles
13. pronotum
A hopper hails from the order orthoptera, which includes ground hoppers, burrowing hoppers, mole crickets, katydids, household crickets, and locusts. There is about 20,000 species known around the world and have been dated as far back as the Upper Carboniferous age, some 300 million years ago. A hopper is described as being hemimetabolous or having a nymphal stage that looks like small adults
and no pupal stage. That's good for us tyers as one pattern in different sizes pretty much covers the life-cycle of othropteras. The ensifara suborder which includes grasshoppers, groundhoppers and locusts and the Caelifera suborder which includes crickets will be the focus of the flytyers enigma.
The Grasshopper's Head
The ensifara sub-order have small stout antennae, generally about 1/3 the body length. The oval oblong eyes are typically a darker shade of the head color and are very pronounced, taking up the upper 1/2 of each side of the head. The two large eyes, which detect movement, are accompanied by 3 smaller eyes which detect changing light conditions. Protruding back from the head is a large plate, called a pronotum, covering the first thoracic segment (prothorax). This plate is important as it protects the hinge portion of the wings.
The Body
The fore-wings are toughened to form the tegmina while the back section folds fan-like and is supple. Just inside of the middle pair of legs is located a small breathing hole. Hoppers do not breathe from their mouthparts. Females have a well-developed ovipositor and can be visible in some cricket species. The body is long and the tail-ends are tapered and pointed (an important feature to consider as a flytyer). Typically, hoppers have very pronounced and over sized femurs, perfect for jumping and launching them into flight. In measurement, a hopper can jump 50-100 times the length of its' body.
The Birth
Our little grasshopper most likely started out in a cluster of eggs in a pithy stalk of a broken plant or in the soil. The cluster of eggs resembled a dropping of molten polystyrene. He laid dormant over the winter, and in some species cases, over two winters, taking 2-3 years to hatch. The nymphs first hatch out in sort of a safety suit which keeps all of their limbs close to their body as they protrude from the frothy egg-sack or from underground. The hatch process is quite interesting. They pump up their head with little bursts of blood and as the head-size increases, the egg sack membrane or soil is extruded away. Once broken free from the obstructions, they shed their little protective shuck and immediately search for food. Other species may "spit" on the egg sack, causing it to deteriorate. During the first few hours, they are pale white and are still somewhat clumsy. After only a few hours they obtain full coloration. Henry II most likely will grow to be between 1 and 3 inches and will live an insect eternity of 3 to 12 months. During their life span, hoppers may molt 5-6 times.
While most of the Orthoptera are omnivorous (plant and animal eating), the focus of the flytyer should be on the herbovorous, or just plant eating variety. It is estimated that while in the nymphal stage, they eat twice times their body weight. They also make for the perfect slumber-hound flyfisher as they need light and warmth to be active. Hoppers remain quiet and still for most of the night. They prefer grassland over wooded land and tend to cluster in greater numbers near water, where the air condenses at night and deposits dew in the morning. This becomes their source of water for the day.
When A Hopper Speaks, Everyone Listens
Most species, particularly crickets utilize 3 different sorts of "songs".
1) calling songs which are species-specific to call far away females,
2) courtship songs while the male and female usually have antennae contact, and
3) aggressive songs, generally male-to-male.
In fact, the songs are so well prized that the males species are kept in cages in some Eastern countries, just to hear the soothing sounds. How are the sounds made? Good question. Most of the species rub a forewing against another. In detail, the top forewing has a ridge of "teeth" on it's under side. This is called the bow. It is rubbed against the topside of the underwing which contains a strengthened vein, this is called the scraper. In effect, the hopper has a built-in violin. This begs the question: If a 400 year old Stradivarius violin is worth $1.5 million, what's a 300 million year old hopper worth? I know, strange thinking.
In 1992, R.B. Toms found that in some crickets, the frequency of the chirp is directly related to the outside temperature. The formula to convert chirps to degrees Celcius is different for each species and remains accurate for that species, regardless of geography around the world.
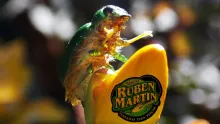
Typical Coloration Patterns
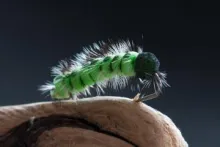
Take a close look at grasshoppers sometime. The photo at the beginning of this article is representative. Typically, the ones where I fish have a pale yellow underside, a green to bright lime green topside, a grey underwing and a brownish-grey top wing. The head is hard-looking and very much a prominent feature of the body. The antennae are highly noticeable and the legs are very pronounced. There are other hoppers that I've seen that have a cream underside and a brown topside while others are
all mostly tan-grey. Take notice of the hoppers around you and tie suggestive coloration patterns around them.
Would Ya' Look at Those Legs
A hopper has very pronounced hind legs, something all hopper patterns should mimic. And about tying hopper legs: I used to think it was a pain in the neck, but I didn't know the right method. I avoided using pheasant tail legs because I hated knotting the little critters. So, instead, I used rubber legs. They didn't quite mimic the true outline of the pronounced legs of a hopper, however. In comparing rubber legs to pheasant tail legs, the pheasant tail wins hands down. They're lighter and more suggestive of the hopper outline. More on tying the legs in a moment.

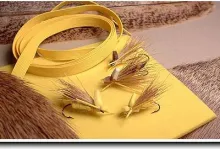
Building Your Hopper
Other than the hook, thread and vise, the materials needed are quite simple and readily available. [super glue, light deerhair, turkey tail, foam strips, pheasant tail and a paint brush with dark nylon bristles]
Before you start, liberally coat a 1/2" wide and 2" long section of mottled turkey tail with clear nail polish. Don't cut the section from the feather stem! Leave it intact until it's dry. Use your fingers to wipe the excess and work in the remaining polish. This will become the wing back.

The Hook
Use a light wire 2XL to 4XL streamer hook. I prefer Tiemco 300's. Pinch the barb down. It just makes good sense to do this with all of your flies. Apply a thread base covering the entire shank of the hook. This base will easily accept the super-glue when you glue the body to the hook. I like to wrap the thread in a loose crossing pattern which makes for an absorbant base in which to glue the body. (see inset)
Making the Body
I have found that sheet craft foam is not only a great material to use a backdrop when tying flies but also as a durable material in foam flies. I use a paper cutter to cut thin strips ranging from 1/8" to 1/4" in width. I have most colors, but we will concentrate on using yellow, brown, grey and white. Now take two 6" strips, one white and the other the color that mostly resembles hoppers in your area. In the picture, I've used yellow on the underside and green on top. Lay a bead of super-glue on one of the strips and place the other on top. Let this set a minute as it only takes a few minutes to set thoroughly.
Now you have a 6" strip that will make about 4-6 flies. Cut a 1"-2" section away from the larger piece. A larger section is recommended until you become proficient at determining the length needed for the size of flies you will tie.
Tapering the Butt Section

Simply trim the foam body to shape with very sharp scissors. I've tried burning and sanding them into shape, but just using scissors work the best. Try using an emery board to sand in the roundness after the general shape is cut. The goal is to get a nice taper in the rear as the natural has. This also facilitates the fly to float butt-lower in the water because less is there to float. Use a razorblade to cut a slot in the middle of the underside running lengthwise. This slot will slide over the hook shank. Practice placing the body on the hook shank prior to dropping a bead of super-glue on the thread wraps.
Once satisfied, glue the body to the hook shank. Just to secure things, wrap the head portion of the foam body tightly to the hook shank. Be sure the body doesn't twist as you tighten the thread down. There, the body is made!

The finished body glued and tied to the hook shank.
Preparing The Head

This is arguably the most difficult portion of the fly. If you get through this one, you're on the way to dozens more! Select a 2B pencil sized portion of deer hair. Stack the ends and place the stack with the tips facing outward over the hook-eye, tying them in securely. It is difficult to prevent the tips from flaring when you tighten the butts down, but with practice, it becomes easier. The tie-in point is approximately 1/3 the way to the back of the hook shank from the eye. Clip the deer hair butts away from the body. Trim away the excess and errant fibers. A flat trim on top helps to seat the wings as described
in the next section.
Tying in the Wing
The wing section should be dry by now. Snip it from the feather stem and flatten it out. Do not do any clipping and rounding of the back just yet. We'll do that when the fly is completed.
Now tie the butts of the turkey at the head of the fly, covering the clipped ends of the deer hair head. The tie in point is the same as the head above. You can be sloppy here and no one will ever notice! Just make sure the wing envelopes the foam body evenly on both sides and has a good curvature wrap. As mentioned before, DON'T do any trimming of the back of the wing just yet!
Finishing The Head and Pronotum
(If you accomplish this task correctly, not only is the head formed, but the silhouette of the middle legs and the prontum as well.)
Be sure to place your thread at the 1/3 point back from the hook eye prior to forming the head. Carefully stroke the deerhair tips backward, over the tie in point. This will take some practice and several manipulations to get the hair in the right position. However, I have found an easy way to start by just using your index finger. From under the head of the fly, place the middle of the end of your index finger on the hook eye. Now push the hair backwards, so it flairs out like a fan. With your other hand, continue to pull the hairs backward and wrapped around the sides and top of the body. Apply two or three secure wraps of thread to hold the mess in place. Adjust any loose or out-of-place hairs with a bodkin and wrap a few more times to secure the deerhair. Its that simple.
Putting the final touches on the head of the fly is as simple as taking two dark fibers from a nylon-bristled paintbrush and securing them in above the head, with about a 1/8" space between them. Remember to clip them relatively short to mimic the natural.
Painting or sticking on eyes are optional, but recommended. Again, the eyes of a hopper are a dominant feature, so as tyers, we should replicate this.
Making and Tying in the Legs
Making pheasant tail legs used to be a royal pain in the butt until I just forced myself to knot-tie a few. I actually found that the knot-tying process isn't that tough if you have the right tools. I use an old dentist's pick with a curled end to pull the fibers through a small loop. It works just as well for me as one of those needlepoint tools that are cleverly marketed as a hopper leg tool. Those tools work quite well but I have just never had the urge or need to buy one. It's your call.
I like to apply some clear fingernail polish to the tips of the pre-fabbed legs to hold all the loose end fibers in place. Tying them in is quite easy. Although each hopper species has a different leg length, I prefer to align the knots of the legs over the back bend of the hook. It just seems in proportion to me that way.

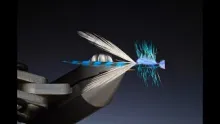
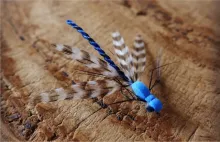
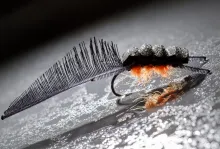
The Finished Foam Hopper
Built-in Strike Indicator
One way to make hoppers seen better while fishing them at dusk is to tie in an over-sized patch of highly visible glo-bug yarn on top of the head and trimming to shape.
Imitating Thorax Segmentation
Although the foam hopper pictured above does not show segmentation in the thorax, it can easily be achieved via a green permanent marking pen. After you tie on the foam body, make slight and evenly spaced marks across the bottom and sides to immitate the segmentation. In some grasshopper species, it is more pronounced than others.
Fishing the Hopper
Although I've never been told exactly' how to fish a hopper, I prefer to cast it as close to a bank or overhang as possible with a mildly splashy entrance. Again, the goal is to mimic a hopper that has just met misfortune and has landed on the water. If you are too splashy and radical, you will send the trout scurrying. One of the best action-packed videos I have ever watched occured as I was writing this article. Flip Pallot, host of Walker's Cay Chronicals, invited Dave Whitlock to fish out west (US) at Five-Rivers Lodge. The ensuing footage was an example of mastery as Dave proceeded to catch several 18"+ brown trout on a Dave's Hopper. My advise: if you ever have a chance to see Dave's in-show presentation, don't miss it.
Happy Hopper-ing!
- Log in to post comments

You can find the rec
You can find the recipe for Taylor's Fat Albert at the following address on the Orvis website. It's under the Fly Fishing home page at the bottom under Fly Fishing Tools and click on Hot Flies. It is then at the bottom of the page. It's a really easy fly to tie in any size!
Tight Lines!
Ed.: The direct link is here.
Does anybody out the
Does anybody out there have the Taylors Fat Albert pattern ? I've tried to find it for weeks and no success.
Thanks
Joe
Great article on the
Great article on the hopper. I've been using the Dave's Hopper for a long time. Your pattern looks interesting. Might just give it a try. I met Dave in the mid 70's at a show in Troy Michigan. He was at the Sportsman's Show in Phoenix Arizona last spring. That man can sure cast a fly line. My friend and I fished the White River in Arkansas using the Dave's Hopper and it was a killer.
I like the looks of
I like the looks of this for a foam pattern. Like to catch fish with them but their looks sometimes just don't appeal to me. The tappered look on the pheasant tail leg is also quite nice (but for fishing I might have to go with rubber legs)
Now that is one very
Now that is one very nice hopper imitation, similar to the one I use personally, however...hoppers often kick in the water, so, by replacing the hind legs with thin rubber strands (tied in a similar manner as shown here), makes for an absolutely deadly pattern!
Try and enjoy!
superberb tye simple
superberb tye simple great fly