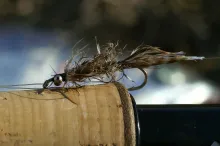
Maybe you found the tandem worm too tandemnised and would be better of with a one-hook-only fly.Then the fly The Wiggling Jigging Worm shown beneath is a good alternative.
It is strongly inspired by the fly Sandiglen (The Sand Leech) originally tied by René Hansen.
However, this version has added weight just behind the hook eye, so it will jig through the water and at same time make vibrations to the sides due to the Magic Head. It is a fly that is very much alive in the water and I am sure it will be taken for a small clam worm. It has the right movement, color and the characteristicly flat profile with all the legs.
Kasper Mühlbach
Wiggling Worm
Fly pattern, materials and tying steps
Cold saltwater fly
Kasper Mühlbach
sea trout (sea run)
steelhead (sea run)
Materials
Hook
Aberdeen, #2
Thread
Rusty, 8/0
Bead
Red, 3.8 mm
Head
Magic Head
Tail
Angel Hair, gold an brownish Marabou
Rib
0.20 mm nylon
Back
3 mm Scud Back or similar
Belly
3 mm Scud Back or similar
Body
Crystal Chenille, brown, medium
Pass the bead over the shank to behind the hook eye.
Let the Magic head follow, hollow part forward, placing it so that it covers the bead and the hook eye.
Secure both with thread and/or glue
Tie a few fibers of Angel Hair.
Tie in the marabou tail.
Tie in the rib.
Tie in the back shield.
Tie in the shield for the belly.
Tie in the crystal flash.
Take the thread to the hook eye.
Bring the chenille forward.
Trim it on the upper and lower side to give it a flat profile.
Pull the belly shield forward. Tie down behind the Magic Head.
Pull the shell back forward. Tie down behind the Magic Head.
Rib the fly.
Secure the ribbing.
Cut off the excess.
Whipfinish and add some head cement behind the cone and bead.
A little difficult
Wiggling Worm
Fly pattern, materials and tying steps
Cold saltwater fly
Kasper Mühlbach
sea trout (sea run)
steelhead (sea run)
Materials
Hook
Aberdeen, #2
Thread
Rusty, 8/0
Bead
Red, 3.8 mm
Head
Magic Head
Tail
Angel Hair, gold an brownish Marabou
Rib
0.20 mm nylon
Back
3 mm Scud Back or similar
Belly
3 mm Scud Back or similar
Body
Crystal Chenille, brown, medium
Pass the bead over the shank to behind the hook eye.
Let the Magic head follow, hollow part forward, placing it so that it covers the bead and the hook eye.
Secure both with thread and/or glue
Tie a few fibers of Angel Hair.
Tie in the marabou tail.
Tie in the rib.
Tie in the back shield.
Tie in the shield for the belly.
Tie in the crystal flash.
Take the thread to the hook eye.
Bring the chenille forward.
Trim it on the upper and lower side to give it a flat profile.
Pull the belly shield forward. Tie down behind the Magic Head.
Pull the shell back forward. Tie down behind the Magic Head.
Rib the fly.
Secure the ribbing.
Cut off the excess.
Whipfinish and add some head cement behind the cone and bead.
The Magic Heads are made by Swiss Marc Petitjean, and are widely available and can be found in many flyshops, but can be purchased directly from his online shop.
Use most of the flies for sea trout, which you will find on this site. Frede, Magnus, Bloody Butcher, Omoe Brush, Epoxy Miracle, Junio Mysis, Klympen and many ,many more,
Paul,
You are right about Connecticut and Rhode Island, I come from Connecticut myself and have made a fly similar to this one and if you send me your email address I will send the pattern to you. Okay :-)
The Global FlyFisher has been online since the mid-90's and has been free to access for everybody since day one – and will stay free for as long as I run it.
But that doesn't mean that it's free to run.
It costs money to drive a large site like this. See more details about what you can do to help in this blog post.


Magic heads
Richard
The Magic Heads are made by Swiss Marc Petitjean, and are widely available and can be found in many flyshops, but can be purchased directly from his online shop.
Martin
I've never seen
I've never seen a magic head or heard of them. Can some one clue me in? And maybe where to pick some up. Thanks and all the best.
these are great bait
these are great baits!
Sea trout flies
fishermanpl,
Use most of the flies for sea trout, which you will find on this site. Frede, Magnus, Bloody Butcher, Omoe Brush, Epoxy Miracle, Junio Mysis, Klympen and many ,many more,
Martin
Bornholm
Hello guys .Im going to Bornholm on march. I`m beginner with fly fishing. Could you give mi some fly suggestions for bornholm in this part of year/
Magic heads
where do i get the clear MAGIC HEAD. DES.
R12 for sizes 12-6
John T,
the size I used for this fly is "Round, R12 for sizes 12-6".
It makes the fly wiggle when retrieved, but I am not sure whether the fish really care.
Kasper
Hi, What size Magic
Hi, What size Magic Head is that and does it make the fly wiggle when retrieved?
Thanks
JohnT
You are right
Paul,
You are right about Connecticut and Rhode Island, I come from Connecticut myself and have made a fly similar to this one and if you send me your email address I will send the pattern to you. Okay :-)
Have you tried it?
Paul,
have you tried it?
Kasper
Just the thing
Just the thing for the CT and Rhode Island worm hatches for striped bass.
Bassies
Nice. I bet the bassies would like it in various colors.