
You don't need to raise birds to get feathers for fly tying, but it's both easy and fun. Here's the story about how I have chickens for eggs, meat and not least feathers

My wife always gives me her special look when I give the chickens my special look - from this angle.
You don't need to raise birds to get feathers, but it's both easy and fun.
Don't expect to be another Whiting, Hebert or Hofmann within a year if you start raising chickens. But expect to get a lot of useful feathers, have a lot of fun and satisfaction - and lots of eggs and meat.
Any garden
I will not go into depth about how you build a pen for your chickens, but will say as much as this: you don't need much space or special skills to do it. We had our chickens in an old laundry drying area behind a garage in a normal suburb in Copenhagen.
You get several advantages by having the animals yourself:
- They eat almost all you organic kitchen garbage
- In return they lay a lot of eggs
- They're fun to be around - especially for kids, but also for grown-ups
- They give meat - depending on the race, both plenty and good meat
- They can provide good fertilizer for your vegetables
- You get some good feathers for your tying

A light Orpington with chickens roaming the suburban garden.
Races
You have the opportunity to have any kind of feathers that you want - except for one: the genetic type. These very specialized birds are not available in free trade, and if you need dry fly saddles and necks in premium commercial quality, you'll probably have to buy them in a fly shop.
As a Scandinavian fly tyer I have a very different need that no one seems to care much about: large hen feathers and soft and webby rooster feathers such as schlappen. Many Scandinavian and particularly Danish sea trout patterns call for large, webby feathers. And along with the genetic capes and the teeny Chinese and Indian necks has come a dire need for good and large hen and rooster feathers.

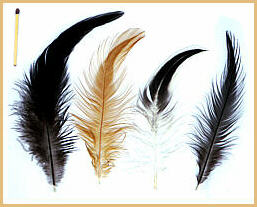
Selections of feathers from home brew birds: left it's hen feathers and right rooster feathers. The leftmost black rooster feather is a saddle hackle the rest are neck feathers. Compare with the match.

Orpington neck. The size is more than 35 x 25 centimeters (14 x 10 inches)
Large rooster feathers are also very hard to find. If you tie salmon flies on big 5/0 and 6/0 irons you will have to look a long while for a good feather. Schlappen feathers can do, but saddle hackle in the right size are much better.
And then there's black feathers. Natural black are not readily available either, so here lies an opportunity too.
For these reasons I have chosen large and stout races, but lots of smaller races will satisfy other needs for smaller feathers.
Select your race or races from literature or go to poultry shows and look at the birds. Note that the bird breeders emphasize the same things that we do: nice even feathers with regular and clean patterns in the right colors. So quality feathers come from purebred quality birds.
I have had the following races:
- Isa Brown - smaller rust color feathers
- Light Orpingtons - large tan feathers
- Black Austral Orps - large black feathers
- White Sussex - B/W Badger feathers
- Silver Egde Wyandotter - Black feather with white edge and center
- Dorking - Large gray/brown/white mottled feathersOther suitable races could be:
- Plymouth Rock - Grizzly feathers

White Sussex rooster. This is just a large chicken developing a beautiful B/W badger neck.
Butchering
If you want to raise chickens you need to be able to slaughter them. This might seem too much for many people and enough to keep them from starting the project altogether, but if you can kill a fish at streamside or shoot a deer and skin it, you can also slaughter a hen or rooster.
I use a very simple method: catch the bird and hold it or get someone to hold it round the wings to keep it from flapping. If this is done after dark, the bird is a lot more calm than in daylight.
Use a heavy stick or the shaft of an axe and hit the bird hard on the head. And that's HARD! If you can't do it, let someone else swing the stick or drop the whole project. It's important that the bird looses consciousness with the first blow, so you really have to mean it! I usually strike once or twice more just to be sure, and often the bird will be dead due to a broken neck after these hard strikes.
But in this family we generally agree that the slaughtered bird must be decapitated to be 100 percent dead. I do this using an axe or a very sharp knife. The axe is a bit crude, but very efficient. If you do not want to spoil the small feathers highest on the neck, use a knife and cut very close to the skull.
When you cut the head, be prepared for a lot of movement and a lot of blood. Have a bucket ready and hold the bird tightly over the wings and let it bleed into the bucket.
Head on
If you want the feathers close to the head both clean and intact, there's no use in cutting the head. How to slaughter without cutting the head is a good question. I know people who poison the birds, but that means goodbye to the meat. Your choice. (see the supplement for more suggestions).
The other possibility is that the bird died a natural death - either in your own pen, in captivity - or in nature if it's a wild bird like a pheasant.
The dead bird needs to be fairly fresh and you need to make sure that it's not too dirty or infected with bugs. The living bugs can be killed by freezing the animal, but eggs and different other stages need to be taken care of with other treatment. Your own birds will be fairly clean if you have taken proper care of them, but wild birds are notoriously dirty and infected.
Read more about slaughtering in this supplement

Breast view (above) and back view (below) of the dead bird with indications of where to cut for the neck piece (black line) and the saddle/side piece (yellow line). The left wing is transparent for clarity on the picture below.

Skinning
When the animal is dead you are ready to skin it. Do this while it's fresh and before any other plucking or cleaning.
If the head is still on, the skinning is quite clean and can be done on a kitchen table. I usually use the bathtub which is easy to clean up afterwards.
Turn the bird over and locate the sternum - breastbone - which is a ridge in the center of the breast. Cut in the groove just in front of and above the sternum. I use a pair of strong scissors which is the easiest. A sharp knife can also be used.
Cut along the front of the neck to just under the head. Be careful not to cut the crop - the small bag where the bird predigests the food. Do this by lifting the skin which is not directly attached to the body, but 'floats' loosely on a layer of thin membranes and sometimes fat.
Expand the first cut perpendicular to the sides around the neck. Follow the line of the skull up to the comb.
You can now start peeling the skin of the neck by gently pulling it loose. Places where it's better attached to the bird you might need to help with the scissors, but overall it's better to use the fingers in order to avoid cutting holes in the skin.
Neck and/or saddle
Now is the time to decide whether you want a neck only or a comination of neck and saddle and maybe the sides (flanks) also.
If you want the neck only, just cut gently all the way around the base of the neck - from breastbone to breastbone. The base of the neck were it joins the back/saddle is generally naked or thinly covered with feathers. This makes it easy to cut the skin without cutting any feathers.

The finished piece of skin: neck only (black line) or neck, saddle, and sides (yellow line).
If you want to use the saddle and the sides of the bird, continue the frontal cut down the sternum to a position where the feathers don't seem useful any more. From there cut up under the wings. You now need cut cut round the base of the wing which can be a bit tricky. If you want to keep on the wings you should now break each wing off in the joint and cut the skin behind the wing. You will need to remove the bones and flesh in the wing later.
Once over the wing you can cut and lift the skin down the back of the bird on each side of the saddle. The skin is often tightly attached to the body in the front and middle of the saddle just between the wings.
How far back you go depends on you, the state of the feathers, and how useful you find the feathers just in front of the tail.
Stretching and drying
Before the skin can be stored it has to be dried thoroughly. This can be done by plain air drying but you will have to aide the drying and preservation process by using salt or borax. I usually use salt which is right at hand in the kitchen, but it does leave the skin quite stiff.

Nail the skin to a board leaving some air below it to let it dry.
You will also want to pin the skin to a board. Take a piece of wooden board like plywood or MDF and a handful of thin 15-25 millimeter (up to 1") nails. Stretch the skin into the shape you want, feathers down towards the board. Start by pinning the neck section to the top of the board and then stretching it with a few nails down the side and back edge.
Don't be bothered if it doesn't look like a Whiting or Metz product. It's hard to cut the regular shape of these necks.
When the skin is stretched you can remove the last residues of fat, membranes or meat that might be left. Now pull it up the nails to let air enter from the feather side and keep the feathers from getting squashed.
Sprinkle salt or borax in a generous layer on the skin, don't mind if some gets on the feathers.
Now leave the board somewhere warm and dry for a few days or weeks. A week's time will usually suffice.
Preserving and storing
Depending on the state of the feathers you can now just take the skin off the board, brush off the salt/borax and then store it in a ziplock bag.
I usually clean the skin by soaking it for a few minutes in lukewarm water and washing it in normal hair shampoo. After this, I treat it with hair conditioner, and rinse and dry with a blow dryer. This will leave the feathers clean and soft, but somewhat messed up. A few seconds in the steam from a boiling kettle will cure that.
The feathers are now dry, but the skin skin is wet. It can be dried between sheets of newspaper and after a few days be stored in ziplock bags.
I have not yet had a skin rot or mold on me - and I have (knock on wood) never seen bugs in home made skins.
I got this excellent piece of advice from Ed Strzelczyk:
Having a few years of experience of raising Chickens and pheasants for hackles, I would like to share a few points to ponder and a very quick and clean way to kill birds. So it is not left up to one's imagination.
First off, I don't condone letting your birds die in there cage!
I also don't condone cruelty to animals even if unintentional, the best way to avoid it is by being informed.
If your not willing to gain this knowledge then raising animals is definitely not for you.
For one to get good hackles, the birds need to be in prime health having not only a good diet of commercial feed, but also some scraps from the kitchen, like lettuce, potato skins and such. Young Dandelion shoots are a favorite too.
Birds even like things like ants, grasshoppers and a special treat you can get for them is meal worms. Fresh water daily is needed for birds to digest their food.
I have water, commercial mash along with poultry grit always available. Grit helps grind the food in there crop. In the morning I let my birds out for some sunshine, which helps produce shiny feathers, and toss them some scratch grains. Later in the early afternoon, I go out and toss more scratch grains and scraps.
Since we have owls, fox and other vermin, I will go out once more before it's dusk and walk them into there coop for the night.
Since the birds need to be at least 2 years old before one will get good feathers, you should do some reading up on poultry.
Learn how to care for and watch for signs of diseases, and how to treat them. There are commercial vitamins which help tremendously. Birds need to be wormed before winter and dusted for mites and fleas.
Your birds can get parasites like ring worm from eating earth worms when the ground is wet, so select a drier spot for them.
A good place to find information is from the library and or the internet, do a search for poultry. There are lots of resources.
To make a quick humane kill I have been using the following method for the past 5 years:
Place two wood or concrete blocks about 8" (20 centimeters) tall in bottom of a clean garbage can. I made a screen to sit on top of these blocks (chicken wire doubled up will do).
When your ready to start, place a block of dry ice in the bottom of a large coffee can inside the Garbage can. Don't forget to wear gloves as your bare skin will stick to the dry ice and get burned by it.
Place your screen on top of blocks over the top of the coffee can and dry ice and have your lid ready.
Pour in about a quart of water into the coffee can so it mixes with the dry ice and close the lid.
The chemical reaction of water and dry ice makes CO2 carbon dioxide.
Get your bird and place him in the garbage can on the screen then close the lid tight. Wait about 1-3 minutes depending on how good of gas buildup you made inside the garbage can. I peek before I start and you will get the hang of it with very little practice (first couple of birds).
The bird is basically deprived of oxygen and you will hear a faint death purr when it passes on. Grab another bird and quickly exchange with the one before, making sure that the lid is tight!
I have twine hung from the rafters and hang the birds by there feet to skin.
I don't gut them until later,after skinning them so the feathers stay fairly clean of blood.
Then I prepare the birds for the table.
After you have done this a couple of times, you can get a production going. Two people can kill and skin 24 birds in about 3-4 hours.
I lay the skins on newspaper, skin side down and layered between more newspaper in a stack ready for the next step, scraping the skins with a dull edged butter knife.
I use Borax rubbed well into the skins and let dry for a day, This pulls the oils from the skin. The next day, I brush off the borax and scrape the oily spots again and re-borax and let dry.
I should mention that I keep these skins in a Rubbermaid tub. A large one works well. This keeps flies from laying eggs on the skins. Make sure you have them laying flat.
Once dried I cut the neck and saddle patches, and put them into separate freezer bags and freeze them for a couple of days.
Here is three key point to remember !
- Get a good cloud of CO2 inside the can before you place the bird in it.
- Once started, keep the lid tight on the garbage can.
- Be quick about things when you need to uncover it, so the gases you have built up remain in the can.
The CO2 is harmless to the meat, so go ahead and make soup, you can safely eat the birds.
The Hazards involved:
- Do not to fall into and get stuck in the can as it works the same for all who need oxygen to live. This is especially a hazard to small Children use common sense and watch your small children that might be around.
- Dry Ice burns if you touch it with bare hands! Not only will you get burned, but when you pull it off it will take off layers of skins which burns for days, not to mention an easy way to get infection. This also is the end of your doing anything with your hands for weeks. Wear gloves when handling dry ice. Trust me on this one, really.
Ed Strzelczyk hae@excel.net
- Log in to post comments


Here is another very
Here is another very simple low stress method to kill chickens. Cut their jugular. You'll need a very sharp knife for this.
Sit, stradling a bucket, hold the chicken in your lap on it's back, head down and over the bucket. They're actually very calm in this position. Hold it's head and pull the skin taught; they have very loose skin, so this is actually tricky. Tap just below their jawline a few times to numb the area, then slice until the blood flows freely. They'll twitch in your lap, but because you've been holding them securely, it's not a big problem. They'll bleed out in about 1 minute and the movement will cease.
Interesting thread.
Interesting thread. We raise chickens, and I must agree with the cone/bag method for slaughter. It is quick and low-stress for the bird.
But many will discover that raising chickens only for the feathers is NOT worth it, economically. It's cheaper to buy them. Heck, it's more expensive, even when you use the meat and eggs, like we do. But it's worth it, if you are trying to stay hormone, pesticide and antibiotic-free in what you eat.
Oh Martin, thank god
Oh Martin, thank god for you! I think I was having anxiety attacks everytime I tried to sleep in my bed! Lol even though I had already washed my sheets I will do these steps this weekend thank you again!
I wouldn't worry
Veronica,
I wouldn't worry much about the bed! Wash the sheets and you will probably be fine. The feathers might be dirty, but there are usually no animals or anything similar in them. They smell and are dirty, but that's mostly it. If you don't see anything crawling, you're fine.
I would do the following:
- Soak the feathers in lukewarm water for as long as it takes to get the skin soft and the dirt to loosen.
- Stir and change the water a couple of times to get rid of the worst dirt.
- Simply pull the useful feathers off the skin patches and put them into some clean water.
- Add some mild soap - shampoo or dish-washing liquid - and wash the feathers as you would cloth or any other material.
- Drain and rinse and repeat until the water isn't dirty anymore.
- Remove the worst water by pressing the feathers in a towel.
- Air dry the feathers by spreading them out in a dry place.
or even better
- Dry the feathers in a pillowcase using a blow dryer or a drying tumbler.
- When they are totally dry, store them in Ziploc bags.
That should give you nice, clean, straightened and dry feathers, ready to use for whatever purpose you have.
Martin
I need advice!
I need advice! I bought a lot of rooster neck feathers online they came to me dirty with thick dried crumbling skin attached and smell awful not realising they were dirty I opened the package on my bed. I'm scared I my bed might have been exposed to something even still how do I clean these for use in crafts ect.
Hang the chicken up
Hang the chicken up by it's feet and put a bag over the head. It will go to sleep quickly because the head is covered.
Cut the neck and let the blood drain into a container. It is fast and humane and your meat will not be contaminated with adrenaline.
Thanks for your comment
Chrys,
Thanks for your comment.
Even though it might work to shoot the birds with a pellet gun, I see a couple of problems with the method: some places it will most likely be illegal for non-hunters. Here in Denmark we need to have a hunter's license to be allowed to shoot any animal with a gun. I have no idea whether it's actually legal for hunters t shoot their own chickens, but I guess so.
Secondly you need to be a pretty good shot. I'm sure that I wouldn't have been able to hit one of my chickens in the head while it was running around in the garden - even with a scope mounted. Personally I wouldn't have been able to use that method.
And regarding the feathers... remember that fly-tyers need the feathers on the skin. And I also have a hard time seeing how 95% of the feathers could come off with the simple method you describe. I have plucked a few chickens in my time, and only few feathers came off as easily as you describe.
Martin
The best way
I think the best best way to kill a chicken for dinner is,firstly let the chicken be free range in its penned garden with plenty of edge plants/shrubs and other chickens-no cock. Let each chicken live happy and fed as another person has mentioned here on left over sunday dinner and cooked left over veg.Costs you nothing as otherwise you chuck it in the refuse bin. Wasted good feed,feed it to your chickens,gravy a bonus. Give the birds a 2 year good life,then as they peck about around all morning,by midday after feeding them at 9am,they rest outside the coup. Pick out your dinner chicken,and shoot it clean in the head with a pellet rifle and scope from a window overlooking. Clean kill. Use a silencer so not to upset the other chickens,they will think its a natural death amongst them. Leave the dead bird 10-15 mins before getting it,the other chickens will investigate,as do all animals,including us to see who's dead, Take the dead chicken,and in the kitchen,with a sharp knife,lift the neck feathers usually brown soft and fluffy below each ear,top of the neck where the skull and the neck meet,and cut the artery either side. Then wait 2 minutes for all the brain electrical activity to cease. Grab the chicken head,and with your other hand,wrap your fore finger and thumb around its neck,and pull forcefully down its body a few times right down to its feet,and 95% of all the feathers come clean off in your hand undamaged. Plus, apart from gutting and washing it,you got got a clean bird and good undamaged feathers.
Chinese silk chickens
Hi all, has anyone of you experience with the chinese silk chickens. All their feathers look like those of an Austrich. just smaller.
This race exist as a medium and midget size. I am just thinking of keeping white and brown one in my garden plus a large brown one of a large race. By the way - in every village there is a club for poultry keepers. A beer or 2 and you will have some scalps.
Thanks a lot
hi Martin,
thanks alot for your quick reply and i live in london,england,uk. i will get in touch with my local council and ask them aswell.
It depends
raja,
Whether you can keep and butcher animals in your back yard depends on your local laws and rules, and since I have no idea where you are in the world, I have no idea whether you can or not.
But where I used to live here in Denmark (a normal family house neighborhood in the city), we were allowed to have chickens (and rabbits if we wanted) on a small hobby-scale in the garden or back yard. We had to conform to certain hygiene standards, but we could butcher ourselves locally. We weren't allowed to have roosters (due to the noise).
Martin
Hi guys,
Hi guys,
can we butcher the chicken in our back garden and if we keep quails and rabbits for meat purpose can they be done without a license or not.
Thanks in advance
This is the way we do it
This is the way we do it. you need a cone or some form of restraint for the bird . . .this only to keep it contained and still. Slip the cone over the head and neck pulling it down snugly over the wings .. . . the neck and head will be sticking out. Then just tuck the bird under your left arm (if you're right handed) with the head lower than the body. With your dominant hand spend a minute or two stroking the bird under the chin and neck. the bird almost falls asleep . .. and then take a very sharp (very) knife or old shaving razor and quietly, smoothly incise the artery .. you can feel it with your fingers when you are stroking the throat. The bird usually remains quiet and will bleed out into a bucket placed beneath it. It simply fades away without recognizing its injured and so there is no upset and no fuss. You can skin or scald it as you prefer but the killing part is important for the quality of the meat. Frightened or struggling animals release a lot of chemicals into their system (just as every living thing does when its threatened) and it affects the taste and quality of the meat .. . .so the calmer and quieter the better for the bird and the better for you if its headed for the table.
I have owned and killed many birds
I have owned and killed many birds including chickens, geese, ducks and turkeys. I have read the killing techniques listed here and I think you all would benefit from my experience. Instead of gassing, decapitating or smothering, try bleeding them out. If you don't have a killing cone, simply holding (or hanging) a bird up-side-down by its feet will cause the bird's blood pressure to 'overwhelm' their brain and they quickly pass out. You are then able to stick the bird, right under the beak where it joins the neck, with a sharp knife. The blood will flow immediately and the bird will calmly bleed to death while 'sedated'. A killing cone keeps the bird from flapping in the last throes, but a bag with a hole cut in it will serve the same purpose. I especially like using a garbage bag for large birds: cut a bird's-head-size hole in the bottom corner, put the live bird in the bag, it will naturally seek the hole and willingly put its head thru the hole. Then you can wrap the bag around the bird's feet and hang the whole shebang with the bird having its neck exposed. All flapping is done within the bag and you already have a bag for unused bits. I have found this to be non-stressful for any bird. The meat stays tender, the birds are calm and quiet so the rest of the flock doesn't wig out. Good luck and be nice to your birds!
as to the lady sayin
as to the lady saying carbon monoxide is less painful than carbon dioxide I doubt it. I've had cop friends tell me it's a very painful way to go when in high concentration...makes your throat and eyes burn. When in low doses apparently does not. Either way is pretty silly arguement as if done properly animal is dead in a matter of seconds any way you do it. If you eat any meat at all don't judge other people....something died for that meal. I used to raise and butcher a lot of rabbits when younger. I was fortunate to have grown up around an American Indian reservation in Oklahoma and they taught me respect for the animals. I have never met an animal I could not train....including turtles and frogs. If I provide it a comfortable life prior to its death and use I feel a sense of loss for the companionship that has been lost...more importantly I respect the fact this animal died so I could live. I must then show it respect and provide it a comfortable life prior to its harvest...
Badger feathers are found on many races
Anonymous,
Badger feathers are found on many races of chickens but my own favorites were White Sussex and Wyandotter, which both have some beautiful multicolor feathers with contrasting rims.
For grizzly it's usually Plymouth Rock that rules.
Where to buy?
Well, search the web or your local classifieds to find sources. You want to buy locally... although I did once buy chickens through mail. They were grownup Orpingtons and were literally mailed overnight in a large cardboard box marked "Live animals", which was delivered by our regular mailman (a woman, actually)!
Martin
What type of rooster
What type of roosters do I need to raise to get the badger feathers, and the grizzly, or hackle feathers. Also where do I buy adult roosters for this?
I have my first batch
I have my first batch of chickens that I am rasing for meat and would like to use the feathers for fly fishing. My only problem is that I have a variety of chickens and dont know what kind they are. Would this be a problem for selling the feathers?
Chickens can become tame
Lilly,
Chickens can become as tame as dogs... almost! They can learn to come when you call, can become used to getting lifted and even petted. Whether they enjoy it or not is another question, but lots of kids have had fun with chickens as "semi-pets".
The rest of us who have had them for feather and meat will not get them quite as tame, but my chickens were mostly a bit difficult to catch, but calm once you held them.
Martin
Do chickens let you
Do chickens let you hold them?
I do not think CO2 is merciful
I do not think CO2 is merciful at all; why don't you use CO, carbon monoxide? Easier than obtaining argon, helium, etc!
Haven't you heard of people dying in their sleep from leaving their charcoal in the house or from being in a car with an exhaust leak? Well, that's carbon MONoxide, not DIoxide and if it wasn't merciful, they'd wake up. Haven't you heard of some people even going into their garage to use that way to commit suicide?
I am very surprised you haven't paid more attention to your chickens' behavior as you force them to stay in the can. Even if it's true there's only a "death purr", and no squirming or other behavior you neither see nor hear, this is more than must be with carbon monoxide.
The feathers will most likely be fine
Connie,
The feathers will most likely be fine after the chicken has been dunked and plucked, but it will be pure mayhem to sort them and make them ready for tying.
You will need to separate all good and useful feathers from all the down and the feathers, which have been ruined while plucking.
I don't think the scolding as such will do any harm to the feathers, but as you can almost guess when you see the pile of feathers after plucking, it's the chore of sorting that's big.
Having the feathers on the skin is so much better for the tier.
Martin
I would think
I would think dunking the bird in hot water or any water would ruin the feathers for selling or using for making ties. Can you still dunk the bird in hot water to loosen the feathers and then use the feathers?
what kind of rooster
what kind of roosters give the best feathers for fly tying,also what kind of other foul are raised for there feathers, like peacocks and others.I fly fish and would like to raise some different varity of foul for there feathers but don't know witch ones.any help would be very helpfull. thank -you.
You can pluck
Geoff,
You can pluck the hens and roosters, and yes, the feathers will grow out again.
This method is not uncommon in certain regions, like in Spain where I have seen plucking of the very expensive Cock de Leon feathers from the roosters. The birds didn't seem to mind much, but they were used to this pretty rough treatment.
Martin
What about just pulling out feathers?
What about just pulling out the feathers you need and letting the Rooster continue to live with a few missing.
Will his feathers grow back?
I am certainly no expert
James,
I am certainly no expert! So I won't email you...
But in my own experience the best chickens we had were slaughtered in the late summer when they had grown to almost full size. We had a year with several Orpington roosters (we were not allowed to have roosters in our neighborhood), and these were slaughtered about the time when they started being noisy (very noisy!).
Industrial chickens live as short as 30-40 days before slaughter, but my guess is that ours were more like 100 day old when we ate them. And they were certainly the best chickens I ever tasted!
We have also eaten a whole lot of the older egg laying hens, several years old. They were nowhere near as tender, some of them only suited for soup! But if my memory serves me right, even the older Oprington hens were delicious. They are very meaty birds.
As I said: I'm no expert, so use this information as you please.
Martin
I need to know the best time
I need to know the best time to slaughter Buff Orpingtons for their meat. Only email if you are an expert on this field. I want to know when they are tenderest.
I have always used salt
Rob,
I have always used salt for my skins and never had problems with it. Borax might be rougher on the feathers, but I don't think so. Might there be something with the feathers from the outset? The bird molting or whatnot?
I have been very hard on some skins during the washing and drying process, and never had any problems.
The only time I have had barbs come off was during a nasty attack of some critters in my fly tying materials. They literally bit off the barbs by the root, but only on a few skins. I have since put some repellent in between my stuff, and never had the problem again.
Martin
Great article Martin
Great article Martin, very useful information!!
Today I completed the curing of the neck and saddle of my first rooster following these directions, and they came out great except for one problem: some of the feathers on the neck lost a significant number of their barbs during the final cleaning with warm water(which I did gently). I am wondering if maybe this was due to the fact that I left them cureing in Borax for a few weeks, which is longer than recommended. I also find it curious that it only happened to the neck and not the saddle. Have you ever encountered this problem and do you know what the cause may have been? Thanks very much.
After being abscent
After be abscent from fly fishing and tying for a number of year due to work comitments i am back in the game so to speak............this article was exactly what i was looking for.
Just a tip, if you go and get a yarn or wool funnel, the ones that taper. Small at the top big at the bottom, pop that over the chicken head before you chop its head off it helps not to get the feathers matted with blood
Etienne
Almost all ages
Heather,
I have skinned birds almost all ages. Young ones have some really nice marabou-like feathers (often referred to as chickabou) often in subtle colors, and older ones have the full, dense and colored plumage.
One thing which in my eyes is more important than age is the stage of the feathers. When the birds molt (or moult, shed their feather and grow new ones) some of them will look horrible, while others will just loose a few feathers at the time. This will most often happen in the spring, but may last several months - even though it's mostly over when the birds start to lay eggs again after the winter.
The easiest way to decide the proper time is to get a hold of the bird and check whether there's a lot of newly grown feathers under the body plumage and whether the wing feathers are uneven and not fully grown. The new body feathers will appear as lightly colored "spikes" sticking out of the skin, and are in reality whole feathers emerging in some kind of sheath. If you find many such spikes, give the birds a couple of weeks or more to finish the growing. The spikes all become new, good feathers. The best time to kill the bird for feathers is right after the molting process has stopped but before the feathers become worn or dirty.
Hope this helps
Martin
At what age?
At what age is optimum for feather harvest?
The best way
the best way is to sever the spinal column either by holding the shanks and placing thumb and forefinger around the neck and pulling or placing the birds neck on the ground and using a broom handle lay it on the neck and put one foot on either side of the bird and pull up quick,painless and then just slit throat and they bleed out good too
I just had the pleasure
I just had the pleasure of butchering 6 adolescent and adult roosters for the freezer. Only the adult was skinned, the rest were plucked...not as bad of a chore as most people make it out to be. My favorite way to humanely kill a bird is to have someone hold it quite close to their body and gently roll it over on its back. This kind of relaxes and hypnotizes the bird. After a minute like that the bird is fairly still, I then take a very sharp knife and cut the carotid vessel, making sure I don't cut the esophagus or trachea. The bird bleeds out fairly quickly with its heart still beating so all the blood is removed. Then we skin or blanch for plucking. We don't usually severe the spinal column until after the feathers are removed. It is much cleaner that way.
Back in the 50's
Back in the '50's we raised chickens in Mississippi. Fresh eggs are always good. The way we killed them was simply grab them by the head, wring the neck --until the head came off. They flopped around and bled a lot, but it was quick and efficient. No one in our family then was concerned about saving the feathers. I remember Mother "burning" the pen feathers and hairs off the skin before it was cooked. In those days, a chicken was only killed for special occassions -- like the preacher come home for dinner --{we always liked those days}. I just may get back into raising chickens!!
One of the best dishes
One of the best dishes is made by the French with roosters and is called coq au vin.
The bird then serves a double purpose. It is a waste to throw the meat away. Search the web for a good recipe for coq au vin.
Enjoy with a good bottle of wine.
About dispatching a rooster that is too aggressive
To Warren,
About dispatching a rooster that is too aggressive:
do it in the dark. If they can't see what is going on, they're a lot more calm.
Also I've read that CO2 is actually not exactly the most humane because CO2 triggers panic (just like you would panic if you can't breathe). An inert gas like Argon, or probably Helium, is probably way more humand as they just die from anoxia and sorta fall asleep as opposed to thrashing and gasping for air.
My favorite way is driving two spikes about 1 inch apart into a block of wood, putting the neck between the spikes and pulling on the rest of the body (not hard, just stretch the neck a little), one quick chop with a sharp cleaver and you're done. Just have to hold the wings to keep them for flapping for a little while. Maybe not totally painless, but very quick.
Roosters can be pretty aggressive
Warren,
Roosters can be pretty aggressive and fierce, and some rather intimidating. But... it's just a fairly dumb, small animal (slthough some are bigger than you think), and you ought to be able to grab it. Get its wings collected by the "elbows" over the bird's back and grab the legs with the other hand and you should be in control. Alternatively a large landing net or a sack can be used to catch and calm the bird a bit.
Regarding the killing I would still use my proven whack!/chop! method. being two persons makes this much easier. Poisonous gas, CO2 from dry ice in a barrel may be an alternative in your case. But it's quite an arrangement to set up for one bird. The club and the axe is much easier - albeit also messier.
You may also consider getting a hand from someone more "brutal" than yourself.
Hope this helps...
Martin
Good article folks.
Good article folks. Can you tell me the easiest way to despatch a rooster you cannot catch (and is too aggressive...or maybe I am too chicken myself...) and you want the most humane way (short of shooting him!)
That is, no need to eat him. Just to despatch him...anywhere! Thanks
The information I was looking for!
This is exactly the information I was looking for! I have these beautiful roosters and although they are destined for the dinner table, I hate to waste their feathers. I thought that perhaps there might be a market for them for fly tying.
Have you ever heard of the English way of killing? That seems to be the best way for me. I want to dispatch my birds as quickly and bloodlessly as possible. I get so much enjoyment out of them alive that a quick and relativly painless death is the way to go!