
It seems that it's shrimps, shrimps and more shrimps if you want to tie flies for Baltic sea trout. Here are some old school alternatives – with a twist

Eyes, antennae, mouth parts, thorns, rubber legs, segmented shells, eggsacks, some LCR added and a hook embedded somewhere in there – oftentimes bent beyond recognition and turned upside down.
That seems to be the way that a vast majority of all flies for sea trout are made these days. It's shrimps, shrimps and more shrimps. Green, tan, pink, yellow or translucent. Red eyes, green eyes, orange eyes, black eyes and all kinds of odd things for legs. Maybe some foam just to rub it in.
Heeding the wise words of Bubba from Forest Gump:
“... shrimp is the fruit of the sea.
You can barbecue it, boil it, broil it, bake it, saute it.
Dey's uh, shrimp-kabobs, shrimp creole, shrimp gumbo. Pan fried, deep fried, stir-fried. There's pineapple shrimp, lemon shrimp, coconut shrimp, pepper shrimp, shrimp soup, shrimp stew, shrimp salad, shrimp and potatoes, shrimp burger, shrimp sandwich.
That - that's about it.”
I have to admit that I'm a bit tired of shrimp flies.
It's shrimps, shrimps and more shrimps

Don't get me wrong.
I know that shrimp patterns work, even the odd ones.
I know that shrimps are very important food items.
I love shrimp patterns and have devised and tied a ton of them myself. Shrimp flies that look like shrimp and not like something from outer space, that is.
I have tied hundreds of shrimps, and I have at least a dozen shrimp flies in my box. It’s not like I don’t like shrimp patterns or don’t fish them. But I just see shrimp flies everywhere when people are tying flies for Baltic sea trout. This very site is a part of that trend. We literally have pages up and pages down with shrimp patterns for sea trout.
So to counter this shrimp trend a bit, I decided to do an article on some old school sea trout flies. Some of the ones that I have fished with for decades, and were fished by people who fished the Baltic coasts before me. Sure we have all these flies on this site already, and there's no reason to show them again, so to put a little spice into the dish, I have decided to do them with some variation.
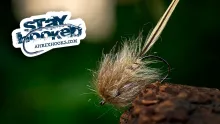
Big Hole Demon with a twist
– different colors.

The Big Hole Demon in its Baltic sea trout style has been a favorite fly for decades on the coasts here. My good friend Niels Have – who is a very skilled fly tyer and angler – hardly fishes anything else on the coast. It’s a good looking pattern that produces.
It’s mostly tied in a black/silver/badger variation. It’s sometimes also seen in a tan/gold/brown color scheme and not rarely in orange or red. So it’s not like there aren’t any alternative versions to the original popularized by Dan Bailey, but originated by a Montana rancher called Pete Narancich. We have told the story about this fly already many years ago, and also shown the most common variations in the article Big Hole Demon from 2008. We also covered the streamer style: Big Hole Demon Streamer.
But black, red and brown is like so last year! Or rather so last decade ...


How about a pink version? Or one in chartreuse? Or ... dare I ... a purple one? Baby blue or yellow, anyone?
It’s essentially just about finding the suitable feathers in any color, dig out some matching dubbing, chenille or yarn and have a go.
Tail and hackle can most likely be found on the same rooster neck or saddle. They are typically selected quite slender, shiny, and stiff, without too much web. Sometimes you can use the tips for tails, and the remainder of one or two feathers as the front body hackle, but I mostly use the really small feathers at the top of of a rooster neck for the tail, and pick a larger feather from the same skin for the hackle.
Personally I don’t mind the fly being a bit “over-hackled”, but some people might find it too bushy. The large hackle makes the fly hover and sink slowly unless you use a heavy hook or add some weight under the front body.


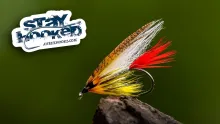
Red tag with a twist
– bright color tag, bright color hackle.

I have fished the Red Tag thousands of times on the coast, and will do so again many more times. It’s a favorite pattern of mine, and I always have a handful of them in my box. It’s taken fish for me under basically all conditions, but is particularly likely to find its place on my tippet when the water is calm and clear and when I’m fishing in the autumn.
I tied it pretty classic style: red yarn tag, peacock herl body and a soft, brown front hackle.
One variation has already celebrated its glory on the Danish coast, and that’s the purple hackle variation called Skyggen or The Shadow, which stems from the island Bornholm.
But why not take the variation a bit further?
The basic fly is the same: a tag, a peacock herl body and a front hackle, but in my variation I have matched the tag and the hackle, and found some colors that I like and I think make a pretty good fly.


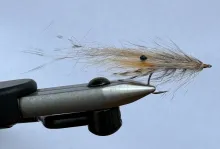
Mickey Finn with a twist
– dull in stead of red and yellow.

This isn’t really a Mickey Finn, but more like a classic shiner or smelt streamer. It’s a type of fly that’s rarely seen on the Baltic coasts these days.
When I started fishing the coast many decades ago, this was a fairly common style of fly, which had a clear inheritance from the classic US bucktail streamers. You would also see Thunder Creeks and Clousers.
These patterns are rarely seen in a Danish coastal flybox nowadays.
That’s a pity, because the bucktail streamer is a very efficient style of fly. It might not be easy to tie well in spite of its humble appearance, but it certainly doesn’t require much in the form of materials.
In this incarnation it’s a ribbed tinsel body and a bucktail wing – light, dark, light like the Mickey Finn’s yellow, red, yellow. It doesn’t get much simpler, but it still looks like a small fish, and is easy to cast and fish with no fuss.


You can vary the colors as you please, but I have opted for some fairly light and earthy colors. The tan version is simply natural bucktail, and the olive and blue ones are natural white bucktail, and olive respectively blue dyed bucktails supplied hairs for the darker part.
In my eyes one of the keys to a good looking bucktail streamer is to dress it sparsely and use very small tufts of bucktail. I tried counting the hairs in my flies, and my best estimate is that there are about 20-30 single hairs in each small bunch, so less than 100 in a full wing. You don’t have to count the hairs, but do keep the small bunches really sparse. It makes the fly look better and also makes it easier to tie. I stack these bunches in the hand to get the tips even, but not totally even.
Also, the wing should ride low, which can be obtained by making the thread foundation under the wing flat and parallel to the hook shank (and not tapered towards the hook eye), and make sure the hair doesn’t flare when tied in. Keep the wing on top of the hook, and strive to make the head as small as possible. It will grow big almost no matter what because it’s covering the hair butts, but few wraps between the bunches is a key to limiting its size.

Martin Joergensen
- Log in to post comments


Sea-run Trout and Coho Salmon
The venerable ol'-time Mickey Finn, a Canadian borne fly pattern, has been vastly improved for fishing in saltwater along coastal BC. The dressing is; silver tinsel body, with a layered wing of yellow Polar bear hair, red Polar bear hair, then several strands of pearlescent Flashabou, all on a size 6 hook. It is called the Pearl Mickey and has built quite a reputation for itself as a top fish producer off the beaches of Vancouver Island. Cheers!
Pearl Mickey sounds like a killer
Rory,
That sounds like a killer pattern. The flash will definitely add some attraction, and when fishing slightly murky or turbulent coastal water, a bit of flash won't hurt.
Exchanging the top wing of the streamer patterns shown here with a few straws of flash would be an excellent variation of these otherwise very stealthy flies.
Martin
More on the Pearl Mickey
I first tried pearlescent Crystal Flash as the topping without much success. After switching to pearlescent Flashabou, that fly became a real hit, especially with Coho salmon. The Crystal Flash added some sparkle, for sure, but that did not seem very attractive to the fish. The Flashabou, on the other hand, gave off a mysterious electric blue-green hue along the top of the fly. That was the key to attraction. More by happy coincidence than good planning. Cheers!
Happy coincidence, indeed
Rory,
You wouldn't think that the choice of flash would make such a big difference, but the Crystal Flash reflects light in a different way with its many small surfaces pointing in all directions. The Flashabou on the other hand, reflects light in glimpses when it turns the right way, and I can imagine that this looks more like a small baitfish turning in the light and emitting a short flash.
It might be me overthinking things, but it sounds plausible to me. And the proof of the pudding, as you know ...
I will try tying some Pearl Mickeys - but probably also try with my "earthy" colors rather than red/yellow only.
Martin
Colour Combinations.... maybe.
Along coastal BC, red/yellow/silver combinations have been mainstay colour combinations forever, when fishing the beaches for sea-run Cutthroat trout and Coho salmon. I am not sure what it is about the Flashabou, whether it picks up hints from the layers of hair below it and refracts the light back as that electric blue-green hue, but whatever it is, seems to be the key to the Pearl Mickey's attractiveness. You may happily find similar quirky results with some of your colour combinations. Cheers!