
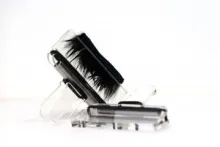
A material spring is a nifty little addition to your vise, enabling you to hold long materials like ribbing or hackles out of the way while tying in other materials.


A material spring is about the most low tech addition you can add to your fly tying vise. It's so simple and easy to make yourself, that buying one seems almost crazy. Sure the store bought ones can be slightly more professional looking, and if your vise manufacturer makes one you may want to opt for the “real deal” rather than doing it yourself. Some also clip on in a slightly more convenient way than the DIY models. But the spring is perfect for a small project, so you might want to give that a chance before buying.
Springs
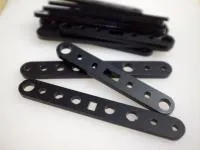
You can make one from almost any suitable spring, provided it's long enough to reach around the vise without opening too much. You need what's called a tension spring – in other words one that you stretch and it pulls back together. You can't use a compression spring, which is too stiff and open in the loops.
Springs can be bought in many hardware stores and builder's markets – online as well as brick and mortar. A selection box with 1-200 springs in different sizes and types will typically run you 5-10 US$, and one of the types is almost bound to fit your vise. This is about what you will have to pay for a brand name spring, so the economy in this project is OK.


Spring length
Springs are usually mounted on the rod that holds the jaws, commonly a simple, round shape. Measure the diameter in the place you want to fit the spring and multiply that with a factor of 2.5 - 3 to get a rough estimate suitable spring length. On rectangular vises like the Regal style, you simply measure width and height and add 1*width + 2*height, which will give you a suitable tension once the spring is stretched around the vise. You want the spring to sit tight, but not open too much.
A suitable diameter for the spring is about 5-7 millimeters or about 1/5-1/4 of an inch.


Attaching the spring
Most tension springs have the last coil in each end bent out as an eye, and that is used for attaching the spring. If the spring doesn't have eyes, most tension springs are thin enough in the material to allow you to bend out the end coils to form them.
A suitable spring can be found for most vises and just connect to itself simply by engaging the two end rings into each other. This can require some dexterity and maybe a slightly longer spring.
Some kind of connector can make the spring sit better and look a little snazzier. A simple rubber O-ring can make a fine connector for a spring and allows for some play. Use a small rubber ring, about the same diameter as the rod or use a short spring if the O-ring is larger.
Another simple construction is using a small piece of dowel wood in a diameter thin enough to go through the spring eyes. A piece of a barbecue skewer or something similar will do the job. Run the dowel through one ring, mount the spring on the vise and run it through the other ring. Cut the dowel so that it's long enough plus a bit to hold the spring securely.
An alternative to the dowel is a thin metal rod or tube. Steel, brass, aluminum or even copper will work fine.
Whether you use wood or metal, you may need to depress or file a notch in the pin to securely hold the spring, which will have a tendency to want to straighten itself and slip off the rod when it's pulled taught around the vise.
Placement and friction
The spring is usually mounted right behind the jaws, far enough away to leave working space, close enough to allow the materials to actually reach it.
If the spring has a tendency to turn or slide, simply add a bit of gaffer tape or something similar under or in front of it. On the rubber O-ring solution mentioned above, the ring will hold the spring in place thanks to the friction.


More laser cutting
On this project I have also experimented with laser cutting some acrylic or plywood profiles to hold the springs, which are good looking and work well, but are also a lot more work to make compared to the simple constructions above.
Also, once you are cutting a more complex shape in a firm material, you need to take into consideration the diameter of the part of the vise you mount the spring on, and make sure the spring rests properly and doesn't roll off the mount because of the tension. In order to avoid this, I played with a holder made from three pieces of acrylic or thin plywood, giving some width and a lot more stability.
But as you can see from all this the laser cut material holder soon develops into something much more complex than the simple construction shown above, but honestly doesn't add much to the function. So stick to the simple solution unless you want to play around with it like I do.
Still it's fun to experiment with these DIY projects, and for those who want to do something similar, I share a file with some of the most successful shapes that I made on this page.


Files for download
If you want to play with the laser cut model, here are the drawings for my most successful design. The base is made from three pieces cut in 3mm acrylic (app. 1/8 of an inch), the central one having hooks to grab the spring. In the drawing you will find two models. One fits a vise that has an 8.5 mm rod connecting to the jaws. That's what my LAW vise has, hence the measure. The other one is suitable for a 6.5-6.7 mm diameter, which is common on the Renzetti vises. If you need something different, you will have to make your own drawings based on this – or maybe with your own design.
Once they have been cut, you have two spring holders for each stem diameter, each with a slightly different spring hook size. You simply stack them with the hook piece in the middle and use a small bolt or a pop rivet to hold them together.
Hand picked for this article
- Log in to post comments
