I have used my fingers and metal bulldog clips plus varying degrees of dexterity for hair hackle loops. I decided to try to make my own material clips for the purpose.


Bulldog paper clamps or clips are as old as Methuselah. The metal version has existed around 100 years, and has been used in fly tying for quite a while. It's great for catching hair or other materials for a thread loop hackle, but not perfect. Still, no matter how much we improve on it and call it fancy names to push it to fly tyers in branded packaging, it's still just a bulldog paper clip. A fancy one, and oftentimes an expensive one too.
Simple construction
Since the clip is such a simple construction, I decided to make it the subject of one of my many fly tying tool DIY projects. I'd like to make a transparent version of the clamp, and having played with a laser cutter and some acrylic for another project, I found clear acrylic to be the material of choice for this tool.
I like to tinker with these projects, and I like to make tools myself where it makes sense. It's not as much to save money as it is to have fun doing it and being able to make my own tools exactly as I want them.


Two flat halves
Since I'd be cutting in an absolutely flat material, I had to make a construction that wasn't three dimensional, meaning that the material didn't have any bends or angles. Simply a flat piece. I also wanted to keep it simple with regards to spring mechanisms and not use metal springs. The ordinary clamp uses a large slit tube made from steel, and that was absolutely out of the question. Some commercial clamps use a bent wire, but bending a steel wire would require more tools than what I had, and hand bending wouldn't be consistent enough for my taste.
I decided to go for a simple rubber band or O-ring solution, where the jaws of the clip was simply pressed together by rubber bands wound around them.


A hinge
I experimented with making a real hinge, but even though the construction did look very snazzy, it would mean cutting hinge parts and gluing them on using solvent. And I'd also need to have some kind of rod going through them, adding yet a step and further materials and complexity to the construction.
The simple solution was just a piece of dowel wood or - a little fancier - aluminum tube acting as the full hinge. This is simply trapped between the jaws and held in place by the pressure of the rubber bands, letting the jaws tip nicely around this simple separator.
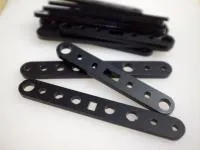
The shape
I used the classic bulldog clip shape as an outset. For size I chose a width of 8 centimeters or about 3 inches, which seemed to suit my needs and the typical width of material I want to handle.
I experimented with different notches and holes to hold the rubber bands and keep the hinge rod in place, but after a few tests, I actually set for the simplest of my designs, which has worked quite well.

Make two
You can make yourself a set. It doesn't require much skill or a tool shop, and the laser cutting can be done by online services as mentioned later. I recommend that you make two identical clips, because some of the tying techniques will require that you transfer material from one to the other. It's also nice to have more than one, because it allows you to prepare more than one color or type of material, and simply have it ready in the clip.
Also, making two or even four is basically the same cost and work as making one. You might need to pay a little more for the cutting if you pay per time or length, but the raw material price is the same since you often have to buy a sheet of material. And the assembly time for a few of these is only marginally longer than for one.
Apart from the acrylic you will need some dowel wood in a thickness of 6-7 millimeters or about 1/4 of an inch. I had some thin aluminum tube lying around, which was perfect and even made the clips a little more fancy to look at.
Laser cutting
Now, I know that few people have a laser cutter at their disposition, but access to such a machine isn't totally impossible. I found one in a so called makerspace, which is a community of tinkerers who fiddle with small and large projects in mechanics, electronics and computers. Such communities are found more and more places, often run in libraries or schools, and access usually just requires showing up and maybe paying a small fee to participate. After that, you to pay for materials while usage of the machines is usually free. One great advantage of makerspaces is the access to expertise and help from fellow makers.


Online services
Alternatively you can simply order the laser cutting online. There are a growing number of places that offer laser cutting from your uploaded designs and mails you the result. You typically pay per length they cut and for the raw material. It's not dirt cheap, but definitely cheaper than buying a laser cutter.
You typically upload your designs as SVG, DXF or PDF. Some places also accept common design program formats such as AI (Adobe Illustrator) or CDR (Corel Draw). You will need a program that allows you to create these files and read what the cutting service requires with regards to lines and colors on your designs.
For the clips I have made, you can also just download the files, which are all ready to be cut, and can be fetched in several formats right here. Each is found in two versions: one contains four jaws, and will make you a set of two identical clips, the other one has eight jaws and makes you a set of four clips.
- Log in to post comments