
What is production leader tying? Tying more than 2 leaders at a time! But, if you are like me, you find out that tomorrow you may go fishing, so you scramble to tie just enough leaders (usually 2) to handle the day and go on with life.
Leaders take time to make, especially to get out the material, find a formula you like, measure, cut and tie. But, I've found that taking an evening or two to tie up a variety of leaders to suit my fishing needs for quite a few trips saves me many rushed prep-time hours in the long run. Preparation and organization are the key elements of production leader tying. But haste in quick production techniques will leave you fishless if you don't tie sturdy leaders! This short piece will lay out the essential elements of tying leaders in bulk more quickly, more easily, with fewer faulty knots and help you use LeaderCalc to your advantage.
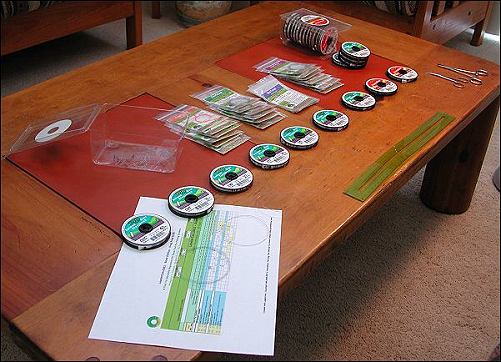 Take time to prepare all materials; organize them in a logical fashion and have all tools and formulas ready. Here, I am preparing to tie about 30 leaders for spring-time seatrout fishing with GFF partner Martin Jorgensen. These leaders are more complex (9 segments) and must be durable to withstand the hardheaded fighting of searun brown trout in the Baltic Sea.
Getting started
After tying hundreds of leaders since the production of Leadercalc in 1999, I've learned many tricks that help speed the tying process. First and foremost, organization is key. The process is not unlike production tying for fishing flies.
 Laying out precut pieces of mono next to the spool helps you determine which piece is next (in case you loose track or are interrupted) and easily identifies the diameter if a piece or two is brushed of the table.
Production elements I find useful are:
- Use an entire table space. A kitchen dining table or a large coffee table in front of the TV are my favorite venues
- Don't work with a window open! That is a surefire way to have a gust of wind disassemble your organization! You'll also loose track of the mono diameters.
- Use your oldest material first. This ensures your material is always the freshest you own.
- Mark your material with the date you purchased it to help determine the oldest-first rule.
- A standard 12-inch (30cm) ruler doesn't cut it. Use a 15" or 20" ruler (50cm) for portability. Or better yet, use a seamstress cloth measure spread across the table length for accurate measurements.
- Sharp scissors or a nail clipper is a must. Used to trim tag ends of your knots as close as possible.
- Forceps are required to tighten perfection or duncan loops effectively in heavy butt section materials.
- You must decide on the balance of time-consuming finesse leaders (more segments, more complex tapers) versus less time-consuming and less complicated tapers of 3-5 segment leaders. Your purpose should direct you: dry fly fishing may require a delicate turnover (= more complex taper), whereas streamer fishing may require something close to straight mono with just a few segments.
- Measure and cut segments a tad longer than the formula requires to compensate for the tag ends that are discarded. I usually measure off 1.5" to 2" more in length (3-5 cm's).
- Formulas are guidelines only. If the formula calls for a segment to be 6" (15 cm's), 5" or 7" (13-18 cm's) segments won't make a big impact on the leader's performance. Getting within a tolerable range is acceptable. It's the overall proportion of butt to mid-taper to tippet that counts. Drastically modifying any of those three elements will have a noticeable impact on the leader's intended performance.
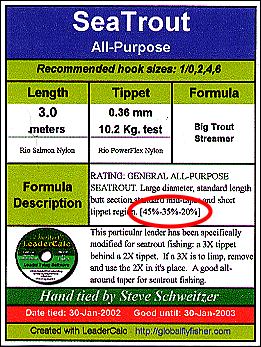 I use LeaderCalc's notes and formula description to my advantage. I include the leader's percentage relationship (Butt%, Mid-Taper%, Tippet%) somewhere on the label. This tells me what I need to know in one glance.
 - Calculate the percentage of butt vs. mid-taper vs. tippet. One element I never go without is the percentage composition of the leader. This simple 3-metric schematic tells me almost exactly how the leader will perform. LeaderCalc doesn't calculate this automatically for you, you must do this yourself. (a future version of LeaderCalc may just have this built in!)
For example: (butt, taper, tippet) LEADER A: 55%-35%-10% compared to LEADER B: 40%-20%-20% tells me a few things: First, LEADER A has a stiff, long butt section, a medium drop-off in the taper, and a short tippet. This leader would work well for streamers or heavy flies. LEADER B has a shorter butt section (less energy transfer) a shorter mid-taper, but a longer tippet. This leader would be good for a more delicate presentation of lighter flies or nymphs.
- Be efficient with at least these three knots: Perfection or Duncan loop, Barrell-knot (also called the Blood knot) and Surgeon's knot. Other knots are nice, but these four are proven effective and can become quick to tie with a little practice.
- Barrell-Knot (Blood knot) Rule of Thumb: for the butt section, using 3 wraps on each side of the barrel knot is sufficient. For the mid-taper, 4 wraps is sufficient. If you use barrel knots for the tippet section (I use the surgeon's knot), 5 wraps is sufficient.
- Use the container for the tippet spools or a nearby trash can to accept the clippings of the mono tag ends. These little clippings are wily and can hurt your feet if stepped on, not to mention they can damage a perfectly good vacuum cleaner! Discard properly.
- Experiment! Tie two or three of a few formulas. Share with friends and get their feelings on how the leader performs. If the consensus is the formula isn't worth your time, make notes in LeaderCalc and avoid tying that particular formula in the future.
- It's best to wet loose knots with saliva before pulling them taught. Amidst leader-tying guru controversy, I pull my moistened knots together quickly; sometimes producing a "chirp". Some prefer to slowly pull them tight to ensure the knot is formed correctly...I don't seem to have that problem using the quick-pull method, but to each his own.
- Don't give untested leaders to friends!
You certainly don't want to at the pointing end of a finger when a fish of a lifetime is lost because your special-secret leader didn't hold up to the test!
A proven productions tying method
 Once a leader is finished, promptly place it in a plastic sleeve, marked and ready for use. It's amazing how leaders can get tangled, brushed away or lost if not packaged soon after being tied. You would hate
to loose all that hard effort, wouldn't you?!
The order of steps I go through in preparation to tie leaders in production fashion are:
- In LeaderCalc, select the desired leader parameters and print out the formula sheet. Highlight or underline the formula using a ruler and marker to make the formula easier to find on the paper as you
are tying the leader. - Print out leader labels in LeaderCalc with the appropriate information. Be sure to calculate the B%, MT%, T%)
- CRITICAL STEP TO SPEED! On your table top: Organize the required spools of material in descending sequential fashion, just as you would build a leader. The photographs illustrate this clearly.
- Measure and cut 2-4 segments of each diameter in preparation to tie 2-4 leaders at a time. Add a little extra to compensate for the tag ends you will discard. Measuring and cutting 2-4 at a time ensures you will have consistent leaders with consistent tapers (measurements).
- Begin the tying process from the butt to the tippet.
- Stretch the entire leader completely to test all the knots. Many times, I have had a hastily-tied knot slowly slip and come apart during the test.
- Only after you have tied and tested an entire leader, cut the tag ends off. Each knot should be uniform and secure.
- Stretch the leader agaqin after cutting tag ends off. This will test the leader one last time to see if any knots will have the potential to slip.
- Using three or four fingers as width, wrap the leader, beginning at the tippet, in a neat loop for placement in a small plastic bag.
- Repeat!
- Log in to post comments


Hi
Leader B is 40
Hi
Leader B is 40/20/20 %. Am I reading this wrong?.
mike
Rajiv,
As you can
Rajiv,
As you can see from the pictures, that's exacty what Steve does. The system even has a facility to print labels for the bags.
Matin
Great article very w
Great article very well explained,just one suggestion after you hv made ur tapered leaders put them individualy in zip lock bags with markings of tippet and fly size.
just a couple commen
just a couple comments
mono deteriates over time. if it is over a year old, throw it away. Thus buy the mono at the begining of the season, and make enough to last the season. Not a "lifetime supply" Orvis has started dating leaders/tippit material..
I find that the best way to carry leaders on the stream is a small photo wallet, rather than a bunch of zip lock bags. That is after loosing s few zip lock bags while shuffling them in white water.
Great site, nice we can exchange ideas/save money without the entries being deleted by the "sponser."
This is a great arti
This is a great article but could you please explain how you identify the But and Midsection of a leader in relation to calculating it's percentage of the overall length?
the page is great...
the page is great....!!!!
Concepts are bery easy of understand