Here's the recipe for making a 'Totally Cool' Wading Stick - Danish Kind. What most people call a wading staff.
The space age tents that are so common now - igloo and tunnel type, even pyramids and classic roof top models - almost all use a special kind of pole: a thin pole 8-12 millimeters (1/3-1/2") in diameter, divided into many sections each a foot-or-so long (30-40 centimeters). These poles are made from glass fiber, carbon or aluminum. I use such poles for making my 'totally cool' wading staffs.
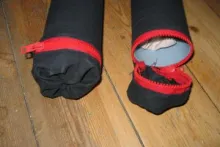
To the left you see the finished foldable staff in its folded and extended version. The staff is kept together by an elastic cord that goes through all sections, and snaps nicely together when you rlease the Velcro that keeps the sections in place when the staff is folded.
It started when I stumbled over a whole bunch of brown glass fiber poles of the kind described. At that time we had two Norwegian tunnel tents, of which the older one had two defect poles. So I thought I could replace them with these new ones.
When that was done I still had a lot of poles. Apart from five or six of the brown glass fiber ones I now also had two black carbon poles from our own tent.
Before a trip to a very rocky island here in Denmark I started thinking about making a wading staff. I had used a stick with a motorbike handle and a heavy brass piece on the tip, but this was just too heavy and clumsy to be any good. What I needed was just a little support on some critical spots and then get the staff out of the way.
I studied the commercially available staffs, but found them expensive and also too heavy in materials and dimensions.
Enter the tent poles. Three or four sections of such a pole would make a great staff. I do the following:
- The poles are held together by a long elastic cord of the bungee type - just thinner. Remove that, save it and take the sections apart. One pole often has enough sections for two or even three staffs.
- Put three or four sections together and measure them for length. If they are too long, mark the bottom and top piece for cutting.
- A good rule of thumb is that the staff should almost reach your shoulder. this might seem too long indoors, but in the water it's nice to be able to reach a bit.
- Cut the two terminal sections if needed - leaving the metal sleeves and enforcement rings that they often have in one end, matching the section it's going to connect with.
- Add a cork handle to the top section. I use either an old rod handle or new rings, and work exactly as I would on a rod. I can recommend a glue gun with hot melt glue for the work, but epoxy is fine too.
- Leave a hole going all the way through the handle. This will be closed with a plug later.
- Sand down the handle when the glue is cured. I simply stick the section in an electric drill and use a heavy glove to hold it and sand paper of increasingly finer grain. Protect the staff with cloth, cardboard or something similar if you want to keep it in mint condition.
- When the handle is ready, you draw a piece of elastic cord through the sections you need.
- Start by tying a knot on the cord. Pull the tag end through the handle section and secure the knot with a small piece of wood and some hot melt glue.
- Now take a piece of wire and draw the cord through the two or three other sections.
- Draw the cord tight - very tight. It just has to be able to give an inch or two when you pull it.
- Tie another knot on the tag end and secure this in the bottom, similarly to the handle end. You might need a plug and/or some glue to keep it from slipping into the pole.
- Cover the tip of the staff with a rubber foot or hot melt glue. I usually add a lot of glue and form it with wet fingers while it settles. This gives you a soft (silent) and durable tip.
- Make a small plug for the hole in the handle, glue it in and sand it smooth.
- The stick can now be 'taken apart' by pulling the sections apart and folding them. It's assembled again by letting the sections go while holding the handle. They will just snap into place.
- I have added a strip of Velcro with a D-ring to the latest models. The Velcro wraps around the sections of the staff when it's not in use, and the D-ring can be used to attach a piece of string or elastic cord to your belt.
- Cut a piece of 'female' Velcro (with the loops) of approx. 20-25 centimeters (8-10") and a smaller piece of 'male' (with the hooks) of approx 2.5 centimeters (1").
- Sow the short piece back-to-back close to one end of the long piece.
- Now form a loop from the long piece so that the short 'male' piece is on the outside of this loop. Let the loop go tightly around the staff and through a D-ring and sow it together 'face-to-face'.
- Slip it on the staff up to the handle and secure the loop with D-ring and 'female' strap just beneath the handle of the staff. I use melt glue for this purpose.
- Run a thin cord (elastic like the one inside the staff is fine) through the D-ring and you are ready to wade.
That finishes today's class in making wading staffs. I can recommend this type of staff. It might seem a bit wobbly at first, but it's more than adequate to support a grown man in a stream. You don't want a crutch - just a light support and 'blind mans pole' to feel your way around.
As stated above this staff is a far cry from the sturdy staffs that seasoned river and salmon fishers use. I have seen people leaning on their staffs in heavy current while casting a spey rod. I wouldn't do this with the Cool Danish Staff! But for support when wading rocky shores and fishing and crossing streams this lightweight staff will do fine.
If you use the aluminum type of pole you get a much stiffer wading staff, which will let you lean harder on it.
As people have said: 'Totally cool'. Don't forget where you saw it first!
- Log in to post comments




Good idea! I was loo
Good idea! I was looking at used ski poles for a wading staff when I came upon this story w/how-to.
I might just give it a try.
You mentioned people leaning on staff while casting, I was thinking about a little butt pad to actually have a one-legged seat while in the middle of the creek/pool! :) Lazy man's fishing! :)