
A digital camera with a good macro facility is the perfect way to take good fly pictures. GFF partner Martin Joergensen has updated his now classical Digitizing Flies article with a whole new chapter on selecting and using a digital camera for fly photography.
It's more than 10 years newer than this and much, much more up to date.
Please notice that this article was originally published in 2002!
Back then digital cameras were few and far between, and film cameras, macro lenses and scanning your flies in a flat bed scanner was the order of the day.
Today most people have a digital camera (or even a phone), which can do more than decent macro shots, and much of what you can read here is very out of date. But the general methods and advice still holds, and the articles should still be worth reading.
This is the most complete lecture on digitizing flies you will find on the net. Its aim is to teach you all the techniques needed for making good fly pictures online. Its lessons can be applied on non-digital flies as well as online pictures of things that are not flies. But its primary purpose is to teach you to get good fly pictures.
Five part harmony
The article consists of four major parts dealing with each their step of the process. These can be read as one or separate parts:
Selecting equipment is the first step.
- Photographing flies
- Selecting and using a digital camera
- Choosing an appropriate background
- Scanning fly photos and flies
- Editing the digital images
- Finishing and saving
Photographing flies
Buy the best 50-55 millimeter macro lens you can afford and a steady tripod.
Photographing flies can be anything from mere routine to a real art. Learn the basic rules here.
Equipment and lenses
Not any old camera
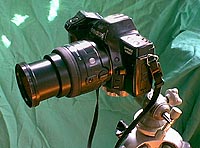
You can not use any odd camera for photographing flies if you want really good results. The most important facility you want is a macro lens. Some compact cameras have a macro setting and some zoom lenses have macro options, but the best solution is a true macro lens.
These come in different focal lengths, but a 50-55 millimeter for a 35mm camera is the best. You can choose a longer lens like a 100-millimeter, but generally you will not need the telephoto capability.
Get the best and brightest lens you can afford. F-stop 2.8 is good, but 3.5 will work. Anything lower (larger number) is not good. With every decreasing f-stop you loose depth of field and have to use a longer exposure, which leads to increased risk of blurred images.
The true macro is characterized by its ability to focus at very short distances - down to 5 centimeters or a couple of inches. This means that the object photographed can become very large on the film. A 1:1 relation between subject and image is desirable - for small flies a 2:1 ratio is even better - in other words an image which is twice the size of the original. To obtain this you will probably have to buy extension ring for your macro.

Most compact film cameras lack a sufficient macro capacity for fly photography. Modern digital compacts are generally better equipped in that respect.
Alternatives
The extension rings can be an inexpensive way to convert a normal lens to a macro. All the ring does is move the lens away from the film plane, leading to a greater enlargement of the subject and closer focus range. The rings are fairly inexpensive, and can usually transfer all functions including auto focus and aperture control.
Another alternative solution is a reversing ring, which you screw on the front of the lens. It facilitates turning the lens, mounting it backward on the camera, which, particularly enough, will give you a fine macro lens. It is only useful for a normal or wide-angle lens, the latter giving the highest magnification. Its drawback is that you loose all automation and will have to set exposure manually. You will also expose the sensitive inner glass surface to the outer environment, which can be hazardous.
Bellows are another solution, which will give some fine results. Bellows like extension rings convert any lens to a macro lens, and will in most cases let you keep all automatic functions. Bellows are a bit clumsy, can be quite expensive and have become a rarity in the catalog of modern camera manufacturers.
The common compact camera bought for the family shots is seldom suitable for fly photos. The common models usually lact proper macro facilities and manual controls.
The development in digital cameras has been rapid and more and more cameras offer a realistic alternative for the fly photographer. Especially the Nikon Coolpix range has shown its value, but other brands and models yeilds surprisingly good results.
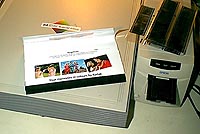
I have used my webcam - a Philips USB model - for making some fine fly pictures. Unfortunately the resolution is insufficient for really critical work, but the lens does extreme closeups and the camera and software is very easy to work with.

Extreme closeup done with a Philips webcam. The original photo is 800x600 pixels, but the quality is still not sufficient for critical work. Click on the picture to see a section of the original photo.
Digital cameras
Digital cameras have become still less expensive and still more popular during the last few years. They continue to be quite costly, but absolutely worth a consideration. The benefits are fast and direct transfer from camera to computer, ridding you of film and development costs and a lot of waiting time.
Unfortunately most digital cameras are useless for fly photography, because they don't have proper macro capabilities and exposure controls. There are models on the market with excellent macro facilities and an increasing number of sites and magazines use them for their fly pictures. But even those camera models that have a macro function are usually not good enough to compete with a fair macro lens on a 35mm camera.
Another reason for the potentially inferior quality of digital cameras is resolution and compression. Dated and inexpensive cameras have 1 to 2 megapixels capacity per picture or up to 1200 times 1600 pixels, while newer ones sport 3, 4 and more megapixels and can offer fantastic resolution.
2 megapixels is more than enough for web use, but only just adequate for print use. You will under all circumstances have to use the best possible quality to be sure about the final result. Many cameras use varying compression schemes which will make picture files smaller but also reduce quality.
If you want to photograph smaller flies like common nymphs and dries, the average digital camera is not a good choice. The better cameras will work well on most flies, but it takes a carefully chosen digital camera - and often a well-stuffed wallet - to get really good, magazine quality digital pictures of all types of flies.
All that said the one great benefit with digital cameras is the short production time. The latency from shot to looking at the picture on a screen is very short, and for web work the digital setup is really a blessing.
We certainly recommend looking into the digital process. More and more of the pictures on GFF are taken with digital cameras - and nowadays most of the fly pictures are purely digital.
Read this chapter on choosing and using a digital camera for fly photography for much more information.
Film
Selecting the right media
The selection of film is far from trivial if you want really good pictures. One rule hovers above them all: when you have found a film you like, stick to that! Switching between many different brands and types will surely decrease your average quality.
The first big choice is between slides and negatives with prints. Slides are generally considered better by professionals, even though the last years has brought print films with almost the same tonal richness and contrast span as slides. Slides have on disadvatage: the need of a slide scanner. If you are not a slide addict and do not plan to buy a slide scanner, use a print film.
Slide scanner addendum
The development during the last few years has brought slide scanners into a price range, where they are absolutely afordable. Slide scans offer great quality - far better than that of paper prints scanned in a flatbed scanner. And the slide scanner scans color negatives as well as slides. The negatives will have a far better tonal range and contrast than any print can offer, and scanning your old color negatives will bring out details you did not know was there.Many of the best photos on GFF have been scanned from slides and color negatives on an inexpensive desktop 35 mm slide scanner.
Select a 100 ASA film. You can opt for a 200 ASA multi purpose film, but for fly photography there is no reason to select a 400 ASA. The grainage of the faster films is not very pronounced, and will not show on the web, but the picture quality, color saturation and tonal richeness is better on the slower films. Use one brand, select a good, stable lab and have them develop your films the same way every time. This is the only way you can ensure consistent results. You might consider having your pictures scanned professionally and put on a Photo-CD. This is a safer and better alternative to home scanning, but also much more expensive. A cheap scanner will cost you little more than what a few good quality cd's cost.
Buy bulk and save money, but make sure the films are fresh and keep them in a refridgerator until the day you want to use them.
The setup
Selecting a background
Use a subtle colored background. Most fly photographers prefer baby blue, but pale yellow or cream will work nicely. Avoid harsh colors and black as they compete with the main subject of your image. Adjust the background distance from the fly to help minimize shadowing.
Fabric or cloth of some kind can be good alternatives, but cardboard is by far the easiest to handle. You can consider using different textured materials or metal plates, but beware of the demands this puts on the light setting. If your purpose is documentation, like illustrating tying steps or showing flies as true as possible, use the light blue or light gray background.
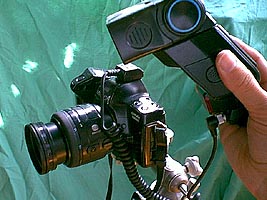
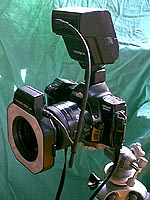
A ring flash (right) is an excellent flash for fly photography, but also an expensive alternative to a regular flash (left).
Proper contrast and light
Contrast and light in the original has to be as good as technically possible. Dark, unexposed spots or light spots that contain no details are a waste of film. They can never be salvaged unless you manipulate details in there in your photo-editing program. Likewise there's no reason to make flat pictures with too little contrast, not exploiting the contrast range of the film.
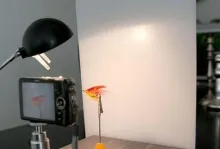
The easy way to obtain good lighting results is by using natural light or several lamps and white paper or tin foil. The paper can be used both as a softener and a reflector while the foil will reflect light in a random pattern.
Setting the light
You can decide whether you want to use a flash or common lamps. We recommend lamps because of the control you get with the distribution of light. Shine light at multiple angles to minimize shadowing. Since most of us can not afford studio-quality lighting, we are forced to use what the household can offer. Use both fluorescent and incandescent lighting to place a nice blend of blues and yellows in the lighting mixture. Low voltage halogen light has a whiter hue, which can be used alone. Unfortunately the lamps give a very sharp light, and some kind of softening is required.
No matter what type of light you use, you can always edit out the hues you don't like later. See also GFF's Tips for Calibrating your Digital Camera or Scanner
It will generally give better results than a flash unless you are very familiar with you flash system, preferably have several flashes, and you have a softening device for them.
A flash right on the fly will give very poor results, and the danger of the light fully missing the fly is greatly enhanced because of the short distance between subject and lens compared to the distance between the flash and the lens.
Ambient light or backlight can highly increase the aesthetics of the picture, shining through hackles, wings, fur, and fuzzy bodies.
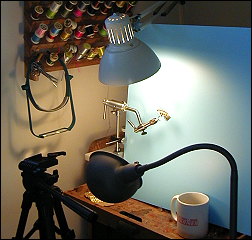
This is an example of projecting incandescent and fluorescent lighting from 2 angles against a baby blue backdrop. Notice the tripod used in keeping the camera still. Also notice the fly shadow is well below the horizontal plane of the fly. The shadow will not show up in the final photo.
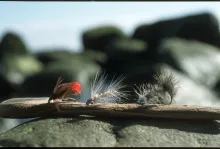
Using nature
Natural light is a great alternative. Don't use direct sun, but find a bright place with no direct light. Overcast days can also produce a great light for your flies, and if you like pictures with the ambience of a natural background, an outdoors photo session will guarantee the light supply.
For backgrounds you can choose natural scenarios, plants, tree trunks, stones or whatever natural material you like. Be very careful that it does not spoil the clarity of the fly, which after all is the subject you want to be clear in the picture.
Holding the camera
Mount the camera on a tripod or clamp to steady it. Don't even think about trying to take a still picture free-handed! You'll get shaky results.
Most tripods will do, but a heavy and steady one is best while the flimsy, tabletop tripods or Grandpa's old antique specimen are not good choices.
You can also mount a tripod head on a clamp. This will allow you to set the camera on the edge of a table, the back of a chair or any similar place.
Holding the fly
Place the fly in a vise, and keep it away from the background. We prefer to have the fly in a vice, because it will give the familiar ambience to the picture, but a pair of tweezers, a pair of pliers or even a hackle plier can be a possible alternative. A clip mounted on a piece of flexible cord can be a good tool, as you can place the fly exactly as you please by bending the cord into the required position. The clip is not exactly charming in the picture, though.
You can also select various branches, pieces of bark, an old bamboo rod or a similar object, and just stick the fly into that. Use a clamp or clothespins to hold smaller foundations steady and in the proper position while you click away.
A very nice article on close up photography. There are a couple of things that you might want to consider:
1. It is normally considered a mistake to use any light source that is not close to the wave length daylight. The exception to this is when you are manipulating the colors for artistic purposes. Excessive color correction during during the production of photographic prints generally results in degradation of the image. There are several methods of avoiding this problem:
a.) Use a color corrected bulb that works in a standard screw in light base. These are available at most good professional photography stores.
b.) Use strobe lamps.
c.) Use indirect window light.
2. As a person becomes more adept at photographing flies, he or she may want to use a 2 or 3 light set up using a second light for the background and a 3rd light as a back light to highlight the edges of the fly.
Sincerely,
Jerry Morton
Exposure
Shutter and f-stop
Force the camera to use the highest possible f-stop. Between 8 and the maximum of the lens - typically 22 or more - will give you the best assurance of a sharp picture.
Let your camera decide the corresponding shutter speed. If you want to be sure about having at least one good picture, you take three: one a single step underexposed, one on the spot and one overexposed. White and black flies can be particularly tricky, and the three exposures can save the effort put into a photo session.
Most SLR cameras have a function, which allows manually over and under exposing pictures. Use that. In stead you can manually override the automatic exposure. If the camera says a 250th of a second at f-stop 8, take one picture at a 125th, one at 250 and one at a 500th of a second or vary the f-stop in the same manner - 5.6, 8, and 11.
Sharpness
Focus manually in order to get the center of sharpness exactly where you want it. Don't trust autofocus for this purpose unless you are forced! Use as high a shutter speed and f-stop as possible. If the setup is steady, prioritize a higher f-stop over the shutter speed unless you purposely want the depth of field to be small. Shutter speeds down to 125 or 60 will do, but lower will increase the risk of blurred pictures.
Depth of field
When you take a picture of a fishing brother holding a trophy trout he will usually be sharp. The background will usually also be sharp. Any branches or rocks in the front will also be sharp. Altogether the depth of field will be several meters, dozens of feet - even miles and kilometers. Within this distance everything is sharp. But the closer you go, the less this distance will be, and when you get really close within 30 centimeters or a foot, the sharp distance can be narrowed down to a couple of centimeters or less than an inch. When you get really, really close, the sharpness will not even be good enough to render a whole fly sharp. If the hook is sharp, the hackle tips will be blurred and vice versa.
You have a way of controlling this distance. By using the aperture of the lens you can increase or decrease the distance. The higher the aperture or f-stop is the better depth of field. Unfortunately this has a price: you will loose light, which again means increasing your shutter time. This again leads to the risk of shaking the camera and blurring the images.
The best SLR cameras and lenses have a small lever or button, which can activate the aperture before the camera exposes the film. This gives you a chance to check the depth of field in the viewfinder.
Composition
The rule of thumb is go close! A true macro lens or a lens with macro facilities is definitely the best for the purpose. Flies are small, and getting them to fill the frame is a must if you want good pictures.
The usual way of depicting a fly is seen from the right side - the head pointing to the right and tail to the left. This is good for descriptive pictures for use in pattern documentation. It does not show the three-dimensional qualities of the fly, which will only be visible if the fly is taken from an odd angle. Using odd angles can also be good for showing details or particularities of certain flies.
Selecting a digital camera
Update to the update to the update
- March 2010
It should be obvious considering the development within digital cameras during the recent years, that I have had no chance to keep up. I myself have eaten my way though several generations of digital cameras, and although I have kept to Canon Powershots, the model I have today (D10) can both do video in decent quality, does excellent macro, delivers 12 megapixel images in stunning quality and is waterproof on top of that! Most modern compact digital cameras will deliver great images these days, and all I'm concerned about regarding fly photography is the macro. The closer the better, and a macro limit of about 1 inch or 2-3 centimeters seem to be the standard for the best cameras. Aim for that and you will be fine. And then enjoy the text below and the ancient cameras - the message is still true, but technology has outrun the gear.
Update to the update
- June 2005
The camera section of the article "From Feathers to Bits" was done in early 2004 in a feeble attempt to keep the article current with the development in digital cameras. Needless to say that the effort has been almost fruitless. The cameras mentioned herein are now several generations old and no longer available.
My recommentation to people who want to acquire a digital camera for macro work is to heed the general advice given here and read reviews from a more current source such as Digital Photography Review, which in my opinion is the best site on the technical side of the subject.
Update
Much water has run under the bridge since this series was first published many years ago. Most of it still withstands the sharp teeth of time, and apart from a couple of Photoshop upgrades and a few niftier and less expensive scanners, what was said in the original article is still very much true - except for in one area: digital cameras. When this article was coined there was no digital camera on the market that could offer justice to flies in the quality we demand. That has changed!

Flybox |

A bunch |

By the water |

Nikon CoolPix 775 |
The new breed
The first digital camera I played with for a longer period was an Agfa ePhoto 780, which was a wonder when I got it, but with its 640*480 pixels pictures, slow reaction times and enormous appetite on batteries, was somewhat an torment to use. And its macro capabilities were non-existent.
It was impressive anyway, but just not for this particular use.
2 megapixels
After the Agfa came many other models. I have tried Nikons, Olympuses and Canons by the score, and over the years their performance got better and better.
The Nikon 99x's (990, 995 and later 4500) were the first ones I saw with really good macro facilities.
The digital camera I use now is a very modest Nikon CoolPix 775. At just 2 megapixels it will impress no one these days, and the current model (Nikon 2100) is available at very reasonable prices - about US$ 200.- in the US or 200.- Euros in Europe - a bit more these days.
It still has what I need: good facilities, sufficient resolution, good optics, compact measures and first of all that really great macro mode.
All this just to say that a skimpy, inexpensive 2 megapixel camera will enable you to take some really nice pictures, both for web and print use.
This said I have to add that my good friend Henning just bought a Canon PowerShot A80, which has a resolution of 4 megapixels. And indeed, there is a difference. His camera more than doubles the quality of what I can produce with my slightly dated Nikon. Were I to buy a camera today, I would definitely consider nothing less than 4 magapixels.
(PS: I actually did buy a Canon PowerShot A80 after having written this, and I'm very happy with it.)

A real oldie: Agfa ePhoto 780 |

Ye olde Agpha |
What to look for
I will exclude the digital SLR's. People who buy these expensive and complex cameras usually need little advice from guys like me. They are nice cameras, but still out of the price range for most of us.
I also part with the idea of buying an pricey high end camera without an interchangeable lens. If I were to spend that much money, I'd buy a true SLR anyway.
That leaves us with a bunch of low and mid range compact style cameras from a whole bunch of manufacturers.
When you go looking for such a digital camera for fly photography, consider the following aspects:

Size compared |
 and a 4 megapixels picture of the same fly in the same lighting situation. As you can see it is not only the size, but also the number of details that differ.")
Details compared |
- resolution
- lens quality and zoom range
- macro facilities
- memory type, amount and limits
- physical format and layout
- battery type and capacity
- facilities
- flash capability
Resolution
You want as much as you can get and at least 3 or 4 megapixels. The best high end compact cameras offer 5 and 6 megapixels - even 8. Nice but no necessity if your aim is to publish on the web. For print work 6 megapixels is great, but I have had 2 magapixel pictures printed with good results.
Still, there is no reason to go for 2 megapixels or less. Prices are low enough to justify better. If you are so inclined, last year's 2-3 megapixels model may do it for you - as it has done for me for a long time. Most of my digital fly pictures here on GFF have been taken with a 2 megapixels camera, and for web use that is more than sufficient. If you want pictures for print, 4-6 megapixels will be nice.
Lens quality and zoom range
It is not for the sake of your blue eyes that manufacturers advertise Carl Zeiss lenses and multi layer coatings or mention good lens quality and high light sensitivity.
The lens is the first step in the light's path to the good picture, and it has to be good. Many of the less expensive cameras have mediocre lenses with distortion, blurred edges and corners and other optical errors. Avoid them.
Notice the lowest aperture of the camera. The lower the better. 2.8 is excellent. 3.5 is good, but 4.5 or even 5.6 may give you a hard time when light levels are low.
Also make note of the zoom range of the camera. Get the information as 35mm equivalent - meaning "as it would be on a 35mm (24*36) SLR camera".
Wide should be wide - 35 mm or less and tele should be 100 mm or more.
Ignore all praises of "digital zoom" and 12 or 20 times zoom ranges. This is nothing else than a cropping of the picture followed by an extrapolation, and gives inferior quality.
Digital zoom is much better performed by a good photo editing program than by the camera - and is best avoided altogether.

This is the same section of the fly enlarged to almost the same size - exactly 200 percent of the original for the 4 megapixel picture and exactly 300 percent for the 2 megapixel. The enlargement has been done with very close attention to maintainin the original detail level and the pictures have been saved in high quality JPEG-format. Hold your mouse cursor over the picture to see the high rez picture and move it out to see the low rez.
You can click here to see the full, unmodified originals as they came out of the cameras:Nikon Coolpix 775 (2 megapixels) and Canon PowerShot A80 (4 megapixels)
Macro facilities
If you want to do fly pictures - which I assume you do, because you are reading this article - you need a proper and well above average macro mode.
This means a close range of about an inch preferably less and certainly not much more. A subject 5 or 10 inches from the lens will never be close enough to be close up. You need to get so close that a fly size #6 or #4 will fill out the whole picture. If you want to depict even smaller flies - like #22 midges - you need a really good macro or an additional closeup lens.
Many cameras are sold with macro facilities that are not nearly good enough for fly photography. Make sure that the closest range in macro position is close enough for your needs by testing and reading specs and reviews.
Memory type, amount and limits
Cameras use a number of memory types. Almost all come in the form of exchangeable cards that can be inserted and removed from the camera.
Avoid all cameras with built in or fixed memory. You will need to be able to exchange and expand memory.
What type you select is a matter of taste - and partly price.
The least expensive type is Compact Flash. These cards come in many capacities from 16 megabytes to 4 gigabytes and even more. Some cards even contain small hard disks! The format is common and widespread.
Less common are Sony memory sticks, SmartMedia and the recent and fast emerging SD cards.
Personally I opt for the Compact Flash because of their price, availability and versatility. A lot of cameras use them, and my Minolta Digital SLR uses them. My family's two Canons and a Nikon use them and they all share cards, which again can be shared with a bunch of friends whose cameras also use CF cards.
And how much memory do you need? Well, that depends on how lazy you are and how often you can empty the card. For table top use the 32 Megabytes card that comes with many cameras can be fine.
But for more flexible use get at least 128 Mb no matter the resolution. That will give you about 130 pictures in a 2 megapixels camera and half of that in a 4 magapixels model. I prefer cards, which have room for at least 50 pictures, and 100 is even better.
Buy several cards in stead of one large if you have the need for more pictures. 4 cards of each 256 Mb will yield one Gigabyte and probably cost you less. It will diminish the risk of loosing all pictures on one card due to breakdown or theft. Loosing a quarter of your production is bad enough.

Canon PowerShot A80 |

Flip out LCD |
Physical format and layout
There are a number of different physical formats on cameras ranging from true SLR's with interchangeable optics over ordinary compact camera formats to the very compact, ultra small cameras. In between - or outside of that range - we find the radically differently designed cameras with tubular bodies or parts that swing and turn in different ways.
I personally prefer an ordinary, not too small, compact camera if I cannot get an SLR.
Midrange and top-of-the-line compacts have LCD screens that are swivelled and can be swung out and angled - much like we see it on modern camcorders. These are extremely convenient, especially if you do a lot of macro work, where the camera often will be mounted low, and an LCD on the back side of the camera will be hard to see.
I also like a small hand grip and a large shutter button, but your mileage may vary on this.
Battery type and capacity
Most cameras still come with rechargeable batteries and a charger. But as competition gets sharper and prices fall, even the large manufacturers choose to leave out rechargeables and go for standard AA or AAA batteries.
No matter what, you will need rechargeable batteries. If your camera don't come with them, buy a set. Make sure that you get high capacity cells (1800-2300 mAh) and an intelligent charger that can recharge them in less than an hour - and maybe even goes in a plug in your car. Low capacity cells and slow chargers will kill you.
Standard battery sizes are nice because you can get them everywhere, but only use them as a backup if you are not able to charge the rechargeable ones.
Some cameras come with an AC adaptor, others have this as an accessory. If you shoot a lot of fly pictures on a table top, this might be a good solution for keeping the camera working for long hours without battery wear.
Facilities
The facilities in even modestly equipped digital cameras are so numerous that it is far beyond the scope of this article to cover them.
I will stress three factors that are useful in fly photography:
Macro again. Macro control must be above average.
White balance. Make sure you have many setting and a manual override.
Manual settings
. Not a must, but certainly nice to have. Aperture control is particularly nice if you want a good depth-of-field.
Remote control. The ability to operate the camera from a computer is very welcome when you do alot of fly pics. This can save the whole transferring step.
Apart from that, you need to be able to shut off the flash on purpose and a delayed shutter is also nice to avoid shaking the pictures.
Flash capability
I don't stress this aspect very much. You will not need the flash for fly photos. Ambient outdoors light or a good set of lamps is a much better option, and the built in flashes in smaller cameras are no good for macro photography anyway.
Some cameras have hot shoes or sockets for external flashes, and with a couple of good flashes and some care taken in the setup, you can get some good results.
But lamps are easier to control, and the reddish tint of their light can easily be adjusted in the camera or in a photo editing program.

Rounded background |

Two lamps |

Flipping out |
Lighting
You will need good light for good pictures - and plenty.
The sun is a very good source if used properly. Some of my best fly pictures have been taken on the porch under a large white sun shade, which softens the sun perfectly. Hazy days are also good, and thin clouds with weak sun seeping through is also OK.
There are only a couple of disadvantages: you have to wait for the proper light and you have to get outdoors.
Artificial light for photography used to mean flashes or large, specially designed lamps. But you have two things working for you here: the size of the objects you want to photograph and the white balance control of digital cameras.
These two things mean that smaller, inexpensive lamps will do fine. My coauthor Henning bought me three cheap, 50 Watts halogen lamps at less than 6 $US a piece. These are now my studio lamps. Combined with various cardboards for backgrounds, tin foil and black and white sheets of paper, they form a perfect little micro studio, well suited for fly photography.
I use the iridescent light setting or use a standard grey card to adjust white balance, and fiddle with the manual settings for aperture and shutter to get the right light. And I take dozens of alternative pictures of the same fly until I get what I want.

Micro studio |
Choosing a background
Selecting a background for your fly photos might seem a trivial task, but trust me: it is not!
The background can consist of everything from the same uniform colored surface to all kinds of materials in strange colors.Next to this text you see a series of fly pictures - the same fly photographed on a selection of backgrounds in varying materials and colors. You can fiddle with them by clicking on one. That will take you to a page where you can experiment and compare the effects of changing the background color and material.
Identical pictures
As you can see the impression of the fly varies greatly with the background. I have tried to make the pictures as identical as possible, and all pictures are exposed manually at the same shutter speed and aperture as well as the light setting has been exactly the same in all pictures.
I have tried to vary color as well as texture and degree of reflection - some materials are dull and some are shiny. Some are also translucent or perforated. These have all been set up in front of a uniform blue background.

Black |

Blue |

Brown |

Green |

Grey |

White |

Blueish |

Cream feathers |

Furnace feathers |

Metal grid |

Blue feathers |

Cardboard packaging |

Newspaper |

Pink feathers |

Plastic |

Fabric |

Weave |

Wood |
Careful with colors
Personally I like the textured bacgrounds, but as it will clearly show here, such a material has to be chosen with care. The basket weave and furnace neck might offer interesting backgrounds, but the fly doesn't really show well on either. The same goes for feathers or other materials, which are too close to the fly colors. Pink and blue necks to match the fly colors may seem harmonic and suitable on paper, but in real life they make parts of the fly invisible.
What's the best background?
Depending on your purpose of photographing a fly you do have some options. My favorite fly pictures are taken by the water and not in a studio, but if the target is to document the shape and color of a fly, a neutral grey, blue, green or white background is probably best. Light textures like wood or more erratic color blends can do too. And of course black. Most things look great on black, but it can be a difficult color to work with and it requires a lot of light.
A comment arrived from Danish Peter Lyngby - one of the forces behind the Danish site ScandicAngler.com:
In my defence I need to say that these pictures were shot several years ago, when the digital cameras had just started coming, and I was handling an expensive golden nugget worth close to a couple of thousand dollars, just barely able to handle 2 megapixels! It's a crazy world...


Scanning flies is NOT recommended as a good method and the chapter below is only kept as a historical reference.
Many tiers want to get pictures of their flies into the computer for web, application or print use or just to have as a nice wallpaper or screen saver. Here's how you do.
Selecting a scanner
Flatbed scanner
The flatbed scanner (left) is definitely the best choice if you want a universal scanner. Buying a slide scanner can be a good second choice if you have lots of slides or want to handle negatives.
The easiest scanner to use and least expensive to buy is a flatbed scanner. These have fallen drastically in price and the quality is better than ever. Get a letter size or A4 scanner. The quality of the absolutely cheapest ones reflects the price, but rising just above the level of cheap will bring you into the amazing quality of the lower middle class. These scanners have an optical resolution between 300 and 1200 dots per inch (dpi). Aim for at least 600 dpi both vertically and horizontally. Ignore all praises that say 3600 dpi or even 4800. This is a purely software based resolution, which is created from the same optical results as any 600 or 1200 dpi scanner can produce. Your picture will not get better by increasing the resolution beyond the optical resolution - just larger.
Go for brand names and make sure that you get good software. The best software is usually light versions of the bigger and well-known applications or serious, tailor made applications. Do not content yourself with so-called user friendly, easy-to-use programs with naive, colorful user interfaces and lack of manual controls. You need to be able to manipulate all aspects of the scanned pictures to get the best results. See "GFF's Guide to Digital Picture Afterwork" for more information on the demands on the program.
You must also reassure yourself that the scanner has a plug-in or Twain module, which enables it to be used from literally any photo editing program.
Slides and negatives
Slide scanners or scanners with transparency adapters can scan slides and film negatives. Both types of originals are usually better than prints, which as a rule of thumb always will contain more contrast and less tonal richness.
Most slide scanners have configurations for both positives and negatives, and it is important to choose the right settings. Scanning negatives in slide mode and then inverting the pictures is not adequate.
True 35 millimeter slide scanners are still rare, but falling in price. Many flat bed scanners can be equipped with a slide unit, but these will not enable the scanner to scan the common 35mm slides in a proper quality. The basic resolution is not good enough. If you want to scan 35mm negatives or slides, we recommend that you buy a dedicated slide scanner. It will add to the equipment bill, but the result is pro quality scans.
The scanning process
Scanning prints
The most straightforward way is to scan a good photo of the fly. You can learn how to get good pictures of flies by reading the "GFF's Guide to Photographing Flies". The common flat bed scanners can take any common size print.
Scanning is an art onto itself, and much can be done in the scanning and following process, but one rule is of utmost importance: always have the best raw materials. Photos should be:
- properly exposed
- sharp - also in the depth
- with proper light and contrast
- well composed
When you scan, make sure that you use the optimum settings in your scanner program. Many programs have automatic exposure, which is worth trying first. Often it is needed with some manual fiddling - especially if you are working with pictures, which are beyond the average. See "GFF's Guide to Digital Picture Afterwork" for more information on this process.
Scanning flies
If you have a flat bed scanner, you actually already have an excellent large format digital camera. In this case you should certainly try scanning flies directly in the scanner. The results can be amazing. And it is the fastest and easiest way to get your flies into the computer.
The method has its limitations. It is quite difficult to do anything artsy and the three-dimensional effect is limited. You can practically only depict the fly from the side and large, round flies or flies with very large, stiff hackles can be difficult to catch properly on the picture. The depth of the picture is also limited, so backgrounds, as you know it from real pictures taken with a camera, are usually not an option.
But there are a few ways that you can make your scanned flies look good.
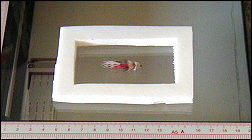
This is an example of a home-made scannerbed fly frame. It is about 3/8" thick and prevents the scanner lid from smashing a small 3D object like a fly. It also allows the scanner light to dispurse and minimize scanner shadowing.
Keeping from squashing
The scanner lid can be a big problem. Usually we just tip down the lid and scan, but a size 12 Royal Wulff will not look good after a squash in the scanner. You can place a suitable object to hold the lid, but a better solution is a small stack of thick, white frames made from construction foam. Make a set of small frames out of white construction foam. The total thickness is 3/8" or 2 centimeters. Place the fly inside the white frame and lay 2 pieces of bright white laser paper on top as a reflective device.
The whole setup will not only keep the flies from being smashed, but also act as a reflector, dispersing the light, resulting in a better picture.
Other backgrounds
If you want a different color background, you can substitute the white paper for colored ditto - light blue or cream is preferable - but it is absolutely worth experimenting with other backgrounds such as textured paper, book covers, fabrics, plastics and materials like wood, bark or metal.
An alternative is to just leave the lid open! Depending on the room above the scanner, this will give you a pitch-black background or something quite dark. This is especially useful for light, translucent flies, which has a tendency to disappear on a white background. You can also experiment with backlight where a normal lamp casts a light on the fly on the glass plate of the open scanner. You will have to experiment with softening the light and moving the lamp out of the view of the scanner.
Mounting the flies in small objects such as cork, straw or small wooden sticks can give you control of their position and add to the dynamics in the picture.
Upside down
Many scanners will cast a shadow when scanning three-dimensional objects. This shadow will usually be on one side of the fly. Make sure that it is on the underside - making the light appear to come from above the fly. If it winds up on top of the fly, your fly will appear illuminated from below, which is very uncommon and strangely looking.
To correct the problem, you just rotate the fly 180 degrees horizontally in the scanner - turn it upside down.
Clean your scanner!
Many scanner glasses and lids are dusty and dirty. Use your normal household glass cleaning agent and a soft cloth or tissue and wipe off the glass and the inside of the lid. Make a prescan while the lid is open. This will reveal smudges or fingerprints, which otherwise can be hard to see.
Saving Pictures for the Web
Final compression and using the right format can be as important as taking good photos and scanning them correctly.
Scale with care. Use an anti alias scheme if available followed by a gentle sharpening.
Scaling
Sizing process
You are now getting closer to the final product. It is about time you scale the picture to its final size. Scaling is also a process that can ruin a lot. No matter how you attack it, it will remove details from your picture and potentially blur it into obscurity.
You want to make sure that your scaling process uses some kind of anti aliasing, interpolation or resampling scheme. This means that clusters of pixels will not only be joined to one average pixel, but there will also be some adjustment of surrounding pixels to make the transitions smoother. This will fight the tendency to form jagged edges, but will also introduce some additional blur to the picture.
After scaling you will want to use a sharpening filter again to remove the blur introduced by the scaling. This time the sharpening can be a little more aggressive, and running the process twice can sometimes be an advantage.
At this point you should have a picture, which is as good as it can be for your purpose. You're ready to save your work.
Final files
Compression
These pictures are meant to be used on the web or as attachments to e-mails. This means special demands on file size. You want the files as small as possible to save bandwidth and transmission time, but on the other hand you certainly don't want to loose all the quality you just put in there. No matter what compression method you use and which file format you choose, you will loose quality when compressing.
The solution to this schism is to use the best possible tools and individually tune every single picture. You will also want to monitor every step and preview your pictures in a browser.
You can choose separate programs for the job or you can use plug in filters. But notice that most standard functions in the photo-editing programs are not adequate for the maximum quality and compression. They do the job and generate the files, but don't exploit the formats and techniques to their full extent.
The file formats
There are basically two formats, which are useful for the web: GIF and JPEG. A rule of thumb is JPEG for photos, GIF for graphics and logos. None of these are particularly good for storing the originals, as they both manipulate the picture with a potential loss of quality, but each has advantages in making small files, which load fast and work in a manner suitable for web use.
JPEG is the one that can make the smallest files, but also the one that can do most damage. The JPEG format can be compressed in different degrees, and if you use too high a compression factor, you will wind up with a very poor picture. JPEG alters the picture and will leave obvious, visible traces in the picture. On the other hand JPEG-compression can do wonders to file size with almost no trace of compression.
The danger of JPEG lies in large areas of almost uniform colors, which can get a strange box-like structure when compressed too hard. A discrete blue background is a good example of such a fragile element. Pictures with more details, hackles, feathers, dubbing, mixed colors will render well with JPEG-compression.
GIF works in a different manner. GIF does not alter the picture as such, only the colors. The maximum number of colors in a GIF picture is 256 - in some cases 216 as we will see later. These colors can be selected from an almost endless scale, but you can only use a limited number. GIF works its magic by this limitation and compressing the picture in a way that does not deteriorate it.
Palettes
As mentioned GIF works partly by limiting the colors. The color collection used is called a palette. The palette is limited to 256 colors, but by further reducing the number of colors you can compress the picture significantly. Naturally a picture with 64 or even 32 hues has a less chance of representing the content properly, but it is absolutely worth looking into the GIF as an alternative to JPEG.
If you want to make GIF's which come out as good as possible on all systems, you have to fall back to the so called browser safe palette of 216 specific colors. By doing this you severely lessen your chances of showing a perfect picture, but you do enhance your chances of having the picture shown on the user's screen the same way as it is shown on yours. JPEG will do the same, though.
GIF is undoubtedly the best format for logos and graphics, which contain areas of uniform colors, but for fly pictures it is not the greatest file format.
Interlacing
Both GIF and JPEG can be interlaced. Interlacing is a technique by which the picture can be shown in stages - typically three or four - with increasing quality.
When the picture loads, it is shown in a rough version at first, and through a few iterations, it is completed to its full quality.
The purpose of this is to give the user a chance of judging the picture before it is fully loaded. This is no longer as needed as it was in the prehistoric Internet age, but for large pictures it can still be convenient. When you interlace a picture it can sometimes grow a bit.
Save your work
When you are satisfied with the result it is time to save your work. This stage is the refined stage, where the picture is in its optimal quality regarding web use. It is not suitable for anything else than putting on a web site. If you want to store it for future use, work on it again or print it, return to the last saved TIFF-file, where the optimum quality can be found, or work from the original, where all the picture's original details are present.
Editing images
Handling you electronic pictures properly and using the right methods and tools can greatly enhance the results.
Working with originals
Two worlds
Before commencing we want to stress one particular fact. Please notice that there is a huge difference between the demands on pictures for web use and pictures for work and storage. And these demands work against each other. The practical meaning of this is that you have to have two sets of pictures: one for work and storage and one for publishing on the web.
All work should be done on a working set of pictures, which are stored in an optimum quality. The last step before publishing is converting to s suitable publishing format like JPEG or GIF. Do not work on JPEG's as they deteriorate every time you load and save them.
Preservation
Your most important asset when working with digital photos is your original. Never modify the original! It is like burning your negatives. This particularly goes for photos taken with digital cameras. If you have slides, prints or negatives, you can always scan your pictures again. You can also reload a Photo CD, but you can not recreate a digital photo once it is modified. Store your originals in separate folders, burn a CD, write protect them - just don't work on them. Load them into your photo editing program and use Save As immediately or make copies of all relevant pictures and work on the copies.
Oversize
We recommend working on an oversize picture. Aim for somewhere between 1.5 and 2 times the final size. If your goal is a 300 by 200 pixel JPEG, work on something like a 640 by 480 pixel original. Less can do, but size will give you quality.
The reasons for this are somewhat obscure, we admit, but in the process of optimizing the picture for the web, we often experience that it is easier to get a crisp, detailed photo when scaling down as opposed to scanning in the final size.
Really large pictures, like the high grade Photo CD formats are excellent for many purposes, but choose one of the lower grades if your final destination is the web exclusively. This will save you time in the process unless you're working on a 256 meg G4 or and turbo loaded 500 MHz Pentium III.
Manipulating pictures
RGB
You will generally want to use the RGB color format for your working pictures. This is the generic screen format, and no matter what the end result, this is the optimum format for screen work. Convert CMYK and palette pictures to RGB before going on. This will ensure a proper presentation on your screen, and an optimum result when using filters and effects.
Cropping
Crop your picture before working on it. Removing surplus will save file space and work time. Cropping is usually done with a special crop tool, but most programs support cropping to the edges of a selection.
Use the cropping to tighten the composition of your photo. Go as close as you can, still preserving the important parts, but enhancing the composition of the picture. One of the most common errors in photo work is not cropping close enough.
Some programs like Photoshop will preserve the entire picture, even after cropping. Don't worry. Photoshop knows what it is doing, but if you insist on worrying anyway, mark the part you want to keep, copy it, and paste it into a new picture.
Adjusting
Tonal range
Few pictures are perfectly exposed from the beginning, even fewer are perfectly printed and you very rarely see perfect scans. All this ads up to pictures, which have an inferior dispersion of light. This can mean several things, the most common being poor contrast - too much or too little.
The second most common problem is color errors. Many pictures are off balance, being too red, green or whatever.
The third most common problem is too light or dark pictures lacking tones in a whole region rendering them quite flat to look at.
None of these errors are easy to adjust if they are very pronounced, but if they are within reason they can be all be removed.
Histograms
If you really want to understand picture adjustment, you want to understand tonal histograms or tonal ranges. A histogram graphs the number of pixels at each brightness level in an image. It is shown as a bar diagram with each vertical line representing the number of pixels at a certain level of light. The well-exposed picture has an evenly distributed range of pixels in almost all brightness levels. The distribution should be without peaks - especially in the extreme darks and lights. By analyzing the tonal range of a picture, you can pinpoint its faults and choose the right adjustment tools. We have included a few examples of pictures with certain errors and their respective histograms.
The most powerful tool in adjustment of histograms is a tool such as the Levels tool in Adobe Photoshop. This tool will let you manipulate the tonal range of a picture by cutting off the extremes and redistributing the existing tones within the whole range - totally black to absolutely white.
The level tools are particularly handy if you want to isolate objects on a totally white background. By stretching the lighter grays you can turn them into a completely white. In this way the light shadows around the object will disappear.
| The normal picture has a normal RGB histogram (above) and evenly distributed R, G, and B histograms (right) |  |  |
| The red picture has a normal RGB (above) and R histogram, but few G and B tones (right). |  |  |
| The blueish picture has a normal RGB histogram (above), but low level of R tones (right). |  |  |
Color balance
Pictures should contain a normalized range of colors and not have any tendency to slide towards a certain color. In extreme cases pictures with color errors can seem tinted, but usually they will just seem warm or cold.
Good examples of common color errors are underexposed winter pictures, which come out light blue, or indoor pictures in either bulb or neon light, which typically come out yellowish warm and greenish. The latter will show faces in a particularly grim hue. Sometimes such errors can result in interesting effects, but usually you want to remove a bit of the tint, and give people their natural skin color.
Again the histogram will reveal the details of such errors. Check each channel separately - Red, Green, and Blue (R, G, and B) and make sure that all curves are as close to each other in tonal distribution as possible.
Many photo editing programs have automatic tools for these adjustments, but using a tonal curve tool and a levels tool to manipulate each of the R, G and B channels of your picture will give you better control and ultimately a better result.
 |  |  |
| Too low contrast will yield narrow distribution of tones. The above picture has light areas, but no dark ones. Stretching the range will give better tonal distribution, but no further details. | Too high contrast will result in a saddle shaped histogram. Nothing will cure this as we lack the details in dark and light areas of the picture. | The normal picture will have a normally distributed and rich range of tones. This is a bit on the dark side. |
Contrast and brightness
The plain contrast and brightness controls that even the most primitive photo-editing program contains are crude and simple tools compared to the above mentioned facilities. They can be used for some quick adjustments of the most obvious errors, but will usually bring you too far within very narrow ranges of adjustment.
Too little contrast can be corrected with fair results, while too much contrast usually means lack of details in dark areas and highlights. These details can not be reconstructed with automatic functions.
Correcting errors
Retouching
You now have a picture, which has the best possible tonal range. This forms a good foundation for the following work, which encompasses editing, filtering and manipulating the contents of the picture - the motif itself.
This is the stage where you correct errors such as dust, scratches and other physical flaws generated in the scanning and physical handling of the picture. Scratches and dust are the most common errors, but stains and curls are also seen.
The method is fairly similar for all of the above.
Enlarge the relevant section of the picture, so that you can see each pixel and use a Stamp or Brush function to paint over the spots or cracks. Do not use Smudge or Swab tools as they seem to rub out colors and leave clear marks. The idea is to mimic or copy the surroundings as closely as possible to mask the faults.
Pick up colors from the neighboring areas and paint over the spots. Frequently select a new, but close, color and use that in order to copy the blend of the adjacent pixels.
For larger flaws you can copy similar areas using feathered edges and paste the copy over the fault. By manipulating the copied patch, turning it, making it partly transparent, you can mask even large errors.
Filtering
The various photo-editing programs have a large selection of filters for many different purposes. Most filters are effect filters, which will alter the photo - sometimes beyond recognition. But several filters are made for correction purposes and can help you in the process of enhancing the picture.
A few advanced programs have special filters for removing dust and scratches. More common are filters, which remove iterative patterns like printing raster or scanning lines from poor scans, and video or television pictures.
Blurring filters can sometimes be a good tool to use for removing errors. Use the blur filters with caution as they do exactly what the name implies - makes the picture less sharp.
Sharpening
Enhancing edges
Of all filters the sharpening filters are the most important when working with web files. As the resolution of the pictures is usually low and the size is limited, we can not have the level of details that is seen in prints or slides. The sharpening process will visually enhance the details in a way, which actually degrades the picture, but makes it look sharper - mainly by enhancing contrasts and edges.
Strangely enough a tool known as an Unsharp mask is also widely used for sharpening purposes. This filter will add a light and a dark line along edges and can give some significant enhancements in most pictures for online use.
The sharpening and unsharpening filters usually have several parameters, which can be adjusted before running the filter. Experiment with these parameters to obtain the best results. Use the filter, undo, adjust parameters and run the filter again. Repeat the doing and undoing several times to find the best setting. The best programs have live preview boxes, which can be used to judge the result before letting the filter loose on the whole picture.
A warning
Sharpening should be done with great care - especially before you scale the picture. As mentioned sharpening will deteriorate the picture, and this loss of quality can very well be enhanced in the scaling process.
- Log in to post comments


I' ll be looking for
I' ll be looking forward to learning more from you as this should help me to better see and learn where I am going wrong on some patterns.
The Renaissance Man
The Renaissance Man Martin is an endless source of wonderment and bears constant watching...
Every time I visit this site I leave wiser and inspired... Thank you...!
I am a 75yr. old, I
I am a 75yr. old, I to think that this site is one of the very best. I found it through looking for information on photographing flies. I have an Olympus C-5060, this appears to cover all that is required for successful results. Many thanks. Harry Phillips Wales.
No it never ends. Af
No it never ends. After loads of research i am now going to buy the A620 because the macro goes to 1cm. Is the software programs suitable with the package when you buy it or do you use another software for editing the pictures. This site has really helped.
Thanks very much
Matt.
Matthew,
The Cano
Matthew,
The Canon PowerShots generally have excellent macro. The A620 actually goes down to 1 centimeter or less than ½ an inch! And it is is less expensive than my A80 was when I bought it - and a lot better in all other fields too. A lot! And you can get an A630 and an A640, which are even better. It never ends, does it? ;-)
Martin
Well what camera sho
Well what camera should i go for now if the A80 is not available. Does the macro on A620 go up to 5cm or better?
Matthew
Matthew,
Most of
Matthew,
Most of the fly images in my own articles on this site have been shot with this camera, which I'm still using. But it's not available anymore, since it has been replaced with newer models, namely the Powershot A620 and even newer (and better) models.
Martin
Thank you very much
Thank you very much for this review this helped me on xmas 2006. I would like to see some pictures of flies taken with the Canon powershot A80. '
Thanks Matthew
I love this website!
I love this website! I am a 13 yrold who loves fly tying and fly fishing and this is the best website i have ever found to suit my needs
As you point out
As you point out, Photoshop is an expensive piece of software for most hobbiests. An Open Source (Free) alternative which has 90% of the features of Photoshop is the Gimp (Google Gimp for download site). I'd highly recommend it to anyone looking to get started. Both the Gimp and Photoshop have a fairly high learning curve so be prepared to spend some time with it.
Thank you, the GFF C
Thank you, the GFF Calibrate your digital camera was fatastic
I found the pages ve
I found the pages very exciting indeed I have an Olympus Digital camera model C- 5060, but never very excited about the pictures of my flies any comments please I also have a little Casio EX Z 55