
Only a few patterns are as generally useful and widespread as the Clouser Deep Minnow. Only a few patterns have their own entry in Wikipedia, but the Clouser Deep Minnow is up there with the Woolly Bugger, the Muddler Minnow, Grey Ghost, Royal Coachman, Diawl Bach and a few others.


Only a few patterns have their own entry in Wikipedia, but the Clouser Deep Minnow is up there with the Woolly Bugger, the Muddler Minnow, Grey Ghost, Royal Coachman, Diawl Bach and a few others.
History
The pattern dates back to 1987, so it's not exactly ancient, but not new and unproven either. Bob Clouser invented the fly as a further development of the traditional American bucktail streamers, but it was actually Lefty Kreh who named the fly.
Clouser from the originator of course.
Deep because this is a fly that usually fishes in the depth.
Minnow because it's an obvious baitfish imitation.
The fly was developed for smallmouth bass on the Susquehanna River in Pennsylvania in the US as we have told it here on GFF before in Robb Nicewonger's article on Susquehanna patterns from 2002.
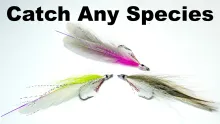
These days you will see Clousers cast by fly anglers fishing all kinds of water for all kinds of fish all over the world, and my guess is that the Clouser's popularity is only surpassed by the Woolly Bugger.
Like the Woolly Bugger, this is a fly with many faces. While the original is quite well described, the number of variations is almost infinite, and combining materials, colors, sizes and tying styles will allow so many degrees of freedom that two flies both named Clousers by the tyers hardly need resemble each other.
Bob Clouser himself offers 12 color variations of "the original" in his shop, and I have given up counting the number of other Clouser Minnows available, including such variations as Saltwater Clouser Minnow, Clouser Minnow for bonefish, Clouser Floating Minnow and many more.
Simple but ingenious
This article describes a basic version of the fly, and the intention is mainly to demonstrate the simple but ingenious technique used to tie the fly. When I myself started tying this pattern I was guessing the method and only after having seen others tie the fly, did I learn exactly how to do it.
Today you can see the method described in several books, not least Bob Clouser's own "Clouser's Flies", and find videos, online and off, which show in detail how to do it.


Eyes and hair
The fly is tied with bucktail. I hear many anglers and tyers complaining that the deer hair is too stiff, but that must be because they never saw this fly in the water.
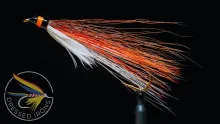
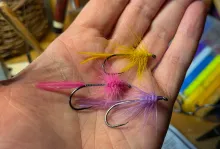
Once wet, the soft hair will move easily, and the fly is a very convincing baitfish imitation. You can choose almost any colors you want for the pattern, but traditionally it's tied with a light and a dark wing, imitating the brighter belly and darker back of a fish. But feet free to experiment. One of the most popular variations is white and chartreuse, and lots of Clousers use red, orange, purple and blue shades of bucktail. My own specimens tend to be tied with white, gray, black and brown hair.
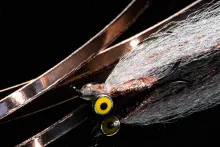
For eyes I normally use bead chain. I don't like the flies too heavy. The original uses lead dumbbell eyes, and large ones at that, and really make the fly live up to the Deep part in its name.
Tying the fly
As I already mentioned there are so many ways of tying this fly. Of course Bob Clouser's own prescription is the way to do it, and his way of tying on the hair in relation to the eyes is what defines this fly. The placement of the eyes is something that sees a lot of variation. Hook selection likewise, and how skinny or beefy the fly is tied also varies quite a bit.
I place my Clouser eyes depending on hook length. On shorter hooks I tend to place them further ahead, while I follow Clouser's own description on longer hooks.
But you definitely don't want to place them too close to the hook eye. You need space to finish the wing sections in front of the eyes. I personally often give myself way too little space for the wings, and if in doubt, move the eyes back a little before you attach them firmly.
Upside down
Remember that the fly will fish upside down thanks to the eyes on top of the hook, which means that if you are tying a fish imitation, you want to put the brighter (belly) material on the top of the hook and the darker (back) over the hook point.
You can add flash in any stage of the tying. Bob Clouser adds it behind the eyes before tying in the wings. I sometimes add it before tying in the second wing, and if you want it more visible, you can tie it in as a last material riding over what will be the upper wing when the fly fishes. Some saltwater versions of the fly incorporates a few peacock herls as the last material, making the fly look much like a small saltwater baitfish.
Tying instructions
|
|
|
|
|
|
|
|
|
|
|
|
|
|
|
|
|
|
|
|
|
|
|
|


- Log in to post comments


Another of those must tie
Another of those must tye flies,the colors are endless my favorite colors are all white,olive & white,white & chatreuse,all black the colors are endless what ever bait fish or attractor color tyer's choice.
This classic pattern vanished
somehow, this classic pattern vanished out of my fly-box... time to stock up for the next trip !
thanks Martin for the input, Heiko