Published Jan 6. 2013 - 11 years ago
Updated or edited Oct 28. 2021

The Test Tube

A weird and futuristic construction from the archives. Really easy to tie... eh, make... uhm... construct... Metal, plastic and glue.

First image - This is the fly as it looked in 2001, scanned in a flatbed scanner
Super simple
Martin Joergensen

This pattern is an experimental fly that I tied - or rather constructed - many, many years ago. Not so long ago I was going through my image archive from the heydays, and these two old images popped up. They were so old that they were scans. Back then I simply put the flies in a flatbed scanner and scanned them.
Not big art when it comes to photography, but OK for documentation. And I liked what was in these two scans. They were both dated spring 2001.

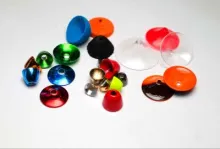
I remembered the fly, which I made using some of André Bidoz' metal bottle tubes that I helped develop. I used it when fished from a float tube and wanted a small pelagic baitfish imitation. In spite of the "stiff" appearance of the fly, it's very lively in the water.
The tubes come in aluminum and brass in two different lengths and André has recently introduced a thinner version, making it possible to make smaller and even lighter flies. You can vary the weight and look of the fly by choosing different bottle tubes.
I have a bunch of these bottles and now fish a lot from a pontoon boat, so it was obvious to fiddle around with this idea again and develop it into something fishable and useful.
Since a all my fishing these days take place sailing, I can troll the flies, and a fly like this will most likely do good when pulled and jigged after a boat.

Simple, translucent - There is almost no tying involved, just some metal, plastic and glue. Another scan from 2001
Translucent
Martin Joergensen

The basic idea is very simple:
A Bidoz tube of my own design as a head, done up with some eyes secured with some epoxy, hot melt glue or LCR - Light Cured Resin - the new black in fly-tying. On my old prototypes I added a few turns of red thread to create an impression of gills. It's still an option.
The body of the fly is formed by the junction tube that usually secures the hook on the tube. But on this fly it's been extended and creates the body.
The tail is tied on the hook and was simply a bunch of flash on the original fly, but might work better if tied with feathers. There's room for some experiments here.
You could also add a little movement in the front of the fly, and something looking like fins might be an idea. It can be feathers, rubber legs or whatnot. I'll keep mine simple, but you can easily work your way towards something.

Remember to line the metal tube before you use it. You can do that before or after the head is finished, but do it, because the raw tube will cut through your tippet like a knife through butter, and the fly will be gone after a few casts.

I have a lot of semi-soft, translucent tube in different colors from The Canadian Tube Company, which will probably work perfectly for this fly. I also have a length of very soft milky silicone tube, which I can also imagine will work fine. The options and variations are many.

Materials - Bidoz aluminum tubes, inner tube, soft junction tube and eyes
Materials
Martin Joergensen
Step 1 - tube

Step 2 - orange accent

Step 3 - gills done

Step 4 - eyes

Step 5 - LCR

Step 6 - curing

Step 7 - head done

Step 8 - evenly covered

Step 9 - inner tube

Step 10 - inner tube done

Test Tube
Pattern type: 
Cold saltwater fly
Originator: 
Martin Joergensen
Materials: 
Tube
Bidoz brass or aluminum tube, short version, lined with plastic inner tube
Front red accent (optional)
Red/orange 6/0 thread or red/orange flash
Eyes
Stick on eyes, flat, 3D or doll´s eyes type, 3mm or 1/10-1/8 of an inch in diameter, covered with LCR
Body
Junction tube of your choice. Translucent, milky or colored
Hook
Tube hook of your choice, suitable sizes are #4-6-8
Rear tying thread
Black or grey 8/0
Tail
Flash and/or chickabou/marabou, grizzly or in a color of your choice
Skill level/difficulty: 
Very easy
Instruction: 
  1. If you want a red or orange accent to the fly, wrap some tying thread on the middle of the tube and whip finish. Just a few wraps will suffice. Alternatively you can wrap a single strand of red flash into the LCR before curing it.
  2. Stick on the eyes in the front of the tube.
  3. Cover the whole head with LCR in an even layer
  4. Cure the LCR
  5. Burn a small collar on the inner tube
  6. Draw it through the head
  7. Cut it in the rear, leaving a small bit
  8. Melt a collar to lock it.
  9. The head is done.
  10. Tie a small bunch of flash or soft feather barbs to the hook.
  11. Whip finish and varnish.
  12. Stick a piece of junction tube onto the metal tube. 1½-2½ centimeters or about an inch is fine.
  13. The hook mounts when you tie the fly to your tippet.
  14. Pass the tippet though the head and the junction tube from the front
  15. Tie on the hook
  16. Pull the hook into the junction tube

Step 11 - body = junction tube - Usually the soft junction tube just holds the hook, but here it forms the body of the fly
Body = junction tube
Martin Joergensen
Step 12 - hook

Step 13 - thread

Step 14 - chicken marabou

Step 15 - tie in

Step 16 - trim butts

Step 17 - finish

Test Tube done - When fishing the fly, you thread the tippet through the head and junction tube, tie it onto the hook and pull the hook into the rear of the junction tube
Done
Martin Joergensen
Tying on the Test Tube
Martin Joergensen

Comments

This will be great f...

This will be great for trout, salmon and bass in the early season. Thanks

.

Log in or register to pre-fill name on comments, add videos, user pictures and more.
Read more about why you should register.
 

Since you got this far …


The GFF money box

… I have a small favor to ask.

Long story short

Support the Global FlyFisher through several different channels, including PayPal.

Long story longer

The Global FlyFisher has been online since the mid-90's and has been free to access for everybody since day one – and will stay free for as long as I run it.
But that doesn't mean that it's free to run.
It costs money to drive a large site like this.

See more details about what you can do to help in this blog post.