
This is the third section of Harry Boyd's continuing bamboo rod course. Here we begin to mold the raw bamboo into something that approaches the shape and form of a fly rod, and the real fun begins. Read more in Part 3 - Staggering Nodes and Rough Planing.
The Global Fly Fisher Guide to Building Bamboo Fly Rods
Part 1 | Part 2 | Part 3 | Part 4 | Part 5 | Part 6 | Part 7
Part 3 - Staggering Nodes and Rough Planing

Many of the tools you will use in straightening nodes and rough planing strips.

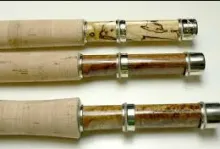
Nodes staggered in a 2x2x2 pattern.

Nodes stagged in a 3x3 pattern.

A diagram of a 3x3 node spacing.

Staggered strips cut to length, nodes are visible as the lighter areas

Heating a node over the fishtail nozzle of the heat gun.

Flattening nodes with pressure from vise jaws.

Straightening the crooks and bends in the same node as above.

A commercially available rough planing form sold by Goldenwitch Technologies
https://www.goldenwitch.com/

Initial forms built and used by the author, pictured with a roughed strip in the groove.

Clockwise from top left: an inexpensive thumb plane; a modern Stanley G12-020; a Lie-Nielson Scraping plane; an original Stanley 9 1/2; and another G12-020.

The author's sharpening system.

Taking .005" off one side of the strip.

A Starrett Screw gauge used to check the necessary 60 degree angles at every corner of the strips.
In our last installment, we focused on selecting, preparing, and splitting the culm of bamboo. As we begin to mold the raw bamboo into something that approaches the shape and form of a fly rod, the real fun begins. We will select the bamboo strips for our rod, stagger the nodes, and cut each strip to length. Then we will straighten and flatten each strip at the nodes and plane it into an equilateral triangle.
Selecting your best strips of bamboo
We concluded our last segment after having split the culm of bamboo into 12-15 pieces for tip sections, and 7-8 pieces for butt sections. Our next task is to choose the very best pieces from among those we have split to include in our rod. When I build a rod, I always arrange the pieces of the finished rod in the same orientation in which they grew in the culm of bamboo. Since this is your first rod, I would encourage you to choose the six
best pieces you have for your butt section. Set aside any pieces which have obvious discolorations. Repeatedly flex each strip to make certain there are no weak spots. The bamboo should bend consistently from end to end, with no obvious soft spots. Choose the six best pieces you split out for butt sections, and bundle them together. Don't discard the others!!
You may need them as back-ups if mistakes are made later. (As an aside, in reality I always choose seven pieces per section, just in case) Do the same examinations and tests on the pieces you split out for tips. Choose two groups of six and set them aside.
Staggering Nodes
Everett Garrison called nodes "Job's gift to rod makers." Nodes are both the weakest and most stubborn parts of Tonkin cane. At each node, the straight grained bamboo crosses over itself and interlocks in highly irregular patterns. Split strips are often crooked as snakes at the nodes. Good rods never have nodes adjacent to each other in finished sections, therefore we stagger the nodes up and down the rod.
Rod makers differ in their node patterns. Leonard and Granger always used a 3x3 node spacing, where each node is separated from another by its adjacent strip of clear bamboo. Payne and Garrison used spiral staggering patterns, where no two nodes are at exactly the same height in a finished rod section. I've settled on a 2x2x2 sequence of node spacing where each node is adjacent to two clear strips of bamboo. "Two by two" spacing places
each node opposite another on the opposing flat, and separated by two node-less sections of clear bamboo. Having the nodes in opposition enables them to counteract each other, resulting in less straightening after the section is glued.
To begin staggering the nodes in a 2x2x2 pattern, place a tape measure open to 56" on your work bench. Number each butt strip of bamboo from 1-6, and align the butt end of each strip of bamboo with the end of your tape measure. Without moving strip #1, move strip #2 up two inches. Move strip #3 up four inches. Don't move strip #4! Move strip #5 up two inches, and #6 four inches. At this point you should have 49 inches of bamboo where
all six strips are between the staggered end sections. Make sure you have at least 49" before you start cutting. Remember the carpenter's adage, "Measure twice, cut once." Of course, your numbers will be different
if you have chosen to build something other than a 7' 6" two-piece rod.
Place a straight edge across the lowest point where it will touch all six pieces of bamboo, and mark pieces 1, 2, 4, and 5. This mark will designate the butt end of each piece in this rod section. You will not cut the butt end of strips 3 and 6.
Using a fine-toothed hacksaw, Coping saw, or X-acto saw, cut each of the four pieces (1, 2, 4, 5). Begin your cut on the enamel side to prevent tearing out the power fibers. Immediately mark the ends of all six strips with a black permanent marker. (I use red for tips and black for butts.) Marking the ends prevents you from getting things turned around later and wondering which end is which. Cut the tip ends of strips 2, 3, 5, and 6 - but don't mark the tip ends. You may need to re-number the strips if your trimming removed the original markings. Repeat the staggering and numbering process for each bundle of tip strips, and we will be ready to start straightening and flattening nodes.
Straightening and Flattening Nodes
When subjected to heat, bamboo becomes pliable, almost plastic, allowing us to bend it to whatever shape we choose. When removed from the heat, the bamboo strip retains the shape to which it was bent. Doubtlessly you have noticed how crooked your strips are; so crooked they will never lie flat in a planing form. Each node probably has a distinct hump on the enamel side. Before we can begin planing, these humps and crooks at the nodes must be minimized. Later, heat treating will do away with the long sweeps and crooks that sometimes occur between nodes.
Before we begin the process of flattening and straightening nodes, the remains of the nodal dams on the pith side of the bamboo need to be planed away. Place each strip on your bench - enamel side down. Using a block plane (described later) and short strokes, smooth the jagged remains of the interior nodal dams until you are removing thin shavings 2 - 3 inches long. Since we'll be squeezing the enamel side of each node in a vise, we must have a flat surface to work against.
Traditionally rod makers filed away all humps at the nodes and straightened the twists and turns over the flame of an alcohol lamp. Although the task can be accomplished that way, excessive filing, heating and bending can gouge and scorch the bamboo at the already weak nodes. Though the idea isn't original with me, I've found a way to flatten the humps and straighten the nodes all in one quick and easy step. As with every single step of making rods, let me urge you to practice on scrap strips before you attempt this on your first rod.
My node treatment process begins with what some rod makers consider heresy, soaking the strips in water. I soak all the strips for a rod in a water filled PVC pipe overnight before I begin to treat the nodes. Usually I add a dash of household bleach to the water to retard the growth of any mold and fungus in the mixture. A rod maker friend of mine who has a much more understanding wife than me soaks his strips overnight in their bath tub! Use your creativity to find a way to soak the strips, but don't destroy your marriage in the process.
Water-soaked bamboo is much less prone to charring, is heated to the point of pliability much more quickly, and works easily. The water largely evaporates within an hour of removing the strips from their bath. Heat treating the rough strips drives away any excess moisture and adds liveliness to the bamboo.
Each node on each strip is heated for several seconds over an electric heat gun. When heated to the point of pliability, the node is pressed in a vise on both the enamel side and the split sides. When you shop for a heat gun for rod making use, look for a wide diffuser, often called a fish-tail nozzle. I could not find one for my heat gun, so I adapted one designed for heating plastic shrink tubing. The wide diffuser concentrates the
heat on the area surrounding the node. I use a cheap 3" drill press vise to flatten and straighten each node. The key feature you need in your vise is smooth, flat jaws. Many machinists vises have scored or serrated jaws which will ruin a strip of bamboo. Should you choose to use a vise you already own, you must file the jaws smooth.
Let's get specific
Soak the bamboo for several hours. To keep the strips submerged, cap the PVC pipe loosely. Set up all the necessary tools for straightening and flattening nodes before you begin. Place the fish tail nozzle on your heat gun. Clear the area around your vise. Working at a "controlled hurry" requires getting everything ready before we begin.
Remove one strip from the soaking bath. Choose a node to work on first, and flex it in several directions. Make mental notes of the amount of force required to bend the strip. While heating the node, constantly rotate the strip in your fingers so that heat is applied from each side. Flex the strip every few seconds, diligently searching for the precise moment when the bamboo begins to become pliable. There is a definite change in the feel. When you experience that change in feel, you'll know it. I use a Wagner heat gun with a 3" fish tail nozzle. I heat the strips on the highest setting while holding them above the nozzle about an inch. With my particular set-up I find that soaked strips require 20 - 30 seconds of heating before they are ready to work. Some very light charring of the pith may occur but the charred portion will soon be planed away.
At the very instant the bamboo becomes workable, place the node in the vise with the enamel side against one jaw. Squeeze the bamboo between the jaws until you see the nodal hump flatten squarely against that jaw, and count out five seconds. Release the vise and quickly reorient the bamboo strip so that the enamel side is up. Squeeze the vise jaws again, this time removing any crooks and bends at the nodes.
Leave the first strip in the vise while heating another node on another strip. The vise serves as a heat sink and keeps the strip straight and flat while it cools. Remove the first strip from the vise as soon as the second strip becomes pliable, and squeeze first the nodal hump then the crooks and bends from the second strip.
Returning to the first strip, begin the process again with another node. I work through the process two strips at a time. When all the nodes on both strips have been straightened and flattened, examine them closely. If some
of the nodes need a little more work return them to the heat and the vise before moving to the next strips. Once all the strips have been worked you are ready to actually start planing bamboo.
Rough Planing
Initial planing the strips in a straight 60* form gives us a product which begins to look like a fishing rod. Using a block plane, we slice the strips into long, un-tapered equilateral triangles. Six triangular strips form the familiar hexagon of a bamboo rod.
Initial planing is accomplished with the assistance of your first set of planing forms. Later, a second set of forms gives you the compound taper of a good fly rod. Rough, or initial forms need not be precision tools. I have two sets, one made on a table saw and one on a router. I'll describe those made on a router so you can make your own initial forms. Perhaps you have a friend with a woodworking shop who can help you out.
Begin with a straight grained piece of hardwood about 4 feet long. Be sure two sides are perfectly flat by running them through a surface planer. Set a router table to make a lengthwise cut through the center of the board. Use a 60* "V" bit, commonly used in making wooden signs, to rout a groove 1/4" deep. Clean up any rough spots in the groove with a triangular file, and you are finished. Sounds simple? Well, it really is.
The block plane epitomizes the craft of rod making. Stanley planes have set the standard for decades. Only one plane is really necessary for making rods, a Stanley 9.5. The modern version of the Stanley 9.5, known as the G12-020, is available through major home centers from about $30 US. Although I prefer the older model for its ease in adjusting the blade depth, the newer version works quite well. The adjustable throat of the Stanley plane helps control the tendency of the bamboo to tear rather than slice. Several other tool makers produce similar planes, all modeled after the original Stanley.
Good rod making books discuss ways to get your plane in proper working order. Several good web articles are also available. Email me (Maker@canerods.com) and I will point you in the right direction. Briefly, you must tune your plane by truing and flattening its sole. Most rod makers replace the original Stanley blade with one which is more readily honed to a razor sharp, long lasting edge. Learning to quickly and consistently hone your plane iron to a keen edge is the single most demanding task in rod making. Although I'm only touching on this subject here, overstating the importance of getting your plane in perfect shape, and your irons much sharper than your razor is impossible. You simply must work on this skill until you perfect it. No shortcuts.
I use a powered leather strop and 3-5 micron diamond paste to achieve the final mirror edge on my plane irons. Other rod makers use Japanese water stones, diamond stones, or even ceramic stones with outstanding results. Some even use progressively finer grits of sandpaper glued to plate glass. Your sharpening goal is a consistent mirror edge which cannot be seen under 30x magnification. Bamboo contains silica (sand) and dulls blades quickly. In final planing, you will likely find yourself sharpening your plane after every single strip. No matter which sharpening method you choose, stay with it until you learn it well. You will be spending quite a bit of time keeping things sharp.
When your plane is sharp and ready to go, make some practice runs on scrap bamboo. Advance the blade until you are taking shavings about .004"-.006" thick as measured with a dial caliper. Copy machine paper is .002" thick, just for reference. Adjust the throat of the plane so that the opening is .010" or less to prevent tear-out at nodes and other irregular grain. To begin transforming the strips into triangles, place the enamel side of one strip against the near side of the groove in your initial planing form. Assuming you are right handed, all your planing will be from right to left. Place the butt end (colored with a marker) to your right. Remember, we never
plane on the enamel side, only on the pith sides. Begin by holding the strip ahead of the plane with your left hand. Start your cut, and cross the left hand under the right as soon as possible. Most of your planing should be done while holding the bamboo behind the plane. Strive to keep the enamel side of the bamboo flush against the groove. At first, you will only remove tiny slivers of bamboo. Make 6 passes the length of the strip. The sixth pass will yield more results than the first. After six passes, flip the strip in the form. Nestle the enamel side against the far side of the groove. Make six more passes, again planing from right to left, from butt end to tip end. As the plane begins to cut more on each pass, you will notice a triangular shape beginning
to emerge. After first making six passes on each side, switch to four passes per side, then two passes per side. Soon you should see a definite triangle beginning to form. At this point you have made 12 passes of
the plane over each side of the bamboo.
Now check the angles of your strip to be sure you are getting consistent equilateral (60*) triangles. A machinist's screw gauge used in cutting threads on a lathe is the tool of choice. You can purchase a Starrett screw gauge for a bout $6-7 US at any industrial tool supply shop. Show them the picture of the one on this page and they will know what you want. Each notch cut in the Screw gauge is a precise 60 degree angle. Placing the strip into the angles of the gauge will verify that you are achieving your goal. If one of more of the angles is incorrect, now is the time to correct it. To correct your triangles, you skew the sole of your plane
to one side to over-correct one side and under-correct the other. Experimenting now, learning to correct your angles, will save you many heartaches later. Sometimes I draw a picture to help me visualize which way the
sole of the plane must be tilted while cutting to correct the triangles.
As you cut more and more bamboo from each side, the strip becomes easier to hold in the form. Don't worry about long sweeps and curves between nodes, but if the bamboo is still humped or crooked at the nodes, go back to the
heat gun and vise. When the angled cuts you are making reach the enameled side of the bamboo, it's time to move on to the next strip. When you have eighteen strips, all in un-tapered equilateral triangles, approximately 1/4" in height from the base of the triangle to the apex, it's time to start thinking about heat-treating.
Our next installment takes us into the dark science of heat treating your bamboo strips.
- Log in to post comments


Too much equipment i
Too much equipment is required to get the blanks perfectly straight. I tell my fishing buddies that the character of the rod is determined by the guide placement on curved rods.
Man, I like this met
Man, I like this method of dealing with nodes and straightening. A water soak, what could be harmful about that? Those power fibres have no doubt been moving and dealing with watery fluids all through their existance and it's hard to imagine any harm coming from it. Water or steam has been widely used in bending and shaping woody materials sucessfully for centuries. Besides, the heat treatment would eliminate any residual, unwanted moisture at that point anyway. Good stuff!
I found out this pag
I found out this page extremely interesting, both texts and photos were really exhaustive on the argument. really a precious work