
Harry Boyd teaches us the tools and techniques required to turn strips of bamboo into tapered sections of a fly rod in Part 5 of his continuing series.
The Global Fly Fisher Guide to Building Bamboo Fly Rods
Part 1 | Part 2 | Part 3 | Part 4 | Part 5 | Part 6 | Part 7
Part 5 - Planing to taper

A set of wooden forms and a set of steel forms, both home-made.

A Dial Indicator affixed to a base, along with the needed 60* point.
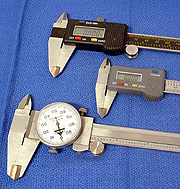
Three sets of calipers, two digital and one dial.

Setting the depth gauge to a zero standard.

Though it's a little tough to see, the forms are being set at 0.1305" at this station.

A view of the same forms which shows the markings at each station on the butt side of the metal forms. Look closely, and you can see the groove for the tip side at the bottom. On these forms, the hex bolt on the left pulls, and the allen screw on the right pushes.

Sanding away the enamel with 400g sandpaper on a small sanding block

Various scrapers and sanding blocks. On the two small metal planes pictured, I have turned the blades backwards (bevel to the back). Doing so raises the angle of the blade to about 85*, in effect turning the plane into a scraper.

Each strip as carefully marked at each station, with pencil, on the enamel side.

Shavings which measure .003" (well okay, ..0035")

Removing shavings of about .003" per pass.

Two things to notice here... first, hold the plane as shown for the greatest control. Second, the plane here appears canted to the right (my left). The sole should be kept parallel with the surface of the forms

A sharp plane should make .001" shavings the entire length of the strip.
This strip has been planed to .1305". The measurements from flat to apex are equal on all three sides.
When one first begins to think seriously about making bamboo rods, block planes and adjustable planing forms come immediately to mind. Accurate planing forms and well-honed plane irons add immensely to the enjoyment of making rods. Before we delve into the world of planing forms, let's review for a minute.
|
P101
7'6" 5wt |
|
| TipTop | 0.065" |
| 5" | 0.092" |
| 10" | 0.102" |
| 15" | 0.118" |
| 20" | 0.132" |
| 25" | 0.146" |
| 30" | 0.156" |
| 35" | 0.171" |
| 40" | 0.181" |
| 45" | 0.200" |
| 50" | 0.218" |
| 55" | 0.233" |
| 60" | 0.249" |
| 65" | 0.268" |
| 70" | 0.286" |
| 75" | 0.309" |
| 80" | 0.345" |
| 85" | 0.345" |
| 90" | 0.345" |
Making rods so far has been fun, yet the work we have done to this point has been rather crude. Setting out to build a 7' 6" two piece rod, we began with a 12 foot culm of bamboo which we flamed-toned and cut to length. We split that culm of bamboo into 24 pieces, then selected the twelve best tip pieces and six best butt pieces. We staggered the nodes and cut those strips of bamboo to the correct length. We soaked the strips for several days, then flattened and straightened the nodes. After getting the nodes under control, we rough planed each strip into an un-tapered equilateral triangle. Most recently we bound the strips into bundles of six pieces each, and heat treated the bundles.
Planing forms
Finally we're ready to begin turning those un-tapered strips into something that looks like a fly rod. One problem: Walmart does not keep planing forms in their inventory. Therefore we really have only two basic options: build our own forms from steel, aluminum, or wood; or buy a set of planing forms. I have forms that I have built, and forms that I have purchased. Both options have something to recommend them.
Should you choose to purchase your forms, be prepared to spend from $250 for wooden forms to as much as $900 for top of the line steel forms, to over $2000 for a Morgan Hand Mill. Within that price range are many options. Many of us who never intend to be anything buy hobbyists in our rod making find an investment of that size hard to handle. But if we're looking for instant gratification, buying forms is the only way to go. Good sources for buying your forms include Russ Gooding in Pennsylvania at https://www.goldenwitch.com/, Lon Blauvelt in Maine at http://members.tripod.com/~BamBooFlyRods/flyrods.html, Grindstone Anglers in Canada, Frank Armbruster in Colorado at http://home.earthlink.net/~bootstrap/fishing/,
and perhaps a few others. Some of the forms we buy are ready to use the moment they arrive at our door. Others require spending some time fine-tuning them and getting them in perfect working order. Be sure to ask about shipping dates when ordering forms. If none of these sources serves your needs, drop me a note at Maker@canerods.com and I'll point out a few more sources.
Although I have no real metalworking or woodworking skills, I made my first three sets of forms, two from wood and one from steel. Doing so requires some time, some equipment and some elbow grease. Making forms from any material requires one to flatten the materials, drill and tap holes that are straight and true, and accurately cut a tapered groove. Should one choose to make his own forms, go ahead and make them from steel. In the long run steel forms will prove less troublesome. Plan on spending about 20-50 hours making a set of forms. If that sounds like too much time, then perhaps making rods which require up to 80 hours each is more than you are up to.
Rather than duplicating content which is readily available in print and on the Web, allow me to direct our attention to some good resources. Both Wayne Cattanach's and Jack Howell's books have good descriptions of the process of making a set of planing forms. The best overall instructions I've seen are those on Tom Penrose's superb web page at http://www.thomaspenrose.com/bamboo.htm. Though I might do a few things differently than Tom suggests, his instructions are excellent. I especially like the layout described by Lawrence Waldron on Tom's page. One more source worth noting is Bob Maulucci's Online E-zine, "Powerfibers". At http://www.powerfibers.com/ almost every issue contains helpful hints on making or improving planing forms.
Whether our forms are bought or built, using them well is the heart of making good rods. Good rods begin with good tapers. Tapers are expressed in thousandths of an inch across the flats, as measured every five inches. Throughout this series of articles we have focused on building a 7'6" 5 weight rod. The taper I use for my P101 is given in the table above.
Depth gauges and calipers
We will set our forms using a dial indicator depth gauge. A depth gauge can be purchased from industrial tool suppliers, but is rather expensive. Goldenwitch sells a beautifully crafted depth gauge as well.
Most beginners fashion their own versions of a depth gauge relatively inexpensively from a dial indicator affixed to a base, and fitted with a 60* point. Make sure the dial indicator you purchase reads in thousandths of an inch, and has either a half-inch or a full inch of travel. You will read it backwards, so be sure that there are numbers reading both in and out. The pictured depth gauge came from Enco. The depth base is part number 610-5000. It is fitted with a Starrett PT06632/6 Contact Point from my local industrial tool supply shop.
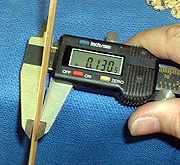
Strips are measured with a Dial Caliper. Again, we will likely have to purchase this tool. Whether one chooses a nice digital model from Browne and Sharpe or Mitutoyo, or an inexpensive import depends on the available budget. Before using the dial indicator depth gauge, it must be "zeroed" or set to a true zero standard. I'll suggest two methods. Most commonly the 60* Starrett point is affixed, the screw holding the bezel on the indicator loosened, and the gauge placed on a flat surface, like one bar of the planing forms or sheet of plate glass. The bezel is rotated until the arrow points to "0", and the screw is re-tightened. This method works quite well with new 60* points. But the tips on those points are easily "dinged" or damaged, causing the measurements to be off by a few thousandths.
Another method first brought to my attention by Chris Bogart uses the Dial Caliper, and trigonometry. First, zeroize the Dial Caliper. Next, open the Dial Caliper up to ..100" and lock it in place. Now set the Depth Gauge so the tip is in the gap between the two jaws of the Dial Caliper and read the depth value. Experiment with ways to position the dial caliper to do this. The actual value should be Cosine 30 degrees (0.866) times width opened. The Depth gauge in this example should read between .086 and .087 on the dial. Because of the probability of having a dinged point, I strongly suggest using this second method. This isn't easy to explain in words, but really is simple. Try it... and hopefully these instructions will begin to make sense!
Setting the forms
Now let's set our forms for the butt section dimensions. The taper chart above gives the final flat-to-flat measurements of a finished rod. We'll use one-half those settings, or Diameter/2, to give us the measurements for each strip. Remembering that the finished rod consists of six strips glued together to form a hexagon helps us understand the simple mathematics involved.
First close your forms completely, and measure the dimensions at each station. I have these dimensions written on the forms themselves with a Sharpie marker. I like to use the largest stations possible in order that the forms provide as much supporting surface as possible to the strips as they are being planed.
Begin at the station on the forms whose smallest possible diameter is just smaller than the 1/2 dimensions of the small end of the butt section. In the example we are using, that will be the 45 inch measurement or .200", which when divided in half is .100". Working towards the large end of the butt section, write the desired dimensions on the forms at each 5" station.
We will now use the push-pull mechanisms of the form and the dial depth gauge to set the forms to the desired taper. Use the pull bolts first, and draw the forms .001" tighter than necessary. Complete the setting by using the push screws to force the bars open that last one-thousandth of an inch.
The force exerted on the bars of the forms is amazingly strong, so much so that after carefully setting each station you really need to work your way through the entire process over again. I often set my forms to the desired taper, wait an hour, and set them over again. Being fastidious at this point will pay dividends later in accuracy and consistency.
Removing the enamel
The first step in planing to dimension is removing the outer enamel surface of the bamboo. Because the enamel thickness varies from one point to another on the culm of bamboo, waiting to remove the enamel until after final
planing sometimes leads to inaccurate sections. Removing the remaining curvature from the outer surface as well leads to more consistent final measurements.
The outer enamel surface may be removed any of several ways. Some makers use a bodied scraping plane. Others scrape with a single edge razor blade held vertically. On your first few attempts proceeding with caution is always the best idea. Sanding the enamel surface way using a hard bodied sanding block and 400 grit sandpaper is the safest method.
Place strip number one in your planing forms with the enamel side up. Using a straight edge, check each node for any remaining bumps. Carefully smooth any bumps with an old dull file or your 400 g sandpaper. When the nodes are correct, a straight edge held next to the node should not reveal any light.
With long, smooth strokes from the butt end to the tip end, sand the enamel surface. Always keep the sanding block parallel with the top of the planing forms. The all-important power fibers will begin to appear first in the center of the strip. Carefully sand until you clearly see the power fibers most of the width of the strip. Removing this enamel coating is the only time the outer surface of the bamboo will be affected. Preserving the power fibers just below the enamel is an important priority.
Removing the enamel also removes the numbers used to order each strip. Renumbering each strip as soon as the enamel is sanded away may prevent some head scratching down the line. Remove the enamel from all six strips for a section, being sure to reorder them correctly. The final step in removing the enamel is placing each strip in the forms at the appropriate position and drawing a light pencil mark at each station depth.
One helpful tip here is to buy only the best sandpaper. Bamboo is tough stuff, and will quickly clog and dull even the best grades of sandpaper. Inexpensive sandpaper is next to useless.
Planing to taper
Before we begin planing to final taper, it's worth our time to touch up the edges of our plane blades. If the blade won't shave hair, it's dull. The edge should shine like a mirror. I cannot emphasize enough how important sharp blades are to this entire process. Less than perfectly honed plane irons cause beginners more trouble than almost all other problems combined. Once the plane iron is sharp, check the depth of cut on some scrap material. Set the blade depth to cut shavings .003" thick or less. The adjustable throat of the plane should be closed to within ..010" of the blade.
Place the strip in the planing forms, not at the position where it will finally rest, but instead at the widest point of the forms. Before planing un-tapered strips to the final taper, we want to decrease their size somewhat. Using the widest point of the planing forms gives the strip as much support as possible and helps maintain good 60* triangles. With slow smooth strokes from butt to tip, begin removing bamboo. Assuming you are right handed, hold the bamboo down with your left hand while moving the plane with your right. Changing the hold down point from in front of the plane to behind it soon becomes second nature. At the end of each pass, lift the plane and return it to the starting point. Dragging the plane backwards dulls the blade and is a surefire way to break a strip. After each pass, turn the bamboo, but never plane the outer surface.
Always keep the sole of the plane parallel to the top of the forms. A good sharp plane should remove bamboo quickly and easily, with very little downward pressure. When you find yourself straining and grunting, something is wrong. Chances are very good that your plane needs sharpening. Even a good blade needs to be sharpened after one or two strips. Continue planing with the strips at the deepest end of the form until the plane begins to touch the forms. When you touch the forms move the strip a few inches closer to its final position.
Once the strip is in its final position, back the plane blade out until it removes shavings of only about .001" per pass. Very carefully remove the last few thousandths of an inch, all the way down to the forms. The final passes will actually shave steel away from metal forms. When the plane starts cutting into the forms, it's time to begin measuring. Using the dial calipers, measure each corner of the bamboo, being careful not to crush the delicate corners. To be honest, I measure the strips over and over again, long before planing all the way down to the forms. A little more bamboo can always be removed, but it's hard to put it back.
Work slowly and carefully, being as consistent as possible. At each station the corner-to-corner measurements should be identical, and should equal the numbers from the taper chart. If the measurements are within a thousandth of an inch or two, you've done excellent work. If the strip is oversized, remove a little more bamboo. Sometimes after planing the first strip from any section, making tiny adjustments in the planing forms brings the final dimensions in line. And don't tell anyone I said so, but there's nothing wrong with sliding the strip forward in the forms a few inches in order to make it easier to remove that final whisker or two! Plane all strips from each section to size before adjusting the forms for the next section.
Believe it or not, tips are simpler than butts. Once all the strips are planed to size, pat yourself on the back, have a cup of coffee, and get ready for our next installment which will focus on gluing the
strips into a rod blank.
- Log in to post comments


Wonderful informatio
Wonderful information. Am i correct in saying that the enamel surface once sanded is never planed to protect the underlaying fibers.
Sory,Excuse my hengl
Sory,Excuse my henglish....the article is ...good.....very good
Tnks very tnks
Rob51
i have many articles
i have many articles about bamboo fly rod tapers--garrison, payne--but i just heard of another but i am not familiar with itis called the "anulet" taper--can you tell me about this--thanks george
i have one question
i have one question
does this method work with salt water bamboo rods also?
if not can you please e-mail me with the right info or tell me about a book i can buy so i can start building bamboo salt water fishing rods.
thank you
joe curran
Thanks for taking th
Thanks for taking the time to prepare this web site. A very enjoyable read. Do you know of anybody building planing forms in the uk?
many thanks
Richard Parkes