
Harry Boyd continues his series on the construction of bamboo fly rods with a look at selecting, preparing, and splitting your culms of tonkin bamboo.
The Global Fly Fisher Guide to Building Bamboo Fly Rods
Part 1 | Part 2 | Part 3 | Part 4 | Part 5 | Part 6 | Part 7
Part 2 - Selecting, Preparing, and Splitting Bamboo

Rafts of tonkin cane.

Harold Demarest. Copyright photos courtesy of Harold Demarest, Inc.
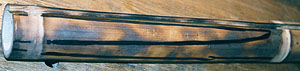
A large, unsightly growers mark, highlighted in black. Marks like this reach beyond the enamel layer and must be avoided when splitting strips to use in a rod.

A raw culm with check split installed

I use an old knife I bought for $6 twenty-five years ago

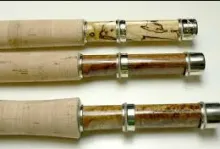
A Honey blonde and a medium dark mottled flamed rod. Which one do you like best?

A properly filed and sanded node.
Our world produces over 1000 species of bamboo. Here in Louisiana, there are acres and acres of wild bamboo. None of the local species are suitable for making rods - believe me, I've tried! Tonkin cane is farmed on plantations in a small area of southern China. "Tonkin," or tea stick bamboo is the common name rod makers use for arundinaria amabilis, the lovely reed. Few natural materials are its equal in strength to weight ratios. In many Asian countries, bamboo replaces steel in some construction projects. Tonkin grows to 40 feet tall in one year. It is naturally straight, with no branches and a slow taper. The prized "power fibers" found just underneath the outer cambium layer, known as the enamel, are stiff and resilient. As they grow, bamboo forms nodes from which leaf branches protrude. Tonkin bamboo does not form leaf branches in its lower sections. Each node, spaced from 8 - 20 inches apart, is relatively flat and easy to manage. The Tonkin bamboo grown on Chinese plantations is harvested every 8 - 9 years when it is fully mature.
I get my bamboo from Charles H. Demarest, Inc.. Harold and Eileen Demarest have helped scores of rod makers get their start. Bamboo comes from China in bales of 20 culms. Each culm is 12 feet long, and approximately 6 inches in circumference. Ordering a full bale lets you work with 12 foot culms. Try to get a culm or two of full length cane. The 12 foot lengths make life simpler, and use the bamboo more efficiently. Since it is shipped by common carrier, it isn't necessary to cut the bamboo in half for shipping. Smaller quantities of bamboo can be shipped via UPS but the culms must be sawn in half to facilitate shipping.
Upon its delivery, give your bamboo a thorough inspection. Some culms have "growers marks" scratched into the outer enamel surface. These marks are Chinese characters used by farmers to identify their crops. The scratches usually penetrate through the enamel to the power fibers, making that part of the bamboo less than desirable. Don't despair, growers marks are usually limited to the butt end of the bamboo, and rarely make the entire culm useless. You simply split around the marks and use those strips which aren't disfigured.
Because some bamboo grows crooked, the farmers straighten it over high heat. Any charred areas on your bamboo must be noted. They will appear dark brown to black instead of the golden tan color of natural bamboo. When I find a burn mark, I circle it with a red marker to remind myself not to use strips from that area. Also, I always mark the very lowest end of the culm with a black marker to prevent getting mixed up later.
Preparation and storage
Before storing the bamboo, a check split is installed in each culm. Left on its own, bamboo splits and cracks as it dries. To keep those splits and cracks manageable we give them a little help with a split through one side of the bamboo from the butt to the tip. Installing the check split is simple. Search each culm for any cracks and splits that have already begun. You may want to use a split that Mother Nature started for you. If there aren't any splits, find an old thick bladed knife to use as a splitting tool. Be warned that you can easily break the high carbon steel of expensive hunting knives.
I use an old knife I bought for $6 twenty-five years ago. Even new, it never held an edge well. You can purchase an expensive bamboo froe, but cheap old knives work just as well. You will also need some sort of mallet with which to strike the knife blade. Breaking the splitting knife is not as likely with a mallet as
it would be with a hardened steel hammer. One more tool needed here is a good pair of leather gloves. The split edges of bamboo are razor sharp. Since you will be using a knife and mallet on sharp bamboo and exerting a good bit of "elbow grease, this is an excellent opportunity to cut yourself. There are lots of good ways to cut yourself in rod making. This is one of the best. Unless you are careful you can wind up with the mother of all paper cuts, or much worse. Use common sense. Take your time. Be careful. And keep some bandages handy, just in case.
Bamboo splits best from butt to tip. Place the tip end of the culm against something solid, like one leg of your workbench. Lay the splitting knife against the one edge of the butt end of the culm. Orient the knife
so that its tip would split the exact center of the culm if it were solid. Getting this angle correct now keeps things simple down the line. Draw a line on the end of culm if it helps you keep things straight.
Tap the knife blade with the mallet. The split should begin to form easily. Help the split along by twisting the knife from side to side, always keeping the tip of the blade near the exact center of the culm. At each node you will probably have to give the knife another tap or two with the mallet. Extend the check split all the way from the butt to the tip, one split per culm.
Flaming
Some initial decisions need to be made before you begin splitting the culm into strips. First, do you want a nice honey-blonde rod, a deeply flamed rod, or something in between. My personal preference is a medium brown, evenly flamed look. Flame tempering adds some resiliency to the bamboo, and makes splitting a little less difficult.
Before flame tempering, the outer lip of each node and the hump above and below the node is filed to reduce its prominence. Though I use a 1" belt sander for this, I suggest you start with a 10" mill file. Place the culm on your workbench and while holding the file perpendicular to the culm, slowly file the outer lip of the node while at the same time rolling the culm toward you. Don't let the edge of the file to dig into the surrounding enamel. File until the lip is nearly gone, then examine your work. You will probably notice that there are distinct humps above and below each node, which need to be reduced in size. To reduce their size, file at an angle, again rolling the culm with each stroke to keep your work even around the circumference of the culm. Keep the cutting surface of the file on the bumps, not allowing the corners to dig into the adjacent areas. When the area between the bumps is about 1/8" move to the next node. Touching up all the file marks with some
220 grit sandpaper is a good idea. After dressing all the nodes it's time to flame the culm. (Skip the flaming if you have opted for a blonde rod)
Flame the culms with a high output, wide flame propane torch. I use a self-igniting BernzOmatic TS 4000. A pencil point flame concentrates the heat, but a wide, defused flame covers a large area with intense heat.
Major home and hardware stores often carry these torches. To flame the culm, work outside on a calm day. Lay the culm on your barbeque pit, or across two metal chairs. Practice flaming on some scrap bamboo. Flame some practice pieces to a very dark brown, almost black. Then sand the enamel away with 220g sandpaper. You'll notice
that though the enamel looks ruined, the power fibers underneath are beautifully colored. It takes lots of heat to ruin the bamboo, but getting the hang of where to hold the torch and how fast to move it takes a little practice.
Start your flaming at the butt end, and work towards the tip. Move the flame from the butt to just past the first node, then turn the culm a little. Pass the torch over the filed nodes at the same speed as you do over the enameled areas. With my torch, I cover an area about 1.5" wide in each pass, covering the entire circumference of the culm in four or five passes. I hold the torch about an inch away from the bamboo, and move it two or three inches per second. Never hold the torch too long in one place, or it will scorch too deeply. One author says what you're doing is similar to searing a steak, high heat for short durations. I try to keep
the torch moving at just fast enough to see the outer layer of enamel "explode" as the torch progresses. I wish I could be more specific, but this is one of those things you learn by trial and error, hopefully on practice pieces of bamboo.
Work from one node to just past the next, moving from butt to tip. When you reach the tip end and see steam and moisture being forced out of the end grain, you will know you have done a good job.
Cutting to length
Making a rod begins with selecting a taper and splitting the culm into strips. Many classic rod tapers have been published over the years. As your skills progress, you can begin to design your own tapers. For now though, let's stick with one of my favorite classics - a fairly quick 7'6" 2 piece 5 weight, lightly flamed. Since most bamboo rods are built with two tips, you need 12 strips for tips and 6 strips for the butt section of your rod.
Because I only make rods of one length from each culm, I cut each culm to length before splitting. In our example we're making a 7'6" (90 inch) 2 piece rod. The finished length for each section will be a little over 45 inches. But if you cut the culm at 45" your strips will be too short. Allowances must be made for staggering the nodes and for extra working length.
Nodes are the weakest part of the bamboo. Good rods never have nodes adjacent to each other in finished sections. I've settled on a 2x2x2 node spacing where each node is separated by two strips without nodes.
Allow a minimum stagger of two inches between nodes. Allowing another 2 inches leeway on each end of the strip gives you a little margin for error in planing and gluing the strips.
Here's the numbers: 45" (strip length) + 2"+2" (extra at each end)+ 6"
(node stagger)= 56"
If you choose a different node spacing, adjust the length at which you cut the culm accordingly. For our example, lock a tape measure in place at 56 inches. Lay the tape next to the tip end of the culm. Because the nodes are weak, you want at least 5 node free inches at the very tip. Make sure the node closest to the tip is at least 12" from the tip. If the uppermost nodes is not twelve inches from the top, select another culm, or move down below the first node. Mark the culm at each end of the tape measure. You will take the strips for the tips from that part of the culm between the two marks.
Now move to the node immediately below your lowest mark and mark the culm just below that node. Starting from this mark, measure another 56 inch section, and mark it. Strips for the butt section come from the part of the culm between these two lower marks. Extend each mark around the circumference of the culm. (Felt tip pens work great for marking on bamboo.) Now just for peace of mind, measure everything again.
To cut to length, over-wrap your marks with masking tape, and trace the marks through to the tape. With a hacksaw or fine toothed coping saw, cut the culm through the tape slowly to prevent tear outs. Mark the end grain of the lower end of the tip section strips with a red permanent marker. Make all your cuts the same way, with the hacksaw and the tape. Mark the lower end of butt strips with a black marker so butts and tips can be kept separated.
Splitting

Start with the entire culm, then split in halves. Split each half into thirds, resulting in sixths. Split each sixth into quarters, giving you twenty-four strips

Starting the split on a half node.

Splitting a half culm into thirds using the knife-in-vise technique.

Making the first split on a sixth-culm strip.
Working with strips at least 1/4 inch wide allows plenty of margin of error for splitting and node straightening mistakes. A culm of bamboo 6 inches in circumference will yield 24 strips 1/4 inch strips. When building very large rods, start with strips a little larger, perhaps 5/16 inch. The sequence goes like this: Split the culm in half. Then split each half into thirds, yielding six one inch strips. Then split each one inch strip into quarters, yielding 24 strips.
Begin splitting by dividing the culm in half, using the check split as a guide. (Put on your heavy gloves. The split sides of bamboo are razor sharp.) Center your knife in the check split, again holding it perpendicular to the enamel. Keep the knife aligned in such a way that every split passes through the exact center of the culm,
even when making the final splits. I use my big knife and mallet until I have the culm in six strips. Once things are lined up, give the knife a sharp whack with the mallet to get things started. Twisting the blade should move the split forward from node to node, though you may have to give the knife another whack or two at each node.
In theory, splitting bamboo into equal parts equalizes the stress on each piece and the splits run straight and true. - In theory. - In reality, the splits try to wander from side to side, and left alone results in some strange looking pieces. The solution is applying enough body english to force the wider piece into an arc. Bending the small final strips is fairly easy. Preventing the split from wandering too far on large pieces tries ones patience. Be willing to sacrifice some bamboo for the experience. By the time you have split two or three culms, the process seems second nature.
With the culm in halves, it's time to split each half into three pieces. From this point forward I use a small knife held in a vise for all my splitting. (I barely start each split with another knife) Keeping the knife stationary allows me to use both hands to apply all the bending pressure necessary to keep each split the correct size.

This is how the nodes will be positioned when the strips are glued together to form the rod blank.
When splitting into thirds constant correcting pressure must be applied to keep things in line. The thin bladed knife prevents the split from progressing too far ahead and allows great control over the entire process. Start the split, then press the bamboo into the knife. Be sure to keep the knife blade traveling through the imaginary
center line of the culm. Take your time, and then slow down some more. Don't forget your gloves. There are lots of good ways to cut yourself while making rods. This is one of the very best. And when you cut yourself, remember I told you so! Keep your wits about you and you will do fine. Since you only need six pieces for the butt, plus a couple of extras for good measure, don't get too worried if some of the splits wander a little.
Each half is divided into thirds (giving you six one-inch strips), and each third (sixth) will be split into quarters, yielding 24 strips. With 24 butt section strips as a goal, there is plenty of bamboo to work around any growers marks or leaf nodes. To split each sixth into quarters, start by splitting it in half. Then split
each half again. Again, mark each strip on the enamel side, and take your time. These smaller splits into halves are actually easier because each side is the same width and tends to wander less. You'll still find the strips wandering occasionally. Bend the unsplit portion of the strip towards the larger section, and things will work themselves back in line. When you finish splitting the pieces for the butt section you'll probably have 18-24 pieces at least 1/4 inch wide. Too wide is okay, but will make for much more planing down the line.
Each of these strips will be split again. Splitting is only learned through experience. Most makers find it very difficult at first, but soon find themselves trying to squeeze a few extra strips out of each culm so they can make more than one rod per culm. For now, though, be content to get six or seven good butt strips and twelve to fifteen good tip strips. If you accomplish that goal, then take a break and have a strong cup of coffee.
- Log in to post comments


Anonymous,
It req
Anonymous,
It requires very little force to split bamboo and can be done with a knife and maybe a small hammer or wooden mallet. No force needed.
Martin
kindly indicate the
kindly indicate the force needed to split the bamoo
Me and my 14 yr old
Me and my 14 yr old grandson are trying figure out how to make our planeing forms from scratch, but not having much luck. Also are the plane forms diffrent for the butt end and the tip end.
Richard Thomas
Hi , I am trying to
Hi , I am trying to find out what a permanent bend in built-cane rod is called? please can you help.
Please email yes or no to me at email address many thanks for your time
Regards William
I have several old (
I have several old (antique) bamboo rods that I have found at yard sales. Two of the rods that I am interested in restoring are heavy rods one is in the 10 foot range and the other is in the 8 foot range. The others are fly rods, they seem to be in pretty good shape still in the original wood box. Any information that you could supply would be most helpful.
If you have the time
If you have the time and money to go to Taipei, Taiwan (Formosa) R.O.C., the economy version of this process can be reviewed at local markets. Don't try to import the stock yourself, but try U.S. shipments in very small quantities.
If you write me a ma
If you write me a mail I'll explain how we get our bamboo to Europe
For tonkin sources t
For tonkin sources try:
Andy Royer www dot bamboobroker dot com
Demarests www dot tonkincane dot com/
or go to www dot bamboorodmaking dot com
or join the bamboo rodmakers list smtp dot goldrush dot com/mailman/listinfo/rodmakers -
the rodmakers liusts has people on most copuntries and they will point you all in the direction of a source if Andy or Eileen can't help you
(if you're in the Us also try www dot goldenwitch dot com)
no financial interest etc etc
Harry,
Is there a t
Harry,
Is there a tonkin supplier in Serbia or Bosnia?
Tnx
please can any one t
please can any one tell me where i can by tonkin poles in england. regards terry.
Harry
I have fail
Harry
I have failed to find a supplier of tonkin cane in the UK , can you or anyone help?
Harry
Do you know w
Harry
Do you know where I can purchase Tonkin Bamboo in England?
THanks
Fantastic!! Do you k
Fantastic!! Do you know where I can found the bamboo pole in Europe?
Thanks for these instruction
Franco
We have a lot of thi
We have a lot of this kind of bamboo poles.
You can pick any ones best for your flyrod in bamboo mountain.
i like it but i wish
i like it but i wish i could find out how to build a split bamboo pole by scratch