
Now that we have our strips of bamboo tapered into sections for our fly rod, the next step is to glue these strips together into whole rod sections.
The Global Fly Fisher Guide to Building Bamboo Fly Rods
Part 1 | Part 2 | Part 3 | Part 4 | Part 5 | Part 6 | Part 7
Part 6 - Glueing strips into a blank

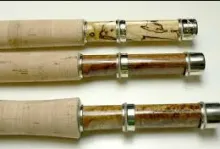
A rod I built for a friend in Memphis, Tennessee

Opening the taped sections with a toothpick and a single edged razor blade.

Open sections, taped together, ready for gluing.

Spreading glue on the fanned open sections with a cheap toothbrush.

Four sections coated with glue and ready for the binder.

One pass through this binder holds things together snugly.

Rolling a bound section to remove the bends.

Two sections in my oven, ready to heat set the Epon.
Thanks for sticking with me this far! Several readers have written to express their appreciation for the series thus far, and to share their anxiousness about seeing the entire series. Today we'll look at turning those freshly planed strips of bamboo.
Let's begin with a quick review. Setting out to build a 7' 6" two piece rod, we began with a 12 foot culm of bamboo which we flamed-toned and cut to length. We split that culm of bamboo into 24 pieces, then selected the twelve best tip pieces and six best butt pieces. We staggered the nodes and cut those strips of bamboo to the correct length. We soaked the strips for several days, then flattened and straightened the nodes. After getting
the nodes under control, we rough planed each strip into an un-tapered equilateral triangle. We bound the strips into bundles of six pieces each, and heat treated the bundles. Finally we set our planing forms, removed the enamel from each strip, and planed each strip to its final dimensions.
In this installment, we'll first tape the strips into bundles. Then we will open those bundles to ready them for gluing. We'll whisk away any dust, and slather the strips with glue. Once we've painted the strips with glue we bind them together, straighten any bends and sweeps, and force the glue to set at an elevated temperature
Cleaning the strips
Gluing the strips into a blank begins with a thorough cleaning of each strip. I almost always sand away the tiniest sliver of the pith side apex of each strip to enable the strips to nestle together in a perfect hexagon. I make one light pass with 800 grit sandpaper on a stiff sanding block. That one pass will remove more bamboo than one might imagine. After sanding the apex of each strip, I wipe each strip down from butt to tip with odorless mineral spirits. Any sort of paper or cloth will catch and tear leaving fuzz that might interfere with gluing, so I use an old worn out leather golf glove moistened in mineral spirits. That leather is fuzz free, and surprisingly smooth. I've been using the same glove for about 40 rods now, and at this point I need to scrounge up another one. The sharp edges of the strips have cut it to ribbons!
We'll bundle the strips together with simple masking tape. Gather the strips for the butt section of your rod into a hexagon being sure strip two is between strips one and three, and so on. Begin fixing the butt strips together with one full turn of 3/4 inch masking tape, plus one flat. Use 3/4 inch tape on butts and mids but smaller 1/4 inch strips of masking tape on tips, just to keep things snuggled together tightly. I always start
and finish the tape on strip number 1. Place a wrap of tape about 2 inches from each end, and at three or four more or less equally spaced places. . When we slice the tape open in a few minutes, the reason for starting and finishing on the same strip with each wrap of tape will be apparent.
Use a common round toothpick to gently pry an opening between strips 3 and 4. Since I started the tape on strip 1, there are no ragged ends to worry with. The very corner of a fresh single-edged razor blade slices neatly through the tape, allowing the section to fan open. Take care to keep the razor blade centered between the strips, not allowing it to shave off any bamboo. When we cut through each wrap of tape the strips will remain joined only on the outer, enamel sides and fan open. The taped enamel sides enable us to roll the strips together neatly once we have applied the glue.
Choosing the right glue is imperative, and we will not be able to find suitable glues at the local hardware store. Over the years rod makers have used four basic types of glue. Hide glues were used for many years, and serve well as long as they are covered with a waterproof coating. Hide glues are messy and difficult to use and are water soluble, thus they aren't the best choice. Resorcinol glue is used in making plywood and other laminates. Its chief drawback is unsightly purplish glue lines which emphasize every little bobble of your plane, and its short working time. Urea Formaldehyde glues are widely used by many rod makers today. Though
I haven't used it, Urac 185 is a good choice for making bamboo rods. I have avoided it because it has a limited shelf life and a shortish working time. Also, without an accurate gram scale it can be finicky to mix correctly
Glueing the strips
I've made all my rods with epoxy glues. The only two that I know are suitable for making bamboo rods are Nyatex, available from Bill Hulbert in Michigan at (517) 546 - 4046, and Shell Epon glue from Stephenson Chemical Company at (708) 966-2022 or via the web at Bingham Projects. I used Nyatex for my first dozen or so rods, and have since switched to Shell Epon. Epon is available in smaller quantities, and seems to smell a little less toxic. Both glues offer an hours long working time which offers the rod maker the luxury of working at a relaxed pace and plenty of time to wrestle with stubborn crooks and bends. The particular Shell Epon I use is Resin 826 with a combination of Hardeners Versamid 3126 and 3140. Many of my rod maker friends use Epon Resin 828 and Versamid 3140 mixed by volume at a 1:2 ratio.
Unless you have the tremendous advantage of a rod making mentor to guide you through your first attempts at gluing a rod, I would strongly urge you to stick with epoxy glues. Both Epon and Nyatex epoxy offer an unlimited shelf life and hours of open time. The only disadvantage I see is difficulty in cleaning off excess glue, and I'll share a couple of tricks to make that less difficult. Let me reiterate that the local hardware store will not carry suitable glues, so don't even try them.
I mix my glue in the small plastic measuring cups sold through fly shops for use with wrap finishing epoxy, which are really medicine mixing cups. Fold the components together slowly for a full two minutes. Set the glue aside, wait five minutes, then stir slowly for another full minute. While you wait, tape some newsprint over your workbench to help keep it clean. Work at a relaxed urgency since epoxy allows that luxury. To keep things a little less messy I wear latex gloves. They are hot and slightly limit my dexterity, but they do keep the epoxy out from under my fingernails. Somehow I usually still manage to get epoxy all over me. I'm the sort of fellow who can get grease on my white dress shirt by even thinking about opening the hood of my car.
Before spreading the glue on the strips, I whisk away any debris with a brush, and blow the strips clean with compressed air. Any trash we leave on the strips now will cause ugly glue lines later. Diligence now pays big dividends later.
Spread the glue on the strips with cheap toothbrushes. My wife buys them 6 for a dollar at our local "Only a Buck" store. Use each toothbrush once and throw it away. To prevent lifting any fibers work only from the big end towards the little end. Load the brush with glue, and slather it on the strips. As the toothbrush begins to drag, load it with glue again. Holding the brush perpendicular to the strips allows it to cover all six strips in a single pass. After the strips are covered with glue, I run the brush down each strip again, holding it parallel to the strips, removing some of the excess glue, and covering any areas which might have been missed earlier.
When I'm satisfied that I have glue on both inner flats of every strip, I carefully inspect everything in good light, just to be sure. If there are dry areas, I touch them up with the glue covered toothbrush. Repeat the process of spreading glue on each strip for each section.
After spreading the glue on each section we bind everything together with cotton thread. Since both the epoxy glues mentioned require a heat-setting regimen, be sure to use only cotton thread. Polyester threads will burn, leaving distinct lines in the rod we have labored long and hard to create. I use 16/4 glace cotton binding thread for all my gluing and heat treating, available from Russ Gooding and his cohorts at Golden Witch.
Since the binding process was covered in some detail in the Heat Treating Installment, I'll only touch on it here. The main difference between biding glued sections and roughed-out strips is that the tips will be much smaller now. Therefore be sure to take things slow and easy. With a Garrison type binder as shown in the most of the photos, it is necessary to pass each section through the binder twice, reversing the drive belt direction
after the first pass. With a four string binder, one pass through the binder wraps in both directions at once. With my Garrison binder I use 24 ounces of weight. The four string binder applies more pressure, so I use only 11 ounces of pressure for butt and mid sections, and 5 ounces for tips. Whether we use a Garrison binder, a four string binder, or affix the binding string by hand, leave a few inches on one the small end to form a loop used to hang the sections while they dry.
Let's review for a minute... We have knocked the faintest edge off of the apex of each strip, cleaned the strips, and taped them together in their final place. We spread the glue with a toothbrush, folded the sections together, then bound them with cotton string. Now comes the toughest part of rod making; getting those glued sections straight. Straightening is a pay me now or pay me later proposition, and believe me, it's easier to straighten now while the glue is soft than it is to straighten the sections later.
Straightening the strips
The first step in straightening is cleaning up some of the excess glue which has squeezed out in the binding process. Urac and resorcinol glues clean up with water, but epoxy requires more effort. Moisten (not "soak") a sponge with either white vinegar or denatured alcohol. Gently wipe away as much of the excess glue as possible. Leaving all the excess glue makes it very difficult to see twists and bends and sweeps. As soon as my sections are bound, I try to remove 75% of the excess glue. Some will remain next to the binding string, and we'll take care of it later.
With most of the excess glue wiped way, lay the sections on a flat surface. I have two Formica covered tabletops that I use as workbenches which serve the purpose quite well. Wayne Cattanach suggests using a melamine covered board. Use your own ingenuity here, but I would not suggest that you take the freshly glued sections and roll them around on your mother-in-law's mahogany dining table! Hold one end of the section flat against the table with the index finger of one hand. Press the index finger of the other hand against the same flat at the opposite end of the section.
If the section rolls slightly, then you have a twist. Moving your index fingers closer together will help you find the exact point at which the twist begins and ends. I'll be willing to wager that it is near a node. To remove the twist, hold the section on each side of the twist and twist it in the opposite direction. Hold it a few seconds, and test for twists again. You will likely have to twist things much more forcefully than you think to get the section flat.
When you have the twists out, roll each rod section on the flat surface. With palms down, begin with both hands in the center of the section, and roll it back and forth under considerable pressure. Start with your hands together, and continue rolling moving your hands farther and farther apart. I'm always amazed at how effective this technique is at removing long bends and sweeps. A few little bends may remain. If so, check for twists again. You can't remove the bends effectively until all twists are gone. Some makers use a wallpaper roller to press things flat. Others roll the sections under a flat board. Keep at it as long as necessary until you are satisfied that you have the section as close to perfectly straight as you can get it. Bends can still be removed after the glue sets, but now is the easiest time to do so.
Work your way through each section, rolling and twisting it straight. When you finish, hang tie a loop in the binding cord and hang each section to dry overnight. The next day, 16-24 hours after initially gluing the sections, both Epon and Nyatex respond well to heat-setting. Forcing the chemical reaction to progress more quickly at a higher temperature results in a stronger bond. It isn't a necessity, but it will make your rods stronger and less likely to "take a set" later.
Remember earlier I said I'd share a few tricks? Here's one. Wiping the bound sections down with denatured alcohol or white vinegar removed about 75% of the excess glue initially. After the glue has cured overnight, remove the binding cord. If we remove the binding cord and wipe down with solvent again, we can remove almost all of the remaining glue. On particularly troublesome spots, sometimes I scrape things a little with a thumbnail. We will have to bind things together again, thus increasing our time at the binder, but that only takes a few minutes. If we don't remove the cord now, wipe down, and re-bind with new cord, the glue-soaked cord will have to be filed or sanded away. I learned this trick from a friend and it has saved hours of work with a file and sanding block.
Bind the sections again, and again spend some time making sure things are straight and flat. The clean binding cord without the glue residue will make things go much more quickly. When things are bound and straight, fire up the old oven. I heat set my Epon at 180*F for four hours. When I used Nyatex, I heat set for three hours at 235*F. I'm not sure I understand all the technical reasons why this is important, but it is. Heat setting Epon
raises the temperature at which it begins to soften from about 145* to about 190*. Rods left in the car in summertime Louisiana might well reach 145*.
I allow the sections to cool slowly, remove the binding cord, and sand away any remaining traces of glue with 400g sandpaper. Then I sit back, have a cup of coffee, and relax. Well, that's not quite true. Usually I wipe everything down with a quick coat of tung oil, and hurry into the house where I make my wife and daughter ooh and ah and brag on me. Either option is okay, but do give things a good coat of tung oil, and be sure to keep the sections bone dry from here on out.
Next time we'll look at adding ferrules, and beginning to turn this wonderful newly completed blank into a work of art suitable for your favorite fishing hole.
- Log in to post comments


In addition to glue,
In addition to glue, use multiple coats of finish. adding multiple wraps at intervals also improves both appearance and strength.
Harry: Your articles
Harry: Your articles were very helpful in the pursuit of my first couple of rods. I am only having one trouble and that is straightning after gluing and binding. In talking with another bod builder he feels 24oz is too much weight for tips and that is my trouble. I have been winding up with significant bends that cannot be removed. Thanks again for your excellent articles.
Does Mr. Boyd contin
Does Mr. Boyd continue to use Shell Epon for gluing his rod strips? Anything new regarding the Versamid choices?
Thank you.