
The handle is both an important part of any rod and a whole project in itself when building a rod. Jan-Ole Willers helps you choose a shape, select the cork and plan added features such as a fighting butt.

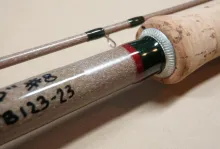
Struble U-18 reel seat fully assembled |

Struble U-18 reel seat in a side view disassembled. |
In the first part of this series I covered all the different components of a home built rod. This part will cover some final decisions and the building process itself.
Decisions
Based on all the previously mentioned considerations I have decided for my new coastal toy to have a full metal Struble reel seat anodised in grey, which will not fail due to frequent usage in the sea.
Because the blank seems to be very powerful I have decided on three strippers, which I would normally not do on a class 7 rod.
I decided to select stripping guides from American Tackle. Titanium framed Nanolite ceramic guides in sizes 20-16-12 will do a good job. Why Fuji is not making a suitable Titanium Stripper in size 20 is beyond me, but that's another story...
Stand out snakes will be from Hopkins & Holloway, and will complete the guide line-up - the size range being 5-4-4-3-3-3-3 - until we reach the tip top. Here I re-decided on a Fuji titanium tip top with Sic insert in size 8 rather than a standard wire loop tip top.
The handle has to be a Full Wells for this rod class in my eyes. Not too thin and not too short - suitable for the size of my hand. Also the fighting butt should not be too smallish.
For your own projects you need to compare with handles on rods you like and take measures of handles you like and some you don't like to find the dimensions of your ideal handle. For that you can use the attached tables in PDF-format where you can fill in the measurements for the handle as well as for guide spacing and sizes.
I personally do not like rods, which are look like a circus horse. So I decided to keep everything on a simple level with regard to colours.
The colour of the blank will be repeated in the fighting butt end. All guides are titanium. I will repeat the colour of the reel seat in the male joints of the blank.
I like to use silver tinsel with rods where I use stainless steel or chrome plated guides, but that was not the case with this rod. So I decided just to go for black winding thread for guide wrappings and the reinforcement wrappings at the female ends of the blank pieces.

Blank with marking for fighting butt and reel seat |

Blank with tape bushings prepared to accept the reel seat |

Reel seat positioned exactly on bushings |

Bushing in reel seat, ready for glue to fill the gap |

Reelseat mounted on bushing, prepared to fill in the glue ring |

Here we align the reel seat with the help of reel with the spine marking. |
Installing the reel seat
To install the reel seat we have to check where the seat should be placed according to our drawing. The bushings needed to install the seat centred on the axis of the blank can be made from masking tape. To connect the two parts I am using a two component epoxy glue.
Put some glue on the bushings and slide the reel seat over them. Once it is in place, fill some glue in the gap between the reel seat and blank.
This will create a strong, direct bond between the blank and reel seat, not using the bushing to absorb all the force. This could in the worst case end up in a loose reel seat - if the glue of the masking tape lost its grip.
This epoxy bond has to cure with the rod blank standing upright and has to be done for each end of the reel seat for obvious reasons. With these bonds made of epoxy any reel seat for a fly rod should be well connected to the blank.
I learned from one of the manufacturers of this type of glue that the bonding power can reach 300kg (660 pounds) per cm². Even if our epoxies will reach just 50% of this bonding value for whatever reason, it will be a rock solid connection.
If you are building your first rod, I strongly recommend not using 5 minute epoxy. I believe you can imagine why. Nothing is more disgusting than a misplaced reel seat.

Cork rings and rubber cork |

Preparations for cork handle installation |


There are two ways to build a handle
You can build it directly on the blank as I have done here, or on a thread rod, which is a little more safe for your first rod. For the thread rod method I would like to give the suggestion to read the following articles about building a grip lathe written by Jon Jenkins and about making grips written by Bob Petti as well as Dave Lewis' article about sanding down cork to the best finish, which you can find here on the GFF homepage.
Let us cover the advantages and disadvantages of both methods. I believe that with the direct method you will not need as much glue as with the thread rod method. This is because you can work out every single cork ring exactly to the diameter of the blank where this specific ring will be located. That is not possible for an already completed handle. The next advantage is just a cosmetic one: you do not have to use a winding check because you can work out the front cork ring very precisely if you have the necessary calm hand and a lot of patience.
The thread rod method is a little more stress free for the first time builder, because if the result on the thread rod is not up to your standards, you can simply make a new handle.
The main disadvantage is that theoretically the handle will not have full contact with the blank when installed. We can not eliminate the inside cavities or holes, which are not visible from the outside, but which might give the handle a certain internal movement and instability in times of heavy strain (e.g. during fighting a big fish). This might lead to a cracked handle. For the thread rod method you will also need much more glue than with the direct method, and that will add some extra weight to the rod.
Installing the cork for the handle with the direct method
After we have installed the reel seat we have to fabricate a cork ring which we can place on the recessed hood. This has to be done carefully to avoid braking the cork, which obviously tends to be fragile in thinner diameters.
It is best done with a round file with a relatively big diameter to avoid an uneven inner shape. While filing, place the filed area on even ground to avoid braking. Work "around" the cork ring clockwise or counter clockwise to avoid a shape which becomes uneven. Check often whether the ring will fit.
After we have installed this recessed ring with epoxy glue, we can start using the whole reel seat as a basis to press on the cork rings from above.
To do so we are reaming all cork rings into shape so that they will fit snugly in their exact final position.
When we have finished the reaming of all rings we can start to glue the rings together. Mount them one by one on the blank using epoxy glue sparingly.
Pressing is now very important and can be done by a simple tool as you can see it in the picture. The right amount of pressure will make epoxy ooze out at the sides, and will result in a handle with virtually no glue rings between the single cork dishes.
Epoxy rings between the cork dishes look bad, so take care to work correctly with no visible glue lines as a goal. Do not use fast curing epoxy for this job. Otherwise you might end up with cork rings, which are not installed properly.


Shaping the handle
At this stage I want to refer back to the point where I spoke about the handle shapes and how important it is to go for the right shape and dimensions.
When the glue is completely cured, we can start shaping the handle. As a preparation I always cover the entire blank and reel seat with masking tape to avoid accidents between sandpaper and blank surface while the rod is turning in the lathe.
Maybe you think this is overdoing it, but just one short touch with the sandpaper on the blank or reel seat while everything is turning can end up in a damaged surface on the rod or reel seat. Also make sure you have to put a solid wrapping on the blank where it connects to the bearing.
The first task is to make the handle concentric. This can be done with a sharp chisel. Your hand has to be placed on something that will give you a steady support during this important part of the job. At this time the glue rings which oozed out can be removed one by one. When this is done the shaping process can commence.
We use sandpaper in different grits. Start with 60 grits over 100, 150, 220, down to 400 grits to give the handle a nice, smooth surface. If you do not feel confident in the beginning, leave out the very fast working 60 grit paper and start with the 100 grit one. Also a moderate turning speed will help.
Do the shaping carefully and take enough time to finish it without stress. Every bit sanded away can not be put back. Use a calliper to compare the diameters with your drawing frequently. Checking the current size by picking up the handle is also a good idea to see if drawing and reality match with the feeling of the grip in your hand.
One more point is very important: Cork dust! To maintain Status Quo in your home - hopefully peace or at least something similar - I strongly recommend always using a vacuum cleaner to keep the dust in your environment on a low level. You can see on the photo how I have done it.

Sanding job done |
When I have finished the handle I wipe off the dust and rub the dry surface with a piece of white candle wax to protect the handle against dirt. This has to be redone from time to time after fishing to keep handle protected. Others are using a special oil available from the rod building supply shops to protect the cork handle. Both methods are a matter of personal taste and are not necessary if you don't want.


Assembling and installing the fighting butt
First we have to ream the inner diameter of the required cork rings to fit snugly on the blank, followed by gluing together the necessary quantity of cork rings. This is not as critical as the reaming of the recessed cork ring or the front ring on the handle, because the outer diameter of the reel seat will hide a lot.
Glueing together the rings tightly is most easily done on a piece of thread rod with some wide shims and some nuts for an even pressure from both sides. To attach the soft Eva foam to the fighting butt we again use epoxy glue, pressing both parts together firmly after we have cut the Eva foam with a tomato knife into the rough shape of an octagon or similar.
To turn the butt into shape we put the raw fighting butt on a small, short piece of rod, placed with one end in the drilling machine. This small piece of rod must be completely straight. To close the gap between the rod and the inner diameter of the raw fighting butt we simply use masking tape to make it a tight fit.
The installation itself is fairly simple. We have to put some epoxy glue on the end of the blank behind the reel seat and push the fighting butt onto it. Wipe off excess glue oozing out with a soft cloth. If oozed out epoxy starts to harden, put some alcohol on the cloth for easier removal of the remaining glue. Do not do this too late. If the epoxy has cured beyond a certain point it is too late and you will face big difficulties in removing the remains.


- Log in to post comments


Jerry,
Check out
Jerry,
Check out this comment to another article, which has links to a couple of sites with a lot of rod building products.
Martin
Where can I purchase
Where can I purchase the cork slicing and decorative pins jigs for doing cork handles
hi I see that you se
hi I see that you seem to be using a drill chuck as a lathe would it be possible for some specs on both lathe/drill and the support bearing you are using to turn the cork handle. This seems a good cost effective way of turning cork handles many thanks
i am rebuilding old
i am rebuilding old sea fishing rods
where can i get the corks ?
thanks Mal