
German Jan-Ole Willers wanted to be able to clear his vise, tools and materials off the dining table for such unimportant events as lunch and dinner. That made him think out and build his own inexpensive portable fly tying bench. You can do the same.
The Reason

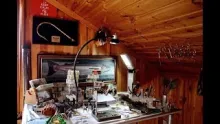
The usual mess |

Testing the design |

The finished bench |
Usually I tie flies in our living room, occupying the dinner table for days on end. To be honest I do not tie continuously in the most cases. Sometimes I tie some flies in one shot because they are missing in my fly box, sometimes I just try some things out or sit down and tie something after I had a certain idea. So the area is just blocked a lot of times with my material, which some people in our household do not like too much... This is the reason that the idea was born to have something that will enable me to tie a fly without endless preparations, but also to stow it away quickly if the area is to be used for something of less importance, like lunch or dinner.
So I decided to build my own tying bench.
Developing
I started to think what "my" bench should look like. I had seen just a few in real life, so I tried to complete my knowledge in this regard on the Internet. With the right keywords put into one of the search engines available out there I found quite a few from very small stations for a few bucks up to complete tying furniture in size of a serious office desk for the price of a pre-owned car.
Having all this in mind I determined what should find its place on my bench, following these points, which my bench should fulfill:
- Holding the most commonly used tools, different kinds of spools of threads, tinsels and wires, head cements as well as some hooks.
- Giving some space to hold the currently used tying materials. All things not in use are located next to me in a steadily growing material bag.
- Having enough space to place my tying lamp on it (I'm thinking already about a fixed giraffe type lamp to enlarge the usable area).
- Having enough space to rotate the bobbin cradle 360° while the vise is located in its regular tying position (If not possible I would go crazy within short, I guess).
- Also we need a size, which allows us to store the equipped bench somewhere while not in use without any problem.
Construction drawings
Download drawings for the tying bench shown in the photos. Use them as inspiration or as precise guides.
The drawings are in PDF-format and require Adobe Acrobat Reader to be viewed.
A second suggestion for a tying station can be found in the article A TV-tying station, which is a more compact bench.
If you build a bench, please send an image to martin@globalflyfisher.com to post as an inspiration to others.
A test setup
With a test setup we can check what size will be okay for our custom-made bench. This is something that I can truly recommend. It helped me a lot in judging the basic size.
Now is the right time to make some drawings and to think about single features you might consider. To decide where to place the tools, considering if you are right- or left handed, where to place the spools and maybe where could be a good place for your hook box...
Details
To get space for some small boxes, I decided to install the tool profiles of the rear area on top of the profiles, which are located on the right and left side.

Cord |
In the gap, which we are creating this way, we can partially push in small boxes or other parts you can fetch out again easily.
The holes drilled in the first rear profile are wide enough to accept empty SLR film boxes, which are used for beads, eyes and other very small stuff.
By using the area above the gap, we are using the area twice, avoiding it becoming too big. To avoid that something slides out to the rear, we need to close the gap with a small piece of wood-not forgetting a small cutout for the cable to the tying lamp through. Remember to check the size of the plug.
As you can see I tried to keep it technically on a simple level. So I avoided things which might look bad if not finished perfectly, like diagonal cuttings or small drawers, which would have been possible below the material stands on the rear profiles. Not using drawers also makes the area more versatile from my point of view.

Materials |
Preparation
I ended up with the following material list:
- Plywood to be used as a stable foundation. As always with wood you will have a large selection and you can decide to go with something cheap and practical or with something really nice and expensive. You can laminate some exotic woods on the surface of the foundation.
- Different pieces of wood for the side and rear walls. These pieces will give you the space to keep most of the things in their place, mainly with the help of holes or metal pins. To determine the right width of each profile consider what each area has to carry. Looking at the number of rows and holes for the tools on the side arms, I may have chosen the wood a little too wide.
- Thin metal (aluminum) rod for the spool pins. Check the inner diameters of your spools to be placed permanently on the bench. In this way I decided to go with a round aluminum rod (diameter 4mm/0.16 inch), which is thin enough and cannot break as easily as wooden ones.
- Magnetic plastic foil. To hold a few hooks and beads or some ready made flies for drying, placed in convenient locations depending on the intended application. Not as strong as regular magnets, but which also in some cases it will make it difficult to remove small things like eyes.
- Cork-shims or substitute. To be used as feet under the plywood to ensure a stable position on the table where you place it while tying. I used four thin cork dishes. They can be bought where you buy rod-building supplies. Small pieces of self-adhesive cork would also do the job.
- White glue. To glue the wooden parts together.
- Epoxy. To glue the magnetic foil onto the wood.
- Coating or varnish. To give the wooden surfaces a certain protection against environmental influences through the daily life, like coffee, head cement etc...
Sources
I bought the plywood and the wooden profiles from a local carpenter. The variety of woods he had was by far bigger and nicer what the local DIY markets are offering. The aluminum rod I sourced from a DIY market. The magnetic plastic foil came through the Internet. One of the big online auction houses helped me in this regard, but also shops with office supplies should have something like this (except in Hamburg!). Everything else is not difficult to get.
Tools
The following tools are required:
- Different saws to bring the raw material to the right shape.
- Sandpaper to fine-tune surfaces and edges.
- Power drill and a variety of wood drills to do the necessary compartments and holes for tools.
- Countersink to widen the top of the small drillings for easier entry of tools.
- Drill rig. I strongly recommend using such a rig. If you do the holes for the spool pins "free style" I think you will end up with a wild row of unparallel pins.
- Clamps and small wood pieces to do the clamping after the gluing has been done. Place the small wood pieces between the clamps and the bench to avoid ugly marks in the surface.
- Old cloth and a piece of steel wool to rub the oil varnish into the surface of the wood for protection purposes.

Magnetic foil |
Assembly
- All wooden parts must be cut with a saw to the right size, followed by sanding.
- Carefully mark all positions for the holes and drill them on a DRILL RIG as deep as required.
- Countersink the small holes.
- Glue the cork shims on the least pretty side of the plywood and install all wooden parts with glue and fix them over night-clamped carefully with wooden protectors.
- Varnish all areas except the areas where the magnetic foil is to be installed. Temporarily cover these with masking tape.
- Attach the magnetic foil with epoxy glue. This is a little tricky due to its curled shape. I assume it's stored on very big spools. Use epoxy sparingly and press carefully to avoid the edges of the foil rolling up at the same time removing excessive glue.
- Install the pins carefully with some epoxy after they have been cut to the right length. If pins do not slide in easily, I recommend using a rubber mallet.
Maybe not perfect
I do not know if the result will be perfect. Time will tell. At least the bench will help me to keep my fly tying belongings in one place.
I am quite confident that based on the points mentioned, almost everybody can design his own tying bench which will improve his tying area.
If you would like to know exactly what I have done you can have a look at the drawings of my table, which are equipped with a metric scale to show you the exact dimensions.

With linoleum |
Addendum
Time will tell
After a certain time I thought about the surface of the working area again and again. Because I was not able to give the surface a finish I liked, because the area was not so easy to clean as assumed formerly and last but not least because I did not like the surface feel.
I was already thinking about different materials when I found what I was looking for: Linoleum. This old fashioned material is about to have his comeback as a material in the furniture industry. You can buy it for example from your local carpenter or at least ask him to order a piece for you. It comes in different nice uniform colors to suit the wood you are using. Typical material thickness is approximately 2 millimetres or 1/10 of an inch.
This type of Linoleum comes "ready to glue" on a thin paper cardboard surface which makes it easy to attach it to the surface of your plywood. If you have to cut the material into the right size use a very sharp knife as it is used for carpets or ask the carpenter to do this for you. To make it convenient to work on the desk later on, hone down the front edge of the linoleum with a very fine file at a 45° angle after having attached it and letting the glue cure. No hurry and constant filing works out best for a nice and even result.
The only negative point I found I do not want to hide: Linoleum will react with solvents due to its composition (mainly linseed oil, pine resin, wood- and cork powder). You will find such solvents in several glues as well as in most head cements I know, and drippings can end up as a dull spot on the surface.
User's tying stations
Below you see some examples of some of GFF's visitor's tying stations. If you have built your own station and want to share, send a description and image to Martin.
Brenton Cumberpatch's bench


GFF visitor Brenton Cumberpatch sent a couple of images and even a PDF-plan of his bench.
Brenton writes:
Just thought I'd share the bench I made after looking at your articles on your site for inspiration.
I had a piece of laminated bench left over after a kitchen sink upgrade and it happily provided the majority of the material for this tying bench.
It easily fits on my lap as a TV station, as well as being able to be used on a table.
I have recycled a 7day pill container and incorporated it into the holder. It's perfect for holding beads, eyes, hooks etc as the front edge is curved making it easy to remove the contents.
I have also added a strip of foam along the top of the back board and inside the right hand arm, so I can mount flies and prepped hook/beads combos.
The holders also happily hold a shot of my favourite whisky while tying ;)
Cheers Bud
Tom O'Neill's bench

GFF visitor Tom O'Niell sent an image of his bench.
Tom writes:
Thanks for showing the benches and your time with the site. Thanks again!
Tom O'Neill
Bdonais' station

GFF visitor Bdonais built this simple station.
He writes:
Frank Duwel's box


GFF visitor Frank Duwel built this portable tying station in a wooden box.
Frank writes:
I made this little bench on the go from an old wooden box.
Some simple adaptions where made and here is my flytying box for taking outdoors and tie flies on the spot.
Frank
Rich Gerbin's station

GFF visitor Rich Gerbin built this tying station.
Rich writes:
Rich Gerbin
Ian Wilson's station


GFF user Ian Wilson took inspiration from this article and built his own station.
Ian writes:
I'm not sure if mine is 100% finished yet and it sure isn't perfect, but functional it definitely is! I did not have access to a drill rig so had to drill all the holes by measuring them out and keeping a steady hand but overall I am quite pleased with the result. I think I will leave the back open as I will use it on a dinner table so things can not really fall anywhere and I need to fit english plugs through the back which are quite large.
The wood I used was ony 6€ for 2 metres of 45x45mm sustainable pine. The spindles are just 5mm dowel that cost 1,50€ for one metre, so all together with the varnish & magnetic strip it only cost about 20€.
The best thing is, like you said, it enables one to keep all our fly tying belongings in one place instead of constantly unpacking then packing everything away. Genius.
Mitch Linne's station


GFF user Mitch Linne also built his own station. Different style, but same basic concept - and a neat vise base.
Mitch writes:
Most of the wood is walnut scrap from a cabinet maker. The sides are cherry from another one. The base is a piece of coated particle board used for making white cabinets. The pins are brass rod. I left the left side with only a couple of holes for later customization. Already I need to create a place for the hair stacker.
Note the beautiful piece of figured walnut they sold me for the pedestal.
Martin Slack's station


Martin Slack' from Melbourne, Australia made his version of the bench.
Martin writes:
I made two very small modifications - I added rubber non-slip feet so that I can use it on a table. Also, I added a right-angled piece as a grip point for a clip-on light. I need a raised piece (rather than just using the board itself) so that I can use it on a table too.
Best regards,
Martin Slack
Melbourne, Australia
John Taylor's station

John Taylor from Ottawa, Canada made two benches.
John writes:
John Taylor
- Log in to post comments


You may discover plans
You may discover plans for building a fly tying bench in your inviting fly angling magazine, yet with the Web you've got access to data in plenitude - and with our help, you won't have "fish" for long to discover the arrangements for an incredible tying bench.
Picture frame holders
I will include, raised and at the two rear corners of the desk, a pair of small easel-type picture frame holders elevated on wood dowels that can be removed. One will hold my iPad so I can view fly tying videos to direct my work. The other will be for printed instructions and recipes.
I just found this site
I just found this site. Great information that I was able to share with someone on another forum looking to build his own tying bench. After reading the article, I've decided to build one to replace the disaster I created before finding the GFF Site.
After seeing this ar
After seeing this article on GFF, I was inspired to build my own portable fly tying bench. I used all scrap lumber and it really cost me very little to build. The only thing I purchased were magnetic strips and aluminum rod for spool pegs. If you would like me to send pictures of my finished bench, just let me know.
Knitting needles
I have used wifes old 4mm knitting needles. this works well if they are not to bent.or pick the up from a charity shop.
Hi, Leonard from Sou
Hi, Leonard from South Africa. Thank you for sharing the information. Just finished my desk and it looks wonderful. It is practical and very neat.
Hole measurements
But,i'd like to know the hole measurements,anybody has idea of them?Jan-Ole?
No set measurements
Atte,
There are no set measurements for the holes. Take the stuff you want to have handy - bobbin holders, scissors, needles, stackers, bottles and whatnot - and a ruler and measure them, and drill holes slightly bigger than the diameters of your tools and containers. Generally bobbin holders and needles fit in small holes - maybe 5 millimeters or 1/5th of an inch - and scissors and the like fit in medium holes - maybe 10 millimeters or about 2/5th of an inch, but it's not really critical.
Martin
Building that bench
Hi,im building that bench,so could you tell what is the diameters of the holes?Sorry for bad english,just a kid,and started flytying at the autumn.But this was really well imaginated bench,going to do that,and get my tying table neat!Thanks alot man,you`re a real artist with a great skill of imagination!
AR from Finland
The easiest way
Drew,
The easiest way to get measurements for the bench is on the provided PDF's - linked in the middle of the article. There you can get the approximate distances and diameters.
Hope this helps.
Martin
Great idea
Jan,
Great idea, can't wait to try both beches. I have converted some of the measurements, however, can you provide the spade bit size(s) for the larger holes and the spacing for some of them on the larger tying table? Perhaps the distance from the front of the bech inward and then the size, then spacing from the first to the second, then I can go with some latitude for spacing. Thanks for the great idea again. You have solved one of lifes great mysteries, how to do something well and not pay a fortune for it.
Greetings from BC
Hi Jan,
Greetings from BC Canada. Thank you for your thorough plans and detailed commentary on your fly tying bench. I've nearly completed my bench! I decided to make the melamine base nearly 36" wide, and will be lining the perimeter with brass corner moulding. Thank you for taking the time to post your plans. "Tight lines" -a-
A suggestion
Hi, Jan! Just got around to reading your article on building your fly tying bench and I have a suggestion. For the top, I recommend using counter-top laminate materials. They're commonly available at local builder's supply houses, cabinet shops and custom woodworking outlets in literally hundereds of colors and surface finishes. They can be applied with contact cement and, because of their composition, are proof against all sorts of common solvents generally found in fly tying materials.
If you decide to use a laminate top, I'd suggest going with either a light tan, off-white or neutral gray color and a slight pebble finish or matte finish rather than a glossy surface. The pebble and matte finishes are great for reducing glare from lighting fixtures with the added benefit that you can buy enough additional material to serve as a "backdrop" for better color visualization.
The units
Hi Dan,
the "big" units are 10cm, the "small" checker style ones are 1cm each. So the total basic size was 65cm X 45cm (25.59 X 17.72inches). Just check what size you need and then decide on your perfect size. My ones e.g. fits almost exactly on a sideboard in my home office for daily storage.
Rgds,
Ole
Very nice looking project
Very nice looking project. What is the scale in the PDF's? I see 10 minor units, which makes me think "metric", but the bench doesn't appear to be 3.5 meters by 2.5 meters! That would be a colossal billiards table. Are your drawings in feet and tenths, by any chance?
Thanks again for posting the whole project, and for such clear photos.
Just finished my desk
Just finished my desk. I made it this weekend. I changed a few things to customize it for my own use. Nice easy to construct design that a person can make with hand tools a drill. I used nitrocellulose lacquer on mine thinking that since I use the same for head cement that any spillage would blend in. I also attached a 8"x1 1.2"x1" board on the surface to attach my C-clamp vise. Simple and easy.
This bench looks great
I just read your website and this bench looks great!! I'm not very good with wood as I have never tried to do something like this before. Perhaps I'll check a few more websites but I especially like yours. Now all I need is the proper tooks and the proper materials to do this job. Thanks again for a great website, Steve Zimmett
First task
I have just bought my first house in the UK, and getting ready to move.
Now that I have a workshop, this is the first task.
THANK YOU!
I will let you know how it comes out.
Tim
Too Cool and very ef
Too Cool and very efficient
I have made this
I have made this very well thought-out piece of kit and I like it a lot.
A couple of suggestions;
I use a C clamp wise and I have rounded the front edge of the base plate, which means I can rest my wrists/underarms on it comfortably.
I have some rather long tools and by drilling holes in in a 45 degree angle these can be accommodated (whether you want them on the sides or at the back).
I am using a lamp similar to the one illustrated and will surely get a swan-neck job as soon as I find it. Whether ordinary lamps or some 12 V jobs, I am not sure, the disadvantage with some 12 V is that you'll need a rather clumpsy transformer. Heat could also be an issue.
Finally I would like to thank Jan-Ole Willers for sharing this very good idea.
Tight Lines
I just found out
Greetings.
I just found out that I will be guiding at Minipi camps verry soon. I read your article a while ago and thought it a good idea to have something portable while I'm out there. I am using old barnboard, from renovations, for my wood. I decided against using dowels as they might get smashed. Although I especially like the idea of the Magnetic foil.
My portable table is comming allong nicely and I thank you for all the good info!
Very thankful
Sunday and i'm in very thankful for all who share. the bench is great and I will give it a try.
Fly tying villa
Hi my friend!
That's not a "Fly Tying Bench".
That's a "Fly Tying Villa"
Looks perfect - especially the holes :-))
Now I know where I can get flys if required.
A tying table on a overbed table!