
I'm sometimes surprised how much material is wasted when people tie flies. Here are some tips on saving

When it comes to fly-tying I'm like when I cook: I like to utilize all the raw materials and all the parts, and waste as little as possible. I even try to use all the leftovers – both the food as well as the fly-tying materials.
Measure twice, cut once
It's an old proverb that goes equally well for fly-tying as for many other activities, say laying carpets or sowing. It simply means that if you are careful at getting the right measurement from the start you do not have to cut a second time, either because you cut too much and have to trim off waste, or you cut too little, and have to cut a new and bigger piece.
It applies very well to fly-tying.
Cut off rib, tinsel, yarn or silk long enough to reach, but not 1½ times the amount you need (2 times isn't actually as bad, the other half can be used for one more fly).
Apply dubbing to the thread enough to reach, but not so much that you have to remove the surplus as a curled up useless noodle.
Select a hackle feathers the appropriate barb size and overall length so that you utilize as much of the feather as possible, not wasting useful barbs at the base or at the tip.
Cut hairs off the skin in the amount you need. Cutting too much means wasting material that has to be removed, and handling the bunch unnecessarily with the risk of messing it up.
There are many more examples along the same lines.
It might seem hysterical, but for those of us who pay our own materials, it might be 10%, 20% or even more that's wasted in some tying steps, and it doesn't take much math to calculate the potential savings ... well, actually it does ... but you get the idea.
To people who tie flies for money - or even for a living - this is even more important, since their livelyhood depends partly on how well they can optimize their material use. You will often see professional tyers meticulously prepare materials for many flies, in that way optimizing both the tying process and the material use.
I know that the money we're talking here may not buy you a new rod or a top notch vise, but if I consider the amount of money that I have spent on fly tying materials over the years, saving just 10% becomes a pretty neat sum.
Wasting less of course also allows me to tie more flies from the same bag of material, saving me a trip online or to a flyshop to buy more.


Don't let dealers demo
When watching fly-tying demos I have yet to see someone teaching how to save materials. Many demo tyers are either manufacturers or dealers – or sponsored by either – and usually have a steady pipeline of material. They simply break out new packages if they need something, and generally don't pay much attention to wasting or saving.


That's pretty far from the way the rest of us tie. I buy a far majority of my materials, and usually dig out old packages, which have been cut into, when I start tying. I don't have an endless stash of new and unbroken packages that I can just open even though I do have to admit that my access to discounted or even free material is far better than it is for most tyers.
But even so: the longer my materials last the happier I am, and I use tying methods that reflect that.
I'm not saying that dealers and manufacturers teach you methods that use an excess of materials, but they aren't exactly frugal either.
Here are some examples of where I save a bit.
Fold flash, rubber legs and floss
One of my personal pet peeves when it comes to saving materials is wasting flash, rubber legs and other materials that come in cut pieces. Yeah, I know that these aren't the most expensive materials on earth, but they're not exactly free either, and sometimes I'm really surprised how much it actually costs to buy a few straws of sparkling synthetic or colored rubber band.
And the tricks below will not only save you material, but actually make your tying easier, and even make your flies more durable.
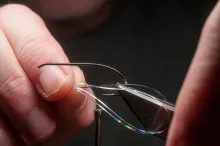
Flash straws: If the recipe for your fly says 4-6 straws of flash for a tail or an underwing, it's really rare that you actually need 4-6 whole straws. In most cases there's no need for the full length, which is mostly about 8-10 inches or some 20-25 centimeters. For tails you will need a fraction of that length, for wings maybe a quarter or less.
Simply fold the straws until you have about twice the length you need. One straw becomes 2, 4 and 8 straws in no time. You then do the last folding around the tying thread, enabling you to tie in the flash with no waste at all. You can cut the loops open before or after tying in. The trick is known as the “thread trap” and is demonstrated by Wayne Luallen in this video.
Simply catch the thread with the material, tie down, fold the front half over (if it's a tail or wing pointing backwards) and cover the folded part with a couple of wraps. You waste essentially no material, the process is easier than trying to catch and tie down loose material butts, and it will even make a more durable fly. The trapped material is almost impossible to tear off.
Folding flash |
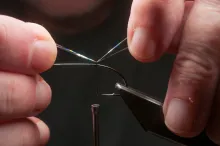
Catching thread |

Tying down |
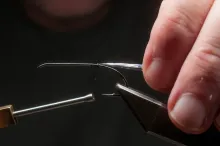
Folding back |

In place |
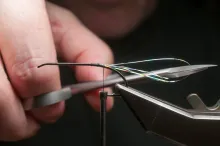
Cut loops |
The method is basically the same for floss or other materials used as veiling or part of a wing. By folding and trapping it, you save material and make a more durable fly.
Rubber legs: Use essentially the same trick. Fold a single rubber leg over until you have double of the desired length. Cut the loops, and catch the middle of the bits behind the thread, tying them down all at once or individually depending on the application. This will save you material and secure the rubber legs much better compared to tying them in one strand at the time and trimming them to length, which will also waste material. When tying in legs on the side of flies like hoppers, beetles or Madame-X-style flies, don't make the legs overly long and trim them afterwards, but measure the needed length and avoid trimming and wasting material.

Keep material on the spool
When it comes to using jewelry thread, wire, floss or even tinsel for things like bodies and ribbing, there's also a way of saving a bit here and a bit there.
Don't cut off the length that you think you might need, but keep it on the spool, and tie in the tag end. Leave the spool dangling until you need to wrap the material, and then grab the spool and wrap.
Tie down and trim, and viola! No waste at all.
The process is even easier if you have a rotating vise, because you simply wind on the material by rotating your fly while holding on to the spool.
The method isn't always possible, because the spool is sometimes in the way. You might also want to handle the material in a way where the spool will obstruct it, like when wrapping floss or silk for a really smooth result. In that case you measure twice and cut once, and notice how much you cut, see how much you trimmed off and adjust the length for the next fly in order to get it right every time.

If the hanging spool means that the material comes off, and the spool ends on the table or floor trailing a long tail of material, use a small rubber band or "spool clip" to hold it. This allows material to leave the spool, but also lets you leave the spool hanging freely. When I use material such as jewelry wire for legs, I usually strip off a fair length off the spool, lay the pool on the table and work with the tag. Once tied in, i clip to the length that I want and repeat. Once done, I just respool the bit still off the spool. Again: no waste at all.
Enough weight, but not too much
When adding weight to a fly, I also see people cutting a generous amount of expensive tungsten wire, wrapping it and then trimming off the butts in both ends.
Why not use the exact amount that you need?
Simply leave the full length on the spool and hold it down tightly to the hook shank with your fingers and start wrapping. Wrap the small starting tag, which most likely sticks out, the opposite way and press it down with a finger or a nail. Then wrap the number of wraps you need, and once done, break, cut or pinch off exactly where you need to close to the hooks shank, and then fold and pinch the end tag around the shank.
Again: no waste. Simple as that.

Save feather butts and tips
When you use feathers for hackling, for wings, bunches of barbs for tails and false hackles, you get left with parts that you won't use: tips, fluffy butts, stems.
Save them!
If you tie a lot of the same pattern, and each fly uses two hackle tips for the tail, you get a whole lot of feathers with absolutely useful barbs for tailing and maybe even for hackling if the feather is long enough.
And vice versa: if you hackle with the base of the feather for a wet fly front hackle or a palmer hackle, you get a ton of tips that can be used for tails or wings on other flies.
If you only have the fluffy, downy base part left, consider trimming off the waste to make dubbing. Marabou-like feather scraps make excellent dubbing as do CDC scraps, where you are often left with the coarser part of the feathers, which have thick and stiff stems, but absolutely nice barbs.

This little beetle was literally tied with scraps. I found the foam strip in my waste basket. I don't remember where it came from. The body was dubbing made from from a bit left over from a hackle series I made for another article, and it was laying on the table next to my vise together with the tip of the same feather, which had been trimmed off after wrapping the hackle. The only "new" material was the rubber jewelry thread for the legs. And there was more of everything, so I could tie more identical beetles.


Finally, if you have cut off all the barbs for tails, you have the stems. Some tyers actually peel off barbs from absolutely pristine feathers to get stems for shrimp antennae and such, and if you are tying Frances style salmon flies, you need 4-6 stems for each fly. Stem tips also make excellent antennae for many caddis or terrestrial patterns, so consider saving them.
Utilize the full hackle
When you tie dry flies, look at the hackle you use. Modern, genetic dry fly hackle is amazing, and each feather can often tie several flies. It might tie one very bushy fly, but the bit left is probably long enough to tie a fly that only needs two or three turns of hackle, so save the bit.
On the best genetic hackles, which are very uniform and long, you will have enough hackle in one feather for many flies. The best feathers are so long and so even in width that they can be used for three, four or even more flies depending on the amount of hackle needed, so save and use the whole feather. You might as well, because these feathers are worth their weight in gold many times over.
Some feathers are tapered, meaning that the tip can hackle one size of fly while the butt section is useful for a larger size or maybe for tail fibers or false hackles.
Save skin scraps
When using fur for flies like modern salmon flies and bass bugs, which call for the hair on the skin, you often get lots of little bits left over when you cut the strips or trim the final wings.
These little bits of hair on skin are very useful.
If you need a hair tail, you will often need a little bit of even hair, which is exactly what's found on these small patches. Even the smallest piece of skin can contain more than enough hair for a tail, and most likely for more than one.
Slightly longer pieces might not form wings or enable wrapping, but trap the hair in a loop and cut off the skin, spin it, and you can get a nice hair hackle.
You can also trim off the hair from the bits and mix it to dubbing. Your hands, soapy water or a coffee grinder can make useful material out of waste. Mix colors and add some flash scraps, and you can make dubbing, which easily matches what you can buy in stores in small, pricy bags.
Trimming fluffy flies
Some flies are tied by adding numerous bunches of material and stacking and compressing them to create a fluffy shape. When the fly is done, it's pretty scruffy looking, and is usually trimmed to the proper shape.
Look at many of the modern flies such as EP Streamers, Gamechangers and many more that use this technique.
When I see people tying these flies, they will often cut off and tie in generous lengths of material and make a fly that's double or three times the length they need. When done they trim of the excess, leading to an agonizing waste of material.
Why not tie in the material just slightly longer than needed, so that it just requires a gentle trim to get it into shape? And of course save the scraps for dubbing ...
I know that material cut too short can be hard to handle peoperly, but sometimes just long enough - and then a bit - is fine.
Wastebasket Stickleback
As a "proof of concept" I dug into my small wastebasket, which has been on my fly tying table for years. I immediately spotted a small bit of fine hackle, and also a short length of green yarn. After a bit more digging I had red and green marabou, and a slightly tired hen feather, plucked from a Brahma hen skin and dicarded because of broken barbs.

A hackle in the waste basket |

Trashed red marabou |

A yarn bit |

Feather bits |
The bits a pieces found their way onto a hook, and out came a small Bugger style fly, not that far from a stickleback impression. I'm probably going to fish it tomorrow on an outing I have planned, so let's see what it can do ...

PS: I did catch fish, but not on the fly - not even on this one. It was on a spinning rod ... I know, shame on me!
Save trimmed off hair
I tie quite a lot of muddlers, and every time I trim one, I get left with a pile of deer hair, which usually just goes in the bin.
But once in a while I use some for a special dubbing mix, which consists of coarse natural deer hair and fine rabbit or hare. It gives a very buggy looking dubbing, which is very useful for generic cased caddis larvae or buggy nymphs or dries. It can also be used for bodies on some of my coastal flies.
The longest deer hair trimmings with no dubbing added will also make excellent legs for dry flies like caddis. Spin a bit in a dubbing loop, and go for the “Italian look” in your dries: chaotic but very life-like.
People who use hair for wings will often trim butts, remove underfur and/or guard hairs, and if these are saved, they quickly amount to quite a bit of “dubbing base”. Cut it into shorter bits if it's too long, mix some colors and add a bit of fine flash and the result can be a really useful dubbing mix. If the hiar is very coarse, adding som fine rabbit in a similar color can help it stick together.
Everything can become dubbing
And speaking of: Almost any scrap material can become a great dubbing, especially if you mix it with other materials – other scraps or new stuff.
Feathers, fur, hair trimmings, bits of flash etc. are all candidates for dubbing blends, and if you use some rabbit or hare in the mix, you have the fine hair, which can hold together almost anything and make it applicable as dubbing.
You can simply mix it in your hands by plucking the materials apart again and again. Another low tech option is water and a lidded container like a jar as described here. The high tech solution is a small electrical coffee grinder, which can fluff and mix almost anything i seconds. Be careful when using it on synthetics, because it can run warm and actually melt your material, which isn't good for neither dubbing nor coffee mill.
You can find more ways
I'm sure you can find more ways of saving in your own tying. Once you start thinking about it, you start seeing places where there's unnecessary waste.
Look at your tying table after a tying session. It tells a story about waste and potential processes where you can save.
One man's trash ...
Let me end this article with another proverb: One man's trash is another man's treasure. You might think that all your leftovers and trimmed off bits are waste, but for others it might be just what they need.
A classic example is necks and saddles: the wet fly or saltwater tyer needs something very different from what the dry fly tyer needs, and once all the “good” feathers are gone, you might be left with a patch of skin, which has the exact feathers that your fellow fly tyer needs.
Most of us tie a mix of flies, and can use most of the hackle, but you might have some “useless” material that can be sold, given or traded for something that you can actually use.
Collecting scraps
If you decide on saving scraps for future use, you need to go about trashing the cutoffs a bit differently than you might usually do. Bag your waste immediately when it's been trimmed off.
Mostly we just cut and let go, and the trash winds up in a big pile on the table. Some tyers use a small bin for the trash, but the net result is the same: a chaotic mix of stuff that might be useful and stuff that's absolutely worthless. Don't just let everything fall to the table and mix with all the other waste already there. Dirty scraps are much less useful than pure ones, which consist of one material only. Keep your table clean and remove the waste while there's only one kind on the table – not after it has been mixed with bits of tying thread, ribbing and tinsel.
Arm yourself with a handful of small containers or zip-loc bags, and simply collect identical and useful scraps in each bag or container. Once done tying, pack it down and have the bags ready when you tie a similar fly next time and produce more cut off scraps. You'll be surprised how much useful material you can collect over a few tying sessions.
- Log in to post comments
