
This is a first! Rod building is common, but how about making your own fly reel? Dutch Tom Biesot takes us through the process of making a beautiful home made fly reel, step by step and in meticulous detail with tonnes of pictures.

Why make your own fly fishing reels?
As much as the creation and tying of your own flies can offer lots of satisfaction so can designing and making your own fly fishing reel constitute a tremendous challenge and it will surely give you a great kick once you have succeeded.
I realize that this article will not be a challenge for many fly fishers, because the technical knowhow and necessary tools are lacking, but the majority of my fly-fishing friends cherish their reels and so I think that this article is interesting enough to be read by most fly fishers.
A few years ago I met Martin Joergensen at the clubhouse of our local fly fishing club. He had been invited by one of our members. That very evening I happened to have a number of my homemade reels with me, which I showed to Martin, who was impressed by the looks of them. So he asked me if I was willing to write an article on them which would then be published on the Global Flyfisher site. I told him I would gladly do so but for now I did not have the time so he would have to wait.
A few months ago Martin’s request came to mind again and I thought it would be a good idea if I described the entire process of the design, construction and manufacturing of a new reel in a global manner with accompanying pictures of the manufacturing process and the materials and tools.
Actually it was not supposed to be an extensive and detailed working description for the making of a fly reel, for that would make the article too long.
Fly fishing has been my passion for over thirty years and like the majority of fly fishers I started with a cheap fly rod and simple reel. However, once I got caught, I developed an interest in the reels themselves. I simply enjoy looking at them, studying them and turning them. Some are beautiful because of their simple appearance; others have been beautifully designed and constructed.
I am a trained fine mechanical engineer which explains the interest in the technical aspects of the reels and how they work.
How it all came to be
In its basic form the fly reel is not a marvel of technique. It must be light weight, strong and durable. The basic design dates back a long time ago and has never undergone any significant changes: a round shaped spool with bearings and a turning knob, a cage with a reel foot, a line guide, and sometimes a drag mechanism.


How it all started
Looking at the available fly reels nowadays, we will notice a huge variety of construction and design, but the basic design will nearly always be recognizable.
I am always on the lookout for the latest developments in fly reels both with regard to their construction and the outward appearance and can really appreciate it if a manufacturer has designed a reel which sets itself apart from the others.
Some twenty years ago I started to adapt a number of my reels technically and/or esthetically, either because I wanted to make them look better or to improve them technically. I have always loved reels with looks which differ from the standard.
The first reel which I altered was a basic carbon fiber reinforced one from which I removed the foot with a saw and then attached a spacer on the foot which now angled forward. (see picture). It resulted in a handsome-looking reel quite different from the basic shapes which were sold a lot in those days.
A short time later I gave a number of my other reels altered looks. Whenever other fly fishers saw them they always responded with enthusiasm.
Thus several reels were technically improved upon or repaired and for other fly fishers as well. These jobs were partly carried out at home but mainly at the hobby club of my former employer “Fokker Aircraft BV” where I worked for twenty years as a tooling specialist and engineer, among others. At the hobby club we had lathes and milling machines at our disposal.


Making my first reel
At some time or other I began to play around with the idea of making my own fly reel. It should be a design of my own, reasonably simply conceived and a nice design, certainly not a copy of an existing type. A class 3/4 AFTMA size was decided upon, suitable for Dutch “Polder” fishing and small trout. This excluded the necessity of a drag system, but I did need a system to prevent overruns due to pulling the line too quickly.
In order to keep the construction simple and lasting O-ring bearings were chosen, neither a drag system nor a clicker system were opted for. The O-rings between the spool and spindle are lubricated using silicon oil. Because the spool needs to have some resistance on the spindle to prevent overruns I made the O-rings protrude just a few hundredths of a millimeter. With the help of the silicon grease the spool moves smoothly and does not overrun when the line is pulled quickly. The O-ring resistance stops the spool without causing too much friction. The spool cannot touch the spindle, so there is hardly any wear.
The spool was constructed using two flange plates joined by a centre bushing. Some thin plastic rings prevent the spool from causing friction with the cage and the locknut. The wooden turning knob was made on a small lathe. My first reel was born and it looked good. Then I had all aluminium parts colour anodized and after reassembling it all looked very nice and professional. It made me feel great.


Buying tools
After my employer went bankrupt I could no longer use machines like lathes, milling machines and other professional tools. So I had to invest money. I bought myself a small twelve-year-old lathe with a detachable cutter head. After refurbishing and retuning I had a wonderful tool in my loft workshop and I was ready to go on. I have owned and used this lathe for more than sixteen years now and it performs as accurately as ever. The cutter head has meanwhile been replaced by a stationary milling machine which makes using it a lot easier and less time consuming.


After the first reel it did not take long before for a second design began to take shape in my mind. Classical looks, still, but with a personal touch, suitable for AFTMA 4/5 line. At my fly-fishing club there were a number of members who were quite interested in the design, so I decided to make three of them. The same sort of bearing of the spool on O-rings was to be used for this reel because this principle actually performed well.
(My first reel is now 16 years old and still turns smoothly on the original O-rings)
The three-piece series took me four months of labour. A big job, because I could only work on it in the evenings after working hours and sometimes during the weekends. But my drive towards perfectionism is to blame as well, I suppose.
I decided never to make a series again. (I felt like being a slave to my hobby).
The design this time incorporated a clicker system with a plastic gear wheel and a quick-change system for the spool. This certainly increased the number of parts to be manufactured (see picture of all disassembled parts). Some of these parts were made of stainless steel.

The choice of materials
Because of my job at Fokker Aircraft, I had a choice of several kinds of aluminium . I collected these from the waste containers at the machine engineering departments. Since you do not need lots of material for the making of a fly reel, I had already soon acquired quite a lot of the stuff and still have enough to be able to continue using it today. For the construction of a homemade fly reel one does not need special aircraft industry aluminium alloys, on the contrary, some of these alloys cannot be anodized properly as compared to the, usually, somewhat milder alloys used for profiles and sheet materials.
The use of different alloys might also give rise to differences in colour after the anodizing treatment. It is better to opt for a decent quality which can easily be worked and anodised. I had better not mention any specifications for material code numbers because these differ from country to country. If you do not have the necessary expertise you had better go to a wholesale supplier in order to obtain the right alloys.
After anodizing the surface becomes tougher and so will better resist scratches, dents and such stuff. A really tough surface can be obtained by hard anodizing. However this is an expensive operation, especially for a one-off fly reel and certainly not necessary if the fly reel is handled with care. I hate watching flyfishermen dropping their reels and rods on the ground after having caught a fish without using a soft cloth or other protective item. I will always treat my reels with care and I will always clean them after a day’s fishing as well as the fly line!


Third reel design, one with a modern styling
After finishing the three-reel series, which had a rather classical styling, I thought that my next project should have more up-to-date looks. So I chose a design with a spool which projected forward such as I had designed for some of my modified reels.
I have always loved these looks. It is quite a challenge to design something which has not been on the market yet, but I was so satisfied with the design. This reel also should be suitable for AFTMA 4 line.
As my lathe has only limited capacity I cannot make large spools and cages. Thus the size of my homemade reels will be limited to AFTMA 4, 5, and 6. But then, I use these sizes most of the time, and certainly in Holland.
Since I am quite pleased with the O-ring bearings, which are also easily made, I decided to apply this system once more as well as the clicker system. To lock up the spool I used the locknut system. It is very reliable, and will never spontaneously come free. Between the spool and the locknut there is a thin plastic ring to prevent metal contact. At the opposing side the nylon gearwheel of the clicker system will take care of this. And the finishing touch, as on all my other homemade reels, of course, the wooden turning knob. All the screws used were of stainless steel. The spool itself was constructed of two flanges and a bushing.
After anodizing in a pleasing colour and assembling I had myself another handsome reel with individual design traits and the corresponding looks. A reel suitable for rudd and small trout. By the way it has already dealt successfully with big trouts on aDutch trout lake.


The design and making of a new fly reel
After having sought my diversions elsewhere for a number of years, due to several circumstances, I recently found the time and passion again to work out a design that I had already developed three years ago in the form of a sketch. And at the same time Martin Joergensen’s request to write an article about homemade reels popped up again. It had to be now or never and I decided to make pictures of the manufacturing process and write about it. It was not supposed to be a detailed description of all the things I had to do but a broad description of the manufacturing of all those basic parts which, when put together, constitute a fly reel. I would like to give some insight into the construction process of a reel.
As you have read in the foregoing part of this article quite some years have passed and I have had the opportunity to expand on my machines and tools. So now a lot of tool work is much easier for me to carry out.


The design
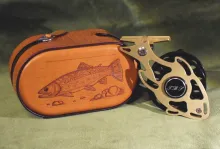
A number of years ago I had sketched a design which seemed nice enough to consider making it. The appearance had the shape of a fish. The reel would have to be suitable for the use of AFTMA 3/4, a good-looking, small light-weight reel for a light rod. After having made some alterations on the design, I had the result in front of me on my drawing table, a fly reel which had one face plate in the form of a fish. The shape is that of a rudd, a species typical of the waters in our Dutch polder landscape and which I enjoy fishing for.
I had embraced my design and shortly after I worked it out with the help of a CAD program. I have been a technical illustrator for quite a while now, so this was not too hard for me.
Having worked out all the details and the technical aspects of the design such as:
-Can all parts be manufactured with my own machines and tools?
-What special tooling needs to be made?
-Do I have the aluminium on stock and if not, can I obtain the sizes I need?
I then made a construction drawing which included all parts.
I proceeded by tuning the parts so that they would fit and be proportionally correct.


Manufacturing the fish-shaped face plate
Since I do not have a CNC cutter and lathe I had to work the form of the fish shaped face plate largely by hand which was quite a task if one considers the number of holes in the shape. But, let us just start.
First I printed the working draft on a 1 to 1 scale and cut it out. Then I proceeded by sticking the paper fish onto the aluminium. Then I drilled two holes into the face plate which I needed anyway for attaching the foot and the spool axle.
After that I screwed the aluminium fish onto a piece of MDF board with two screws (see photo).
Then I milled the fish shape from the aluminium and drilled the pocket holes so that I could saw them with a jigsaw. Because I screwed the fish shaped aluminium onto the piece of MDF I was able to mill the outline of the fish with a router bit. After milling the pocket holes and the outline I sawed the outline with a jigsaw. I am in possession of an electric jigsaw but it could also be done by hand.
The MDF backing provides good handling and it will keep your hands away from the saw. It took me an hour to get the job done as accurately as possible, but we are not in a hurry.
Now we can unscrew the fish shape from the MDF backing and start the finishing of the fish shape. We strive for a very smooth finish, and that is a rather time consuming job.


I partly used machines with the help of a router bit in a stationary drill guiding the parts by hand, which keeps the edges square. It could also be done with a file and sandpaper but it will be much harder to achieve smooth results. In the centre hole we shall cut a thread size M6 for the mounting of the spool bearing shaft.
The hole in the tail part has a 5 mm diameter and is countersunk for the screw of the reel foot adapter. We will leave the surface rough for now.


Manufacturing the spool
For this reel I decided to make the spool from massive bar stock. This will be quite a challenge for my smallish lathe and also a time consuming job because I can only remove small amounts of material in a single pass.
The reel is small; the spool diameter is a mere 58 mm.
I started by roughing out the spool with the recesses on either side of the flanges and the hole for the bearing shaft and then the spool was placed in the milling machine to mill the weight reduction holes (14) with the help of a rotary table tool. 8 holes on one side and 6 on the other side which will also have two small holes drilled in it for mounting the turning knob (crank) and the counter balance.
The holes must be situated exactly opposite each other. For this we can also use the rotary table tool. However, we need to make special tools in the form of clamping devices such as a jig axle to be able to fix the spool. We can use this jig axle again when we are cutting material from the inside of the spool.


The next step is turning the spool exactly to size and when doing so we have to see to it that the centre hole is very smooth because the bearing shaft has to fit in. Since we have chosen to make the spool from massive stock we can size up the bushing. That is because we do not have to use screws for mounting the spool flanges, as was the case with my previous models.


Manufacturing the bearing shaft
Manufacturing the shaft is a relatively simple procedure. The diameter is in accordance with the diameter of the spool hole in combination with the O-rings, which we will be using for spool bearings. At one end we will cut a thread M6 size which will be screwed into the housing and at the opposite end we shall drill a hole in which we cut M6 size thread for the locknut. This may be done by hand with the help of a vise, but I prefer to use the lathe because it results in a straighter thread.
Cutting the slots for the O-rings will be done at a later stage when we tune all the parts. The spindle is to be left 0.5 mm longer than calculated so that we can cut it exactly to the required length when tuning. In the centre a hole must be drilled in order to mount the spindle in the housing.

Making the reel foot
The reel foot seems to be a part that is difficult to make, but nothing is farther from the truth. We shall start with a massive bar stock in which we first drill a hole and then make the diameter the average size of a reelhouder on a rod. Then we will turn two conical parts on each side of the stock. The centre part is left round.
We will use a face mill on the cutter to divide the bar stock in three equal parts and we will end up with three reel feet which only have to be milled to size. Subsequently the sides and the underside and voila! a pretty reel foot. Later on the mounting holes will be drilled.


Making the reel foot adapter
As we can see on the drawing the fish shape face plate has to be a certain distance from the (reelhouder), because it will interfere with the operation of the reel if it is not.
We shall have to construct a spacer. Again this is not very hard to do. We will use bar stock of approximately the right size and then cut a hole with a thread size M6. Then it will be milled to the proper dimensions. The wide cylindrical part must subsequently be flattened for attaching the reel foot. Having finished the reel foot and adapter we can now tune both parts to each other and make the mounting holes.
Making the locknut
In order to be able to fix the spool on the spindle and to be able to remove it a locknut will be used.
We have already established M6 threading in the shaft so we have to make a threaded part on one outer side of the locknut. Next we will have to make a flange part and a gripping part so that we can screw on the locknut easily by hand.
Finally we have to mill small recesses in the gripping part so that we will have a better hold when screw it on and off. These small recesses will be made using the rotary table tool, enabling us to achieve neat distribution.


Making the gearwheel for the clickersystem
This reel has a clicker system or ratchet, which is not necessary for the functioning of the reel but it sounds so good when we turn the spool. Besides it gives the reel a professional touch.
We have to make a plastic gear wheel. I use a sheet of PVC for the purpose.
On my other reels I would use two screws to attach the gear wheel to the spool. However, since we are now working with a spool made from massive bar stock there is simply too little space for the screws (bigger bearingshaft hole!).
The solution is quite simple. A small pin in the spool will pick up the gear wheel so that it runs along a small extension.
We will use the jig saw to cut a small disc roughly the diameter of the gear wheel. A hole will then be drilled in the centre of the disc and the disc will subsequently be mounted onto a jig axle especially made for the purpose. Using the axle we can now turn the disc to its proper dimensions.
The next step is placing the disc in the vise of the lathe to drill the hole, so that we can accurately place the disc on the bearing shaft. Then a hole will be drilled for the little pick up pin.
Now the teeth must be cut. We have to make another special jig axle with a clamping bush so as to be able to clamp the gear wheel. With the help of the rotary table and a special cutter bit we can now mill the teeth one at a time on the milling machine.


Making the spindle for the turning knob and the counter balance
These are two simple parts to make on the lathe The spindle has a flange part to retain the knob and a internal M3 thread to mount it on the spool.
Fabricating the line guide
The line guide consists of two parts, a shaft with a flange at the base and a endplate. The shaft is easily made on the lathe, at the end we will cut internal M3 threading so that the endplate can be attached. First we draw the endplate on a piece of sheet aluminium, then the hole will be drilled and countersunk. After that we will first saw the shape roughly with the help of a jigsaw and finish it to the exact dimensions.


Making the wooden knob.(crank)
I have always enjoyed wooden turning knobs on reels. That is why all my homemade reels have them. We may turn the knob on a woodturning lathe or we may use a stationary drill but I prefer to make them on a small woodturning lathe which I also use for making my own fly tying tools and other fly fishing items. I hope to write about them in a follow up on this article.
The woods which I use are diverse: mahogany, korlmander, diamond wood or rosewood, anything with a nice-looking grain will do. The web is a great source for obtaining small pieces of these woods. For this knob I used diamond wood.
If you have a woodturning lathe at your disposal this is not a hard job. First we will give the wood piece a nice round shape and roughly dimension it. Next we will drill the centre hole for the spindle. We slightly undersize the hole so that we can ream the hole exactly to size leaving a very smooth finish. We will then recess one of the ends for the flange part of the spindle and cut it loose.
The knob must be put onto an axle jig and given its final shape. Then we smooth it all up with a piece of sandpaper. Next we will soak the wooden knob for a couple of days in paraffin oil and then polish it. The oil will have made the wood impervious to moisture and it will be self lubricating.


Making the clicker system
The ratchet has been placed in the head part of the fish shape and is of very simple construction. A very small disc with a hole for the placement of a small pin.
We will slide a little piece of silicon tube on this pin and then another pin. The latter will touch the teeth of the gearwheel causing the clicking sound. The accompanying picture will clarify things. We could just stick the disc with double-sided sticky tape for a while so we can see if it works as expected.
Making a thin plastic ring
To prevent wear between the spool and the locknut we should place a thin plastic ring between them. We make this from a thin hard nylon foil with a thickness of about 0.2 mm. This can be had from hobby shops. From the nylonfoil we cut a circular shape and stick it onto the end of a large diameter aluminium shaft. We place the spindle in the lathe and first cut the centre hole followed by the outline with a knife-like chisel. The ring will then be released from the sticky tape. It is a simple way to make all kinds of rings.

Tuning and adjusting the reel
We have now produced all the parts of the reel and will partially assemble it.
This makes it possible to correct deviations and we can visually check the result.
After assembling I noticed that my reel needed a modification: two extra weight-reducing holes in the head, which should give it a more harmonious appearance.


After mounting the spool on the shaft with the locknut and the plastic ring, we are able to determine the length of the spindle. There should be a clearance of 0.2 mm between spool and locknut with the nylon ring . We bring the spindle to its desired length on the lathe.
The spool turns with a very small amount of tolerance on the shaft. To prevent overruns when pulling the line we need to place two O-rings. This requires us to cut two slots in the shaft. This is a critical step in the making of the reel. The O-rings should only protrude a few hundredths of a millimeter. The friction between the O-rings and the spool will prevent overrun. However it must turn smoothly.
We will start by making two recesses in the shaft wth the milling machine, so that we can easily place and remove the O-rings later on.
Then we cut the first slot or groove slightly less deep than necessary and put the O-ring which has been lubricated into the groove. Now we have to check the friction with the spool. If there still is too much friction we shall have to cut the groove a bit deeper and try again. Once the friction feels okay we repeat the entire process for the second O-ring. See to it that the friction is not too heavy, because the anodizing will add a couple of hundredths of millimeters and the spool will run with a little more friction.
Nameplate or decal.
So as to be able to conceal the location of the screwed bearing shaft we can make a disc in which we can have our name or initials engraved after having it anodized.
We will stick it on with a special slow setting waterproof glue as a final operation after the anodizing and assemble.
Finishing the parts
Once we have manufactured all the parts we have to give them a finishing so that they can be anodized. It is very important that there are no visible scratches or dents or other irregularities on the parts. This is a time-consuming process for a perfectionist such as I. But it is certainly worth the trouble because scratches cannot be removed after anodizing and they will certainly affect the appearance.


Determining the colour and anodizing
Now that we have all the parts finished and everything fits we shall have to determine the colours for anodizing. This seems simple but it is paramount for the reel’s appearance. The wrong colour will leave us with a reel which is esthetically less pleasing. So we have to pay a lot of attention to this. But we first have to find out if the anodizing company has all the desired colours.
Meanwhile I had drawn the reel in a CAD program and with the help of the software I was able to colour the parts of the design and immediately judge the results. After trying a number of colour schemes, I chose one that appealed to me very much. Actually there were a number of colour schemes that I liked but I have only one reel!
I took the reel to the anodizing company in the hope that I would get each and every part back without scratches and no missing parts.

Reel assembly
Fortunately the anodizing nearly always succeeds and after a couple of days I could start the assembly in a state of bliss. This is always an exciting happening: will it all have the appearance we wished for and will it look as pretty as it did on the computer? No scratches, be careful with the screwdriver near the anodized parts. The bushing with the O-rings must be lubricated with silicon oil for smooth running of the spool.
Finally we shall mount the parts of the clicker system. The clicker disc will be glued onto the faceplate. Because this is something that must be performed with accuracy we will use slow-drying waterproof glue so that we have the time to position it properly.
The same glue will be used for the nameplate.
While assembling the reel I had already noticed that the reel had turned into something special, a nice design and unique. That is what makes creating your own fly reel so special. It is the great kick that we do it for.


Details of finishing
Because I will always spend a lot of time on the finishing process the reel is worth examining closely. There is nothing that bothers me more than scratches or irregularities; I always have to remove them.


When the reel was finished I made a special display unit for it so it can be observed from all sides. I had quickly made a design and the parts were not too difficult to make with the help of my woodturning lathe. All I needed to do now was to bend a brass bow and I had my display unit. I have placed the unit with the reel on it on my fly tying desk and I cannot stop looking at it. It looks great. By the way, I have not yet used it for fishing.
I hope that I have provided you with some insight into what is needed to design and make your own fly reel. Because I have a day-time job, all the work was done in the evenings and the weekends. It took me about 6 weeks to manufacture the reel and then I don’t count the hours designing the reel with all the drawings involved.
Actually it was not supposed to be an extensive and detailed working description for the making off a fly reel, but it was very difficult for me too shorten the article , I am sorry for that! I can understand that for the majority of the readers this article is difficult to read because of all the technical details, but I hope that they enjoy the end result as much as I do. Maybe there are fellow fly fishers who also posses the technical possibilities and skills to make their own fly reels or other fly fishing gear and that this article will prompt them to do so.

- Log in to post comments


hello , my name is E
hello , my name is Eric Harkless and i have a new reel invention and i don't know where to start. i do know i need to get a patent and from what i hear from people is that patents cost a lot of money. I don't have any but i know that my reel will make billions. do you have any advice you can spare or are you interested in making it for me for 5% of the patent? I have to try every avenue that comes to me because i believe in this product more than i believe in myself. sad to say but true. Any help of direction you can give me will be appreciated on many levels.
Hello Erik and Sandr
Hello Erik and Sandra,
It was nice to meet you at the Fly supply store. Thanks for the nice words about the article.
For sure we will meet in the future, maybe in your beautifull fly fishing cabin, or on a fly fishing show.
Best regards,
Tom and Fousjia.
Hello Dan,
Sorry
Hello Dan,
Sorry for the waiting, I was reading your question today.
You asked me about designing a simple drag system for the future in my reels. I am thinking about it and maybe in a future reel design I will build such a drag system in one of my reels. I am thinking of a little disc brake system.
Thanks for your nice words and I hope to see your reel design photo's soon!!
Best regards,
Tom Biesot.
Hello Tom, We met
Hello Tom,
We met at Daniel (Fly Supply). You told us about the reel and showed pictures of this beautiful reel. You indicated that the full story was on the Internet. We are very impressed by the beautiful piece of work and fascinating information about the design of this reel. Who knows, we meet again (along with your wife and passionate fly fisher).
greet
Erik and Sandra
www.flyfishfarm.com
Superb work, an info
Superb work, an informative article and a great design. I too am an engineer and have been thinking about a project such as this for a while now. I have large workshop machinery so can use larger bar stock and I'm aiming more toward a 7/8 weight for sea trout and an 11/12 weight for salmon. Great descriptions here and definitely the "poke in the ribs" that I need to get started.
Have you got any plans to incorporate a reasonably simple drag system to future designs?
Thank you, keep up the good work.
hi tom. Can you expl
hi tom. Can you explain the functions of the gear wheel
Hello Jon,
Thank
Hello Jon,
Thank you for the interest and nice words about my reels.
As you probably has read in the article at the end, I encourage people to design and make there own flyreel when they have the skills and the equipment and use the article as a guidline and not to "copy" one of my reels. So I don't give any measurement drawings of my reels, I hope that you can understand that. Designing your first reel is a difficult part of the proces, making it your personal reel, but it is great to achieve. I hope that you can show me your reel in the near future!
Kind regards,
Tom.
Do you have blueprin
Do you have blueprints with dimensions and materials for the "third reel design"? I've just started a machining program and think what you've built is awesome!
thanks for any information!
Jon
I've one of Toms fir
I've one of Toms first reel for sale
Hello Paul,
Thank
Hello Paul,
Thanks for the nice comment on the reels.
I am not using special O-rings, just a good quality from a tooling company in my own town.
The size is changing with the reel I design, so there are no special sizes, you must choose a diameter of the shaft in your design and then the diameter of the o-ring. Then you make sure that the O-rings protude only about 0.05 mm .
That is done when you make the grooves in the shaft. Buy the O-rings smaller in diameter then the shaft diameter.
Be carefull when making the grooves.
Best regards,
Tom Biesot.
Hello Tom,
this is
Hello Tom,
this is a great article, the reels are looking fabuleus, the O-ring bearing design is great, can you give me some more details about the O-rings specific types and sizes.
Kind regards,
Paul
Hello Rick,
Thank
Hello Rick,
Thanks for your nice words about the article, I will answer your "technical" questions in a personal mail.
Kind regards,
Tom.
I really appreciate
I really appreciate this article. I've read through it several times and will do so several times more. I always learn something new each time. My first reels will probably be along the lines of your first and second models.
The simplicity of the O-ring bearing design is great. I've never heard of it before (which is not saying much as I'm pretty much the beginner). Are there specific types and sizes of O-rings that should be used for this? I've read that the depth of the groove is a result of trial and error until it gives the right amount of friction to eliminate over pull. Is the width of the groove critical or is close enough good enough?
Thanks for whatever answer may be forthcoming. And thanks again for a really great article.
Rick
This is a really awe
This is a really awesome fly reel. I've never seen anything like it. It's in a class by itself
I am not versed in t
I am not versed in the laws of copyright and patents but, in my mind, to intentionally try to make money from someone else's idea or art without their permission is morally and ethically wrong. Trying to rationalise it wont make it right.
Fine work Tom.
Cheers,
Steve.
Hallo Jeff,
Thank
Hallo Jeff,
Thank you for explaining the copyright and patent applications. I know the business very well, I am working at The Dutch Patent and Trademark office. I was aware of the danger that someone could use my design to make a profit when I was writing the article, but the protection against it, is a very costly thing. So I didn' t do that.
Thanks for caring and for the nice words about the " amazing" design and my work.
Kind regards,
Tom Biesot.
Copyrights typically
Copyrights typically only apply to works of art, literature, music, etc. and is automatically granted upon creation of the work. A patent typically covers a design, invention, or product, which covers this reel. Patents are not automatically granted upon creation of the work. All countries, except the United States, function on the "first to file" style of application. This means the first person to file a valid patent application receives the patent. The United States is currently transitioning to this system, but has previously used the first to invent system, which means the first person to invent the design and diligently work towards filing the patent receives the patent regardless of who filed first.
All that being said, I hope you can sleep well at night with stealing someone's design on your conscious. It's no better than literally stealing money from someone.
Amazing design, and amazing job!
Sean,
I'm not qui
Sean,
I'm not quite sure that your interpretation of the copyright laws are quite valid... if you see a picture of an Apple product or one from Bang and Olufsen without measures on it, does that mean you can copy their design as you please? I'm sure that Apple's and B&O's lawyers will disagree! Copyright is there no matter what text or signs is on a picture, manuscript or drawing unless it's waived (like with Creative Commons) or has run out.
But Tom probably has no lawyers and most likely won't pursue you if you copy and/or sell his design. Whether you want to do that or develop your own original designs is fully up to you and your conscience.
Martin
Since all of the pic
Since all of the pictures are dimension-less, if I machine one similar and sell it, then that's not copyright infringement!
So far I have made one of my own and a simpler one for sale! My spool size is 3.5 in, the line guide is different, and the reel foot extension is different and lighter. Thank you Tom for your great ideas!
Beautiful work. Whoe
Beautiful work. Whoever said that a fly reel is just a line holder has obviously has never seen these works of art.
Cheers,
Steve.
Is there any way I c
Is there any way I can get one of those
This is a piece of a
This is a piece of art.
Can I ask you for a fuller explanation on how you used the router cutter.
Hi Gert,
Thanks f
Hi Gert,
Thanks for your nice words, see you at the club!
Kind regards,
Tom.
Hi Tom
You've shown
Hi Tom
You've shown me the earlyer models of the fine reels you've made at our club evenings.
And I thought had an idea of what your capable of.
But your new creation realy is something else it not only looks great it runs smooth to pure stroke of geniouse how you've used the fish desin as base plate.
Best regards Gert
Thank you Yasma for
Thank you Yasma for the nice comment on the reel.
As you can read in the article, I don't make reels for people to buy.
The past few month's I have got a lot of people who are interested in buying my reel or to make one for them, but I am sorry for you all. At the moment I am working on another project, so keep looking at Global Flyfisher!!
Best regards,
Tom Biesot.
Hello Tom
Loved you
Hello Tom
Loved your reel looks great,I would like to have one.
Kind regards
Hello Greg,
Thank
Hello Greg,
Thanks for the nice cooment on the article, it is a great hobby to make your own flyfishing gear.
To make a design is the most difficult part of the project and that takes a lot of time.
Kind regards,
Tom.
Hello Tom
Loved you
Hello Tom
Loved your reel looks great,i have a small machine shop in Cleveland ,Ohio
When i retire i hope to make some reels, looks like it would be a fun hobby.
Greg
real nice work you d
real nice work you do i hope to more keep up the good work your doing its interesting and no cnc machines wow
thank you
Richard
Hello Jerrel,
Nic
Hello Jerrel,
Nice to hear from you from my second homeland Surinam, thank you for the very nice comment on the article.
The next time I come to Surinam we must do some serious fishing again in the Surinam rivers and lakes.
See you soon and say hello to everybody!!.
Love from Tom and Fousjia.
Extraordinary craftm
Extraordinary craftmanship, proud to call you my uncle, love from Suriname.
Thank you richard fo
Thank you richard for your nice comment on the article.
Best regards,
Tom Biesot.
verey nice Tutorial
verey nice Tutorial keep up your wonderfull work
Hi Tom,
Outstanding
Hi Tom,
Outstanding design reel, a piece of art and special the idea of the fish as the frontplate, I like that. And a very interesting article about the ins and outs of your fabulous work.
Thanks.
Warm regards Henk van Bork
Hi Tom,
When you sh
Hi Tom,
When you showed me your new reel at the club I was deeply impressed. I knew your abilitys, I've seen your other reels, but this one was something else. What a design, what a craftsmanship, what a beauty!
Hello Chris,
I am
Hello Chris,
I am pleased that you liked the reel ,you have to see it in your hand, it looks really beautifull.
At the moment it stands on my desk, but in the near future we go fishing with it !!
Thank you for your very nice comment.
Best regards,
Tom Biesot.
Hello Korrie,
It
Hello Korrie,
It is nice to hear that you liked the article so much, it was a lot of work making it, thanks for your kind words.
I like reading your articles too!
Kind regards,
Tom.
Tom,
Awesome reel,
Tom,
Awesome reel, a work of art, and truely inspirational. It is almost a shame that it won't be fished.
Kind regards
Chris
This is the most del
This is the most delightful reel/project in terms of fly fishing I have seen in years.
Very well done. Kudos to you.