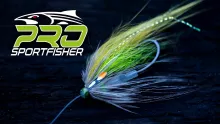
Bucktail and Arctic fox The left fly is tied with the traditional bucktail while the right one uses the softer and more voluminous Arctic fox
Martin Joergensen
magazine block-instance:2-picture:1
External
20676
Yes
Edit
Red head Mickey This mickey Finn has a read head in stead of the original black
Martin Joergensen
magazine block-instance:2-picture:2
External
20675
Yes
Edit
Mickey Finn The original dressing. Jungle Cock eyes were not uncommon back when, but are rarely seen on modern versions.
Martin Joergensen
magazine block-instance:3-picture:1
External
20681
Yes
Edit
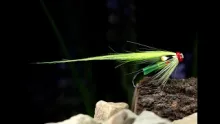
Polar Mickey The classic Mickey Finn, but tied with hair from Arctic fox
Martin Joergensen
magazine block-instance:3-picture:2
External
20683
Yes
Edit
Mickey Jiggy Bob Popovics' Jiggy tied in Mickey Finn colors
Martin Joergensen
magazine block-instance:4-picture:1
External
20678
Yes
Edit
Mickey Clouser A Clouser Deep Minnow tied in Mickey Finn colors
Martin Joergensen
magazine block-instance:5-picture:1
External
20677
Yes
Edit
Thunder Creek Mickey Kieth Fulsher's Thunder Creek tied in Mickey Finn colors
Martin Joergensen
magazine block-instance:6-picture:1
External
20679
Yes
Edit
Salmon Mickey Having just the colors in common, but still pretty "Mickey Finninsh"
Martin Joergensen
magazine block-instance:7-picture:1
External
20680
Yes
Edit
Mickey Biplane Flatwing Mickey Finn style Tied by Bob Petti
Bob Petti
magazine block-instance:8-picture:1
External
20685
Yes
Edit
Bird Fur Mickey Tied by Bob Petti
Bob Petti
magazine block-instance:8-picture:2
External
20686
Yes
Edit
Mickey's Ghost Originated by Mike Martinek and tied by Bob Petti
Bob Petti
magazine block-instance:8-picture:3
External
20684
Yes
Edit
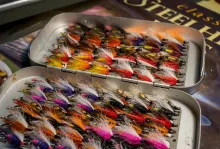
Coastline In Denmark the Mickey Finn is quite a popular saltwater fly
Martin Joergensen
magazine block-instance:9-picture:1
External
20688
Yes
Edit
Jiggy Finn A Popovics Jiggy in Mickey Finn colors
Martin Joergensen
magazine block-instance:9-picture:2
External
20674
Yes
Edit
Mickey Jiggy Fish Fish seem to like the yellow and red colors
Martin Joergensen
magazine block-instance:9-picture:3
External
20687
Yes
Edit
Step 1 - thread Start the thread right behind the hook eye
Martin Joergensen
picture frame-instance:1-picture:1
External
20654
Yes
Edit
Step 10 - tie down Tie down the tinsel with a wrap of thread or two
Martin Joergensen
picture frame-instance:1-picture:10
External
20663
Yes
Edit
Step 11 - trim tinsel Trim the remaining tinsel and cover the stub with a few wraps of thread
Martin Joergensen
picture frame-instance:1-picture:11
External
20664
Yes
Edit
Step 12 - wrap ribbing You can wrap it the same way as the tinsel or counterwrap it
Martin Joergensen
picture frame-instance:1-picture:12
External
20665
Yes
Edit
Step 13 - finish ribbing Wrap the rib in 5-7 even turns and make sure it ends up under the hook shank where you tie it down
Martin Joergensen
picture frame-instance:1-picture:13
External
20666
Yes
Edit
Step 14 - tie down Tie down the rib with a couple of wraps of thread
Martin Joergensen
picture frame-instance:1-picture:14
External
20667
Yes
Edit
Step 15 - trim rib Trim off the remaining rib and cover the butt with a few wraps
Martin Joergensen
picture frame-instance:1-picture:15
External
20668
Yes
Edit
Step 16 - first yellow bunch Prepare a sparse bunch of yellow bucktail, trim it to length and tie it in
Martin Joergensen
picture frame-instance:1-picture:16
External
20669
Yes
Edit
Step 17 - red bucktail Prepare a sparse bunch of red bucktail and tie it in on top of the yellow
Martin Joergensen
picture frame-instance:1-picture:17
External
20670
Yes
Edit
Step 18 - yellow bucktail Prepare a final sparse bunch of yellow bucktail and finish the wing
Martin Joergensen
picture frame-instance:1-picture:18
External
20671
Yes
Edit
Step 19 - form head Form a small head, whip finish and cut thread
Martin Joergensen
picture frame-instance:1-picture:19
External
20672
Yes
Edit
Step 2 - rib Tie in the rib on the underside of the hook shank
Martin Joergensen
picture frame-instance:1-picture:2
External
20655
Yes
Edit
Step 20 - varnish Varnish the head with clear varnish a couple of times
Martin Joergensen
picture frame-instance:1-picture:20
External
20673
Yes
Edit
Step 3 - cover tib Cover the ribbing all the way to the hook bend
Martin Joergensen
picture frame-instance:1-picture:3
External
20656
Yes
Edit
Step 4 - and back Take the thread back to the hook eye, forming a smooth thread base
Martin Joergensen
picture frame-instance:1-picture:4
External
20657
Yes
Edit
Step 5 - taper tinsel Cut the tip of the tinsel to a triangular shape
Martin Joergensen
picture frame-instance:1-picture:5
External
20658
Yes
Edit
Step 6 - tie in tinsel Tie it in with the silver side towards the hook shank
Martin Joergensen
picture frame-instance:1-picture:6
External
20659
Yes
Edit
Step 7 - start winding Wrap the tinsel towards the hook bend in touching turns
Martin Joergensen
picture frame-instance:1-picture:7
External
20660
Yes
Edit
Step 8 - and back When you get to the hook bend, start winding the tinsel back again
Martin Joergensen
picture frame-instance:1-picture:8
External
20661
Yes
Edit
Step 9 - touching turns The tinsel wraps should be close, but not overlapping
Martin Joergensen
picture frame-instance:1-picture:9
External
20662
Yes
Edit