
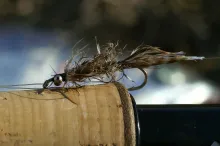
The red Tag is simple, uses few cheap and common materials and is all natural ... and a killer fly!


It doesn't date back to Dame Juliana's "A treatyse of fysshynge wyth an Angle" but it has many of the characteristics from this era: simplicity, few cheap and common materials and all natural.
The fly most likely dates back to the 1850's where it came out of the vice of one Martyn Flynn from Worcestershire, England. It was tied as a dry fly and meant for grayling. Its original name was The Worcestershire Gem, but few people refer to it as anything else than the Red Tag these days. A very suitable name since the predominant red tail or tag is one of the main traits of the fly.
It's a very simple tie. The original used red wool for the tail, peacock herl for the body and a natural brown rooster hackle. It's a very generic dry fly, maybe imitating a small beetle or some other nondescript flying insect.
When I learned to tie it, it was as a wet fly. This is generally referred to as the Red Tag Palmer because the hackle is palmered. You can tie the palmered version as a dry fly too, and you can also tied the usual front hackled version as a wet fly. My adaptation has been converted to something in between and I have also added a rib to reinforce the fly for our rough fishing in salt water and I also add bead chain eyes now and then just for no particular reason and because I like flies with eyes.
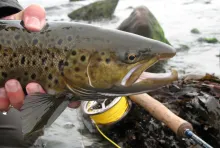
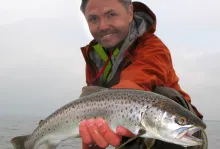
The Red Tag is my Go-To fly in clear and calm water and in the autumn when our sea trout are known to be a little less hungry and a little more selective in their choice of food items.


Tied as a salt water fly, the Red Tag doesn't look like anything the trout would normally eat, but it obviously has the same tempting magic as the dry fly has on the grayling, because it's a true producer in the salty element too.
It's an extremely easy tie, and very suitable for beginning fly tiers. I like to tie it in smaller sizes like 10 and 8, but you can of course tie is as a meatier fly on almost any size hook as long as you can .get enough peacock herl on the hook and use a larger hackle.
I also prefer soft hen hackles for the fly, which can be difficult to find in smaller sizes, but many hen necks actually contain a lot of suitable feathers, and you can often find cheap hen patches in different natural colors, which just beg to be wound as front hackles on a nice Red Tag.
The herl is quite vulnerable and will turn brittle after a while, so reinforcing it with tying thread as shown in the step-by-step pictures and adding a rib can be a couple of ways to make longer lasting Red Tags.

Step 1 - thread |

Step 2 - wool |

Step 3 - tie in |

Step 4 - cover wool |

Step 5 - rib |

Step 6 - herl |

Step 7 - tie in herl |

Step 8 - grab the herl |

Step 9 - create rope |

Step 10 - body |

Step 11 - tie down |

Step 12 - trim herl |

Step 13 - rib |

Step 14 - base |

Step 15 - Hackle |

Step 16 - strip feather |

Step 17 - tie in |

Step 18 - turn hackle |

Step 19 - trim |

Step 20 - finish |
Palmer variation
At step 13 above make this variation:
- Tie in a hackle, stem first, curved side forward
- Wind the hackle in open turns to the rear of the fly (or as far as it reaches)
- Wind the rib forwards in the opposite direction of the hackle, catching the hackle and tying it down without crushing down the barbs
- Tie down the rib with the tying thread, trim the rib
And continue from step 19.
The variations aren't endless of course, but I have already mentioned ribbing and putting eyes on the fly. You can also do as my friend Henning and add flash to the tail as well as using both a body hackle as well as a front hackle. This can be a very good method to add volume to larger and beefier flies. Color wise you can also improvise. The tag can easily be changed to another color, but then it wouldn't be a Red Tag, would it? Peacock herl can also be bought in all kinds of strange hues these days with blue, purple and red sheen in the inherently greenish herl, and you can even find bleached and dyed herl, which have lost all traces of that illusive metallic flare that's in the natural material.
I personally think that the color and shine of the herl is one of the key elements to the success of this fly and rarely venture beyond the red tag and the natural herl, accented with a nice, dull brown hackle.
I have tied this fly for ages, and the style has changed over the years. You will find it amongst the absolutely oldest articles here on GFF, as in this old B/W version as well as the Low Water Red Tag shown here. Both articles are 12-15 years old at least. And of course the Red Tag was also a part of my Fill-The-Box-project from many years ago.

- Log in to post comments


One of the best trout flies
One of the best trout flies on Prince Edward Island Canada. We call it the brown hackle. Usually fish with two flies. ( a must) Brown Hackle on end and a Whickems Fancy on top.
Tie in the hackle stem first, curved side out ...
I have a question about the tying technique. Why tie in the hackle stem with the curved side out? Won't the natural bend in the barbs end up pointing the wrong way? Am I completely clueless here?
Hackle orientation
Jannick,
If you want the hackle to curve and sweep to the rear, the easiest way to achieve this is to tie it in on your side, tip to the rear, curved side out (towards yourself), and then start wrapping over the hook (away from yourself). This will make the fibers fall naturally towards the rear of the fly as you want it in a wet fly like this.
If you tie it in curved side in or wrap it the opposite way, it will have a tendency to stand our more perpendicular to the hook shank, which might be wanted sometimes (like in a Woolly Worm), but not in a more traditional wet fly.
Martin