
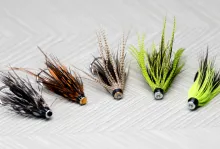
During a recent gettogether with some Danish flyfishers I hauled out some of my cod flies. One of them was this one - The Rocket. They were quite excited about the fly - first of all because it's a light tube fly, second because it's very durable. They saw in it not only the cod fly that I had made, but also a pike fly, a fly for pike perch and a universal fly for all kinds of deep fishing for larger fish.

The Rocket - tube and epoxy
During a recent gettogether with some Danish flyfishers I hauled out some of my cod flies. One of them was this one - The Rocket. They were quite excited about the fly - first of all because it's a light tube fly, second because it's very durable. They saw in it not only the cod fly that I had made, but also a pike fly, a fly for pike perch and a universal fly for all kinds of deep fishing for larger fish.
Bottles of epoxy
A year ago or so I bought two bottles of epoxy, but not before recently I started using it. It was Bob Kenly's principles of combining tube flies and epoxy that was the impulse.

A treble is commonly used for tubes in Scandinavia. I prefer a single hook
I have since then made several large epoxy coated patterns which have all proven succesful, but it was the combination of the tube, Gartside's braided Corsair tubing and epoxy that really was a hit. This fly is the most rercent result of this combination.
The idea is to use the plastic tube to make a light fly and the braided tube to hold the epoxy in shape.
By covering all tail and wing materials and the dumbbell eyes with the tube and then the epoxy you get an almost indestructible fly.
Heavy fly
The fly is still heavy, but not nearly as heavy as a similar fly tied on a large hook. It's not easy to cast, but with patience in the backcast and less ambitions regarding casting length it's not that bad.
I have experimented with a sinking line on a 9 weight 11' two hand rod, and that works very well when you have gotten used to it. One of the above mentioned fishers - Michael Jensen - urged me to try a short one hand rod in stead - like an 8' 9 weight, and I will if I get the chance.
Materials
| Tube | Cotton swab tube, melted in both ends |
| Thread | Black 6/0 |
| Tail | Black squirrel or Arctic fox |
| Rear body | Dark olive dubbing |
| Wings | Black squirrel or Arctic fox and peacock herl |
| Sides | Orange squirrel or Arctic fox |
| Front body | Dark olive dubbing |
| Body/head | Corsair tubing, 0.5" diameter |
| Gills | Red flash dubbing |
| Eyes | Painted dumbbell metal eyes |
| Cover | 5 minute epoxy (or according to taste) |

Tying instructions
A rotary vice makes the epoxy work much easier. You can also study this animation for a clearer understanding of the process.
- Cut the cotton of the swab and melt the tube lightly in both ends to create a collar
- Mount the tube in a tube fly vice or on a heavy needle in a standard vice
- Tie in the thread approx. 0.25" from the rear end of the tube
- Tie in a 05." tuft of hair to circumference the tube and form a tail.
- Dub 0.25" of the tube with olive dubbing
- Tie in a 1.5" long wing above and below the tube
- Tie in 4-6 peacock herls on top of each wing. Length approx. 2.5"
- Tie in two tufts of orange hair as sides to reach the tip of the tail
- Dub yet another 0.25" of the tube
- Whip finish and cut thread
- Prepare a 1" pjece of braided tube by folding it a bit 'into itself'
- Do this by pressing the tube together, reversing it into itself, and pressing it with a pen or similar cylindrical object
- Pass the now semi closed end over the fly so that it covers the front body and the base of the sides and the wings
- Make sure that the 'side lines' of the tube are parallel with the sides
- Press the tube together and tie in the thread over the narrow part
- Secure the tube and tie on the eyes
- Make sure that they sit in the right angle with regards to the wings
- You don't need to secure the eyes more than just adequately
- Wind the thread to a point behind the eyes
- Apply some flash dubbing tightly to the thread
- Make a small ball of tightly wound dubbing behind the eyes
- Whip finish in front of the eyes
- Prepare a suitable amount of epoxy on a piece of paper. I usually put a sheet under the fly to mix on and to catch drops
- Apply the epoxy with a match
- Start by covering the eyes and the front of the fly with a small amount
- Then cover the braided tube. Make sure you get the the rear edge of the tube
- The epoxy will sink into the materials under the tube
- Keep on adding epoxy, while constantly rotating the fly to avoid dripping
- Finally add epoxy over the gill section
- Keep on rotating the fly while the epoxy settles. The least pause or hesitation will make it drip
- When the epoxy stops moving, keep rotating for a few more rounds
- The fly will now be hardned and very hot
- Leave it in the vice for a few seconds
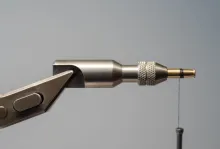
- Draw a piece of silicone tube over the bare piece of fly tube
- Use a treble or single hook according to taste

The leader is drawn through the tube and attached to the hook which is then drawn into the soft silicone tubing.
- Log in to post comments


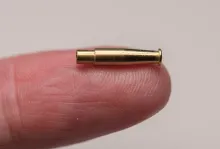

When the fly is done
When the fly is done, there will be a small piece of the tube protruding in the rear of the fly under the materials. Press a piece of slightly larger diameter soft tube over this as an extension. This extension serves as a guide for the hook. When the hook is attached it will be drawn into the soft tube and sit fairly tight there.
Martin
I don't understand s
I don't understand step 34. Never have tied a tube fly before.