
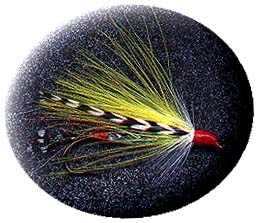
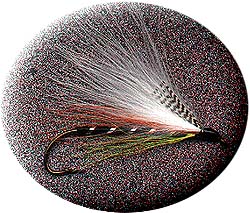
The second streamer swap to have originated from the forums on this site, Doug Saball's Marabou Streamer Swap was a great success! The theme for the swap was that participants would contribute an original or established streamer pattern which used marabou for the wing material.

The second streamer swap to have originated from the forums on this site, Doug Saball's Marabou Streamer Swap was a great success! The theme for the swap was that participants would contribute an original or established streamer pattern which used marabou for the wing material.
Tyers of all abilities entered this swap, including Doug's 12 year old son Jonathan, who just began fly tying. It's nice to see our streamer tying and fishing heritage being passed down to the next generation...Now to the streamers!
Marabou Barnes Special
Submitted by Steve Desmond
| Hook | Streamer, 4x to 6x long single, sizes 4 to 10, or tandem |
| Thread | Red |
| Tail | Jungle cock body or any spotted feather |
| Body | Traditional: flat silver ribbed with oval silver tinsel or Modern: Orvis Braid tied at ends (small) |
| Wing | Sparse red bucktail over which is sparse white bucktail over which is yellow marabou flanked by two thin grizzly hackles |
| Collar | Flared back white hackle |
| Head | Oversized painted red |
| Comments | My favorite early season Northern Maine salmon fly. Fish it on bright days, slowly twitched against the current or trolled very close to shore. |
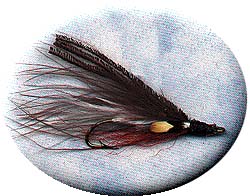
Marabou Black Ghost
Submitted by Aaron Hirschhorn

| Hook | Daiichi 2421 (I just like the way the up eye looks) |
| Thread | Black 6/0 Unithread |
| Tail | Yellow Marabou |
| Body | My preference is for Tinsel Chenille, but have used the traditionalBlack Floss ribbed with silver, Kreinik Metallic, Estaz (trimmed) and Bill's Bodi-Braid. |
| Throat | Yellow Marabou |
| Wing | White Marabou |
| Eyes | Yellow with Black pupil. (I use a Sharpie for the pupil). |
Aaron's Tying Instructions And Comments On This Pattern
This is a straightforward tie.
1. Place hook in vise.
2. Attach thread to a head's length behind the eye.
3. Tie on the tail, and wrap the thread back to the bend. I generally like the tail to be bushy, since marabou moves so seductively in the water.
4. Tie on the tinsel chenille and advance thread to the head position. Wind body material forward to waiting thread.
5. Tie on beard.
6. Tie on wing.
7. Build head, whip finish and cement.
8. Paint on eyes.
Though I haven't fished streamers all that much in the past, the last two seasons have seen me use them more and more. I enjoy the visual effect of seeing the fish dash, slash and sometimes connect with the fly. My successes have come primarily on freestone streams. Tailwaters have not been so kind, although this summer the East Branch of the Delaware was fairly generous when I used a #14 2XL nymph hook for a Black Nosed Dace. The Marabou Black Ghost has been a decent producer on the Willowemoc Creek.
Aaron Hirschhorn
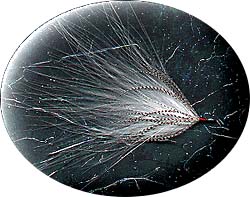
Reverse-Tied Marabou Blacknose Dace
Submitted by Chris DelPlato
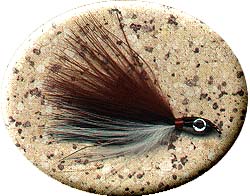
| Hook | Mustad 3665A or equivalent, sizes 6 - 10 |
| Thread | Red 8/0 Uni Thread |
| Body | Medium Flat Silver(traditional) or Gold Tinsel |
| Top section (back) | Brown Marabou |
| Lateral stripe (middle) | Black Marabou |
| Bottom section (belly) | White Marabou |
| Eyes | Peel & Stick-on Prismatic size 1 1/2 or 2 |
| Tail (optional) | Red Hackle or Marabou |
| Head coating | Dave's Flexament |
Chris's Comments On The Pattern
What's in a name? In the case of this particular fly, the name I have chosen pays homage to some of the trailblazers of streamer fly design. "Reverse-Tied" relates to the 'backward' technique of tying bucktails which was developed by Carrie Stevens and brought to greater prominence by Keith Fulsher's Thunder Creek series. "Marabou", while it is the theme of this fly swap, also reminds of A. Wellington Ballou of Litchfield, Maine -- the father of the marabou streamer. And finally, "Blacknose Dace" which is the name of the baitfish we are trying imitate, as well as the name of Art Flick's popular brown/black/white bucktail color combination. Incidentally, some consideration was given to how, exactly, this part of the name should be spelled -- Black Nose, Black Nosed, Blacknosed or Blacknose -- all of which I've seen in various fly fishing/pattern texts. I went with the latter, as it appeared in a book entitled "Complete Field Guide to American Wildlife" by H.H. Collins. "Blacknose Dace - Rhinichthys Atratulus" sounded authoritative enough to me. Within the U.S., this little guy enjoys clear brooks with clean bottoms from Minnesota to Tennessee, Virginia to Maine. Let's tie one on!
Chris's Tying Instructions
1. Tie in thread about 1/8" behind hook eye.
2. Attach tinsel about 1/4" behind hook eye. Wind on with slightly overlapping wraps toward rear of hook and back, reversing direction just before hook begins to bend, and ending at starting point. Trim excess.
3. We will use three colors of marabou. Both the brown on top and the white on bottom will each be about twice as much as the black in the middle. In other words, approximately 2/5 brown, 2/5 white and 1/5 black. As I tie in these bunches of marabou, I like to keep it wet. This can be done with saliva, but in order to keep the dye out of your mouth (and who knows where those feathers have been) a small cup or bowl of water on your bench might be a better option. With such a wispy material that can be blown about by the slightest breeze, this makes the tying job more manageable. Especially since the color separation is a key element of the pattern.
4. Begin with the black, first measuring the marabou length so that you will have enough length past the hook bend after you are done folding the head back. Take half of the total amount of black needed and hold it by the butt ends. Place this "hold point" even with the hook bend allowing the marabou to lay on top of the hook shank with its tips toward the eye. Adjust the length of the marabou until it extends about 3/4" past the hook eye. Now slide this "hold point" up to where you tied off your tinsel, approximately 1/4" behind the eye. Now bring this bunch of marabou down along the side of the shank and tie it in there with a few good solid wraps. Trim excess. Repeat on opposite side of the hook with the rest of the black.
5. Repeat this procedure with the brown marabou on the top of the hook and again with the white on the bottom. Flipping the hook upside down (rotary is a plus here) can make the bottom easier to tie in. Remember to keep the marabou moist and separated into your four bunches.
6. Now you have your four bunches of marabou (2 black, 1 brown, 1 white) coming off the front of the hook. Wind your thread forward toward the hook eye, solidifying the
bind-down point and extending it right up to the eye. This will be the foundation of the "bullet head" of the fly. You can leave it slim or build it up, depending upon how large you want the head to be. Now, wind the thread back to the back of your head foundation (1/4 - 3/8" behind the eye, depending upon fly size).
7. One by one, starting with the two black ones, fold each of the marabou bunches straight back and bind them down with two turns. Finish with the brown and white bunches.
8. Complete the tying with a sufficient number of wraps to form a thin (1/16" or so) red band of thread. Tie off using a whip finish or half hitch (if your tool is big enough to fit over the head of the fly).
9. Coat the head with a clear epoxy, back to and including the red band of thread. I use Dave's Flexament. This will protect the head from getting frayed when you start catching all those fish! If you are using a stationary vise, apply the coating sparingly as it has a tendency to drip or run. With a rotary vise, you can apply a bit heavier and then rotate the fly 180 degrees if you see a drip or 'sag' forming. After the first coat has dried, affix the stick-on prismatic eyes. Apply a second coat over the head, eyes and band. A third coat is optional.
10. Go fishing!
Fox Hole
Submitted by Will Taylor
| Hook | Mustad 3665A #4 (I like the Limerick bend) |
| Thread | Black 6/0 |
| Body | Black Floss, down and back |
| Rib | Flat Silver Tinsel, sz 14 |
| Throat | lemon yellow bucktail, length of hook |
| Underwing | orange bucktail, length of hook |
| Wing | single white marabou plume |
| Shoulder | Teal or Mallard flank, tented over front 1/4-1/3 of wing |
Will's Comments On This Pattern
The Black Ghost is a pretty classically productive pattern left well-enough alone, but its simplicity almost begs for some innovation. I found this variation one day in the fly shop in Greenville when my son Ben & I got rained off the West Branch, & we proceeded to have a great time with it & West Branch landlocks once we were dried off enough to return. There's one in the jaw of a huge salmon below Little Ambejack falls if you want a closer look.
In continuing to mess with this pattern, I've added a bit of flash to some of these by using silver holographic tinsel ribbing, or by slipping 2-3 strands of pink crystal flash (it reflects the orange nicely) along each side of the underwing. Them real smelts are pretty flashy little critters.
Marmalade
Submitted by Ron McKusick

| Hook | straight eye, 6x long |
| Thread | Black 6/0 |
| Head | Wet and Wild nail polish that has glitter in it |
| TAG | red size "A" nylon |
| Body | Gold Mylar piping, small size. (Pick up some at a craft store after Christmas) |
| Wing | first lay on some yellow calf tail fibers, about 25, then an orange grizzly marabou plume. Next tie in 1 Crystal Flash strand and fold it so there is 4 fibers lying over the marabou. Then orange mallard flank feather and lay this over the marabou. After the hook is in the vise, start the "A" nylon 1/2-inch behind the eye. Wrap toward the tail position and then take some nail polish and coat the windings. Take the gold piping and measure it against the hook. Cut it and take the core out. Slide the pipe over the eye and down to the tail position where your thread is waiting. Hold the pipe with you left fingers and take 4 turns of thread with the bobbin. (I'm right handed). You should be able to let go of the pipe and make 2 whip finishes with your right hand. |
Marabou Mickey Finn
Submitted by Jonathan Saball
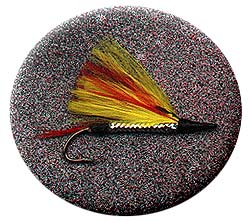
| Hook | Mustad #8 |
| Thread | Black |
| Body | Silver mylar tube body or flat tinsel |
| Tail | Red Feather (optional) |
| Tag | Red thread, to secure the tube body (optional with flat tinsel) |
| Wing | White Marabou |
| Eyes | Small bunch of yellow marabou on bottom, over which is an equal amount of red marabou, over which is a yellow bunch of marabou equal to the first two bunches combined. |
This is one of the 'old' standbys. It was developed during the "gaudy" period of patterns. It does not resemble a baitfish. However, when tied with marabou feathers it simulates a leach.
Jonathan's Comments On This Pattern
This is the first swap that I was in. I am 12 years old and I started to learn to tie flies with my dad this past year. I have been taking a fly tying class from Ron McKusick this fall. I am learning a lot about fly tying. It is fun to go fishing with my dad and catch fish with the flies that we tie.
Dad's (a.k.a. Doug) Comments On This Pattern
This was one of the first patterns I learned to tie, when I was Jon's age. At that time I didn't know of any fly tying classes. So I taught myself and learned a lot of errors in tying. I am also taking Ron's class and I am learning new and the correct way to tie. Back to the pattern. This marabou pattern has been very productive for me. The most memorable time was, yes story time, when I was a teen-ager. It was raining hard; the water was up and very dirty. I was in Winchindon Mass camping with my family. I went to a little creek that entered into a larger stream. The angle that I was casting allowed me to cast into the stream, and retrieve up the creek. I caught about twenty rainbows and brookies within a few hours, but only kept a few to eat. One of the best day's fishing I've ever had.
Purple Spawn
Submitted by Stan Jakubaszek

| Hook | long shank streamer (Mustad 3665A size 1 used) |
| Body | Chinese Red floss tied with slight taper |
| TAG | medium flat gold tinsel |
| Rib | medium flat gold tinsel |
| BELLY | natural deer tail tied sparse |
| Throat | pink marabou tied sparse |
| UNDERWing | lilac krystal flash 10 strands |
| Wing | purple marabou plume as flat wing |
| SHOULDER | green wing teal |
| Cheeks | Jungle Cock tied long |
| Head | hot pink |
| Comments | This pattern was based loosely on John Shewey's 'Spawning Purple Spey' and converted to a streamer. The fly looks 'very fishy' when wet and should be an effective pattern for landlocks, etc. |
Northern Redbelly Dace
Submitted by Doug Saball
| Hook | Mustad #8 |
| Thread | Black |
| Body | Silver mylar tinsel, flat |
| Rib | Silver oval tinsel |
| Throat | sparse red calf tail |
| Wing | White Marabou on bottom, brown marabou in the middle, and 3 bronze peacock on top |
| Cheeks | Medium Jungle Cock eye. |
Doug's Comments
This is a simple streamer to simulate a male northern redbelly dace
during breading season. For the remainder of the year the red throat can be changed to yellow or white for both males and females. It should be fished in quiet stretches of rivers, creeks, bogs or lakes.
The northern redbelly dace (Phoxinus eos) is one of the most attractive minnows found in New England. It is brownish-olive in color on the back and upper sides. There are two lateral black stripes; the upper line is fainter or broken into spots towards the tail. The space between the lines is silvery. The lower sides and belly are white or silvery. During breading season, late spring and early summer, the male has a brilliant red belly. Thus the name and pattern for this streamer.
This species is distributed from Nova Scotia to eastern British Columbia, southward to the Adirondacks, southern Ontario, southern Wisconsin, the Dakotas, and Montana. (1) The northern red belly dace is found in bogy, acidic lakes, ponds, and streams. It tends to avoid running streams, frequenting quiet backwaters. Few adults grow larger than 2 to 2½ inches long. They feed on algae from mud and rocks. Because it is mainly a vegetarian and grows to a small size this minnow provides excellent forage for trout without competing with them for food. (2)
References
(1) Freshwater Fishes of New Hampshire, John F. Scarols, New Hampshire Fish and Game Department, division of Inland and Marine Fisheries, 1973.
(2) Bulletin 184; Freshwater Fishes of Canada, W.B. Scott, Crossman E.J., Fisheries Research Board of Canada, Ottawa 1973.
Yellow Butcher Streamer
Submitted by Doug Saball

| Hook | Mustad #8 |
| Thread | Black |
| Body | Silver mylar tube body or flat tinsel |
| Throat | Red hackle fibers |
| Wing | Yellow Marabou on bottom, brown marabou on top, flanked by three peacock fibers |
| Cheeks | Medium Jungle Cock eye over the peacock fibers. |
Doug's Comments
This is a general baitfish pattern that could simulate any of the lined minnows or shiners. The marabou, when wet, simulates the undulating action of the natural fish.
I found this fly to be a little more difficult to tie than I expected.
Ron McKusick, a professional tier told me, that the peacock fibers I used were not playable enough. He suggested using the eye fibers from a peacock tail rather than the packaged fibers I had.
Soft Hackle Streamer
Submitted by Bob Petti
| Hook | Mustad 3407, #6 |
| Thread | Danville 6/0, Red |
| Tail | 2 strands of silver flashabou |
| Body | White marabou |
| Hackle | Natural mallard or similar duck flank |
| Head | Red |
Bob's Tying Instructions
1. Attach red thread behind the eye of the hook and wrap to the end of the hook shank.
2. Take one or two strands of silver flashabou, double them around your thread and tie them in at the rear of the shank.
3. Choose a marabou feather that has a thin stem and fairly thin barbs (not "fluffy" like wooly bugger marabou). Strip the unwanted fluff from the bottom of the feather, especially where the stem is too thick to wrap.
4. Tie the marabou hackle in by the *butt* and wrap your thread forward to just behind the eye of the hook.
5. Palmer wrap the marabou hackle up the hook shank, folding and stroking the marabou fibers back as you wrap. You want the marabou to point to the rear of the fly as much as possible.
6. Tie off the tip of the feather just behind the eye.
7. Fold a mallard or similar duck flank feather and tie in by the tip. If your flank is heavily "one-sided", you can avoid the folding by stripping the short side and wrapping the one-sided flank feather as if it had been folded.
8. Make one or two wraps of the duck flank to create a hackle collar in front of the marabou body.
9. Tie off the flank feather and build a small head. Whip finish.
10. Trim any excess flashabou that extends beyond the marabou.
Bob's Comments
This fly was originated by Jack Gartside. He makes a very compelling argument for the fly in the book "The Art of the Trout Fly" by Judith Dunham. In it, he alludes to the fact that the soft hackle streamer is the result of imitation through reduction of materials. He had stripped a baitfish imitation down to its bare essentials - a few wisps of flashabou inside the body to serve as flash, a three-dimensionally shaped body formed from the palmered marabou hackle, and a mottled scale effect from the flank feather, which also acts as a foil to the water causing the marabou to pulsate more effectively. Even the choice of red thread was deliberate. The results are a fly that has a good silhouette when viewed from all angles, subtle flash, and built-in movement that does not require a lot of angler manipulation.
It's a simple fly, but well thought out.
Although it lends itself to a multitude of color combinations, I favor the pattern shown, white having always been a good color for my streamer fishing.
Yellow Marabou Spruce
Submitted by Ron Gherardi

| Originator | A.K. Best |
| Hook | Mustad 9672, size 2-6 |
| Thread | Black 8/0 prewaxed |
| Tail | Peacock sword fibers |
| Rib | Copper Wire |
| Body | Rear ½ yellow floss, Remainder peacock herl |
| Wing | Yellow marabou and Yellow badger hackle tips |
| Hackle | Yellow badger hackle |
Marabou Bicentennial Smelt
Submitted by Bob Skehan

| Hook | Mustad 94720, size 6 |
| Thread | Black 6/0 |
| Body | Copper Mylar Braid, Wrapped around hook shank |
| Throat | White Marabou, To bend of hook. |
| Wing | 3 strands each of pearl, blue, and pink Crystal Flash, over which is a medium gray marabou plume. |
| TOPPING | 4 or 5 peacock herls as long as wing. |
| Eyes | Painted white with black pupils |
Bob's Comments
This pattern is my marabou-casting-conversion of Jim Warner's original featherwing version published in Dick Stewart and Bob Leeman's "Trolling Flies For Trout And Salmon".
The original pattern uses flat copper tinsel for the body, red, white, and blue bucktail for the first layer of the wing, 4 medium blue dun saddle hackles for the rest of the wing, doesn't have a herl topping, and uses jungle cock nails for cheeks instead of the painted eyes.
I substituted the Crystal Flash for the bucktail to add a bit of sparkle to the pattern, and I've always been pleased with the way that this material works with marabou patterns. I added the herl topping because I like streamer patterns with a dark "back". (And most all patterns should have that magical peacock herl in them).
The original pattern rates very high on my list of "smelty" patterns. (Is "smelty" a word?... You know what I mean!)
- Log in to post comments


Chris, I am interest
Chris, I am interested in your pattern and I have been tying flies for quite a few years. I have not yet gotten into streamers as I stick to nymphs, dries and wets. I would love to try to tie your pattern but incorporate lead eyes. I have two questions. Do you have any suggestions for doing this or any better way to add weight? Secondly, since i am new to tying streamers, your descriptions are great but could you send me a couple of pictures or a video so I can see exactly how you are tying the fly. Thanks for any help you can be.