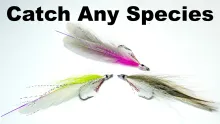
Bucktail Bucktail is available in countless colors -- as well as the natural brown/white combination
Martin Joergensen
magazine block-instance:2-picture:1
External
18398
Yes
Edit
Longer hook The traditional Clousers are tied on longer hooks with the eyes fairly far back
Martin Joergensen
magazine block-instance:2-picture:2
External
18395
Yes
Edit
Right between the eyes Hallmarks of the Clouser is the eyes and the strip of bucktail between them
Martin Joergensen
magazine block-instance:3-picture:1
External
18396
Yes
Edit
The head The head of the fly looks quite fishy. Remember that it most likely fishes upside down
Martin Joergensen
magazine block-instance:3-picture:2
External
18397
Yes
Edit
Skinny minnow The Clouser Minnow can be tied pretty skinny and still work well
Martin Joergensen
magazine block-instance:4-picture:1
External
18394
Yes
Edit
Step 1 - thread Start the thread and take it backwards to give plenty space in front of the eyes
Martin Joergensen
picture frame-instance:1-picture:1
External
18376
Yes
Edit
Step 10 - light hair done The light part of the wing is set. This will become the underside of the fly
Martin Joergensen
picture frame-instance:1-picture:10
External
18385
Yes
Edit
Step 11 - turn Turn the hook upside down
Martin Joergensen
picture frame-instance:1-picture:11
External
18386
Yes
Edit
Step 12 - flash Tie in a bit of flash. Some tyers tie this in on the other side of the hook, behind the eyes before tying in the first wing
Martin Joergensen
picture frame-instance:1-picture:12
External
18387
Yes
Edit
Step 13 - pull back and secure Make sure the flash lies flat along the hook shank
Martin Joergensen
picture frame-instance:1-picture:13
External
18388
Yes
Edit
Step 14 - second wing section The second and darker wing section should be equal in length to the first one
Martin Joergensen
picture frame-instance:1-picture:14
External
18389
Yes
Edit
Step 15 - secure second wing Again you want to cover the butts and not tighten too much to avoid the hair flaring
Martin Joergensen
picture frame-instance:1-picture:15
External
18390
Yes
Edit
Step 16 - head Form a head over the wing butts. It can be rather large without problems
Martin Joergensen
picture frame-instance:1-picture:16
External
18391
Yes
Edit
Step 17 - whip finish Whip finish and cut the thread. The fly is ready for a layer of varnish
Martin Joergensen
picture frame-instance:1-picture:17
External
18392
Yes
Edit
Clouser Deep Minnow. Step 18 - finished fly You can varnish in front of the eyes, but also over the light hair between the eyes and the rear thread wraps. But don't drip into the wing!
Martin Joergensen
picture frame-instance:1-picture:18
External
18393
Yes
Edit
Step 2 - eyes Tie in the eyes on top of the hook shank. I'm a little too close to the hook eye here...
Martin Joergensen
picture frame-instance:1-picture:2
External
18377
Yes
Edit
Step 3 - secure eyes Criss-crossing the thread and winding it parallel to the hook shank will set the eyes firmly with no need for glue.
Martin Joergensen
picture frame-instance:1-picture:3
External
18378
Yes
Edit
Step 4 - light bucktail Put the light material on the "top" of the fly. Remember it rides upside down when it fishes
Martin Joergensen
picture frame-instance:1-picture:4
External
18379
Yes
Edit
Step 5 - measure hair I use a normal shank hook, and like the wing at least double hook length
Martin Joergensen
picture frame-instance:1-picture:5
External
18380
Yes
Edit
Step 6 - trim butts Trim the bucktail before tying it in so that you can cover it fully with tying thread
Martin Joergensen
picture frame-instance:1-picture:6
External
18381
Yes
Edit
Step 7 - tie in Tie in the butts in front of the eyes. Don't let go of the hair
Martin Joergensen
picture frame-instance:1-picture:7
External
18382
Yes
Edit
Step 8 - behind the eyes Pass the thread under the hook shank to behind the eyes and tie down the hair right behind the eyes
Martin Joergensen
picture frame-instance:1-picture:8
External
18383
Yes
Edit
Step 9 - secure hair Secure the hair with a few rearwards wraps. Don't make them too tight or the hair will flare
Martin Joergensen
picture frame-instance:1-picture:9
External
18384
Yes
Edit