
Ant patterns are usually a bit of foam and a chaotic dry fly hackle. But why not tie it more imitative? It's quite easy.

Foam and bristles.
Get out your ant repellent!

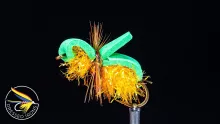
The proper positioning and angles of the legs are a key to the imitative quality of the pattern.

Ventral and dorsal veiw of the same Edwards' Little Ant.
Ant patterns are usually a bit of foam and a chaotic dry fly hackle. But why not tie it more imitative? It's quite easy. This pattern was originally shown to me by Oliver Edwards. Oliver's hallmark is indeed very accurate imitations, but usually his patterns are quite complex and hard to tie. But not this one. It takes about a couple of minutes to tie - and a minute or so to arrange the legs - the key to the pattern's fine appearance.
All synthetic
The materials for the ant are few and simple - and all synthetic. For the body we use foam of the closed cell craft foam type and the legs and antennae are single, synthetic bristles from a broom or paint brush. A few years back I cut a piece of a new, small broom ... much to the regret of the cleaning staff in the house - namely myself and my wife. We've bought a new broom since then. The broom bit supplied enough leg material for lifetime worth of ants and beetles.
The shape and position of the legs is an important factor in getting the imitation convincing. I don't doubt that a trout will hit an ant whose legs and antennae are straight as a ruler - or chaotic like the dry fly hackle. But it adds greatly to the appearance of the pattern if the legs are bent as shown.
This is easily done with a pair of thin pliers or tweezers. Oliver Edwards heats them before the maneouvre, but I have used cold tweezers for all my ants, and that works fine.
Bend each leg as shown and double it over, giving it a hard squeeze to set the bend properly. Then open the bend to a proper angle and it will sit there for a long while. Getting the legs symmetrical can be tricky, but with a little practise you will get some fine results.

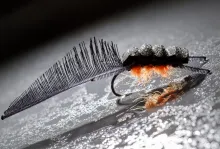
Above you see a similar view of a small beetle tied using the same materials and technique.

A generic foam beetle tied as the ant - with a few modifications.
The technique used for this ant pattern can be used for other terrestrials too. A beetle is very easy to make using the same materials.
The beetle is basically tied in the same way, but with the omission of the antennae. The major difference between this little beetle and the ant is the abdomen. By folding the rear part of the foam over the two rear set of legs and tying it down there, you imitate the larger abdomen of the typical beetle.
Again the legs make a difference. The beetle will basically do with two sets pointing rearwards and one set pointing to the front. Each leg should have a knee with a slight bend and the beetle will be ready to join the ant and crawl off ...
- Log in to post comments


So how do you see it?
So how do you see the stinkin thing when you cast it?
Your ant pattern works great
your ant pattern works great; caught a 28 inch rainbow in a california northern lake last year.I use .016 monofilament for the legs, and use a warm to hot needle over a candle to make a bend in the leg.I use a black marker pen to color the legs.Thanks for sharing your pattern.If you like I would send you my version of the ant. THANKS John
The beatle's cool
The beatles cool looks the part, of to tie some now, i love tying flies out of foam and the many ranges of colours, makes some of the patterns easier to adapt for terrestrials. Thanks Jan
So how do you see it ...
"So how do you see the stinkin thing when you cast it?" what are you tying with? I can recommend you well cured fly tying material that doesn't stink :)
This is a great fly pattern!
Realistic Legs for Terrestrials
Japanese Nymph Legs is a product very similar to the synthetic bristles from a broom that the Author uses. They are very similiar in size but are made of a slightly different material that makes shaping them a bit easier. I use an adjustable heat soldering tool and have through trial and error figured out the best temperature for melting the bends in the legs without melting through the material. The JNLs are available at retail from a few shops, mostly those that have a section for realistic fly tying.