
This time we look at guide selection and preparation as well as the critical process of wrapping the guides. Learn some neat tricks from German Jan-Ole Willers in this third part of his extensive rod building series.

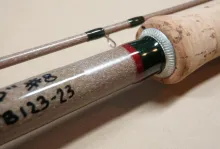
Things needed for guide feet preparation and test placement. |

Test placement on blank with help of rubber bands |
To ensure a proper fit almost every guide foot has to be aligned and filed for one or more reasons. Filing has to be done to avoid damage to the blank by sharp edges which might cut or grind into the blank while using the rod later on. Therefore the underside has to be flattened if required. Another point is that we have to ensure an easy transition of the winding thread from the blank onto the guide foot.
Aligning of the guide feet for double foot guides into a parallel plane can be done with a set of small pliers.
The filing and aligning process has to be done carefully to avoid fatigue fractures later on while using the rod. I always use key files; you can buy them in a small set in different shapes for a couple of bucks.
Placing the guides & static distribution test
You can make your first building project quite simple by exactly following the data many blank manufacturers supply for their blanks.
Sage for example offer these data through their webpage.
You can also do it the way you prefer to have the layout. In some cases you simply cannot use the original recommendations 1:1 because you decided to use a different guide types and/or sizes. I would not recommend to use a deviating number of guides for your first rod. Be loyal to the manufacturer's data, but later on you may use one stripper extra or less, depending on the type or rod.
First you have to glue the tip top into place before all further steps. After this I place the guides according to the manufacturer's recommendation, placing the guides temporarily on the blank using the small rubber band constructions that you can see in the pictures.
In this way adjustments are done very easily and contrary to the usage of masking tape no remaining masking tape glue will disturb later on. Neither will it loose its power during the stress testing.

Stress test, fig.1 |

Stress test, fig.2 |

Stress test, fig.3 |

Stress test, fig.4 |
Some general guidelines:
- The number of guides should be not too few (Fig. 1). This would end up in punctual stress which might be too high to the blank. Also you would not utilise the full potential of the blank. In very few cases you can go with one guide less than usually recommended for that specific rod, but I myself have never done that.
- The placing of the guides should end up in an even distribution of the power in the rod. It should end up without too uneven patterns (Fig. 2a) or guides placed too close to each other further down the rod (Fig. 2b).
If the rod is put under stress (carefully, otherwise the guide might leave its position) you will see if there will be a nice and even distribution. The line should enter and leave every single guide with identical angle as demonstrated in the drawing.

Line angles |
- As rule of a thumb the first stripping guide should be placed approximately 75-85 centimetres or 29.5-33.5 inches away from the butt end of the rod. If the guide comes too close to the butt end of the rod (Fig. 3) the shootability of the rod will be reduced and additional friction might be put on the line at the first stripper while fighting a fish. Check out which distance suits you best. The simplest way is to compare with your other rods to get an idea where the first stripper should be placed. This point is very important if you use double haul techniques.
- I always make the distance from the guide closest to the tip top to the rod tip 10-12,5 centimetres or 4-4.5 inches.
- So Fig. 4 should show how the setup should look. For an easy practical use I always use a layout sheet as you can find it this PDF-file.
One important point point regarding the drawings: They are just for demonstration purposes and not correct in regard of dimensions or number of guides! So do not transfer the illustrations 1:1 into a real project.

Installing a guide |

Ready to install the guides. |

The wrapping process |
Wrapping the guides
After we have decided on a certain guide layout (which we have hopefully noted down correctly) we can prepare for the wrapping process. Remove all guides except the tip top and clean the entire blank with alcohol. In this way we avoid any dirt on the blank, which might end up under one of the wrappings. Also clean the guide feet with alcohol if you have used masking tape for the stress distribution tests.
Now we turn in the wrapping yarn, cutting off the end after 4 or 5 tight turns (Fig. 1). To gain the right pressure on the thread I let the thread run through a book. It should be tight enough to avoid a loosening and loose enough to enable us to align the guides finally to the tip top and the other guides later on when the wrapping is done.
After a couple of more turns we have to put in a loop, what will enable us to pull the end of the winding thread under the wrapping itself, as shown (Fig. 2).
When we have reached the final width of the wrapping, we have to cut off the thread with a length of 10 to 15 cm, pulling the end through the loop (Fig. 3).
Now we tighten the loop until the loop is about to go under the wrapping (Fig. 4), followed by another cut of the wrapping thread very short (1mm / 0.04inch) in front of the loop, which now holds the thread tightly (Fig. 5).
Press your thumb firmly on the place indicated by the arrow in figure 5 to ensure that the thread which is pulled under now is making a sharp curve.
Now pull the end of your thread under the wrapping (Fig. 6).
If everything was done correctly the end of the wrapping is secured tightly under the wrapping, not coming out again at the place where the loop left the wrapping (Fig. 7).
Reinforcement wrappings
I tend to do the reinforcement wrappings with a little more thread tension, which can be adjusted easily with an additional weight on the book we are using. The procedure is generally the same as for the other wrappings. You have to put a loop in after a few wrappings. Check which way around suits you best. It might be a little tricky because we work at the end of a piece of the rod. Just connect the next piece of the rod. That will help you. I always do reinforcement wrappings in the same length on a rod. This will give the rod a professional appearance when all parts are lying next to each other.
If thread butts are sticking out through the wraps, it is very difficult to avoid a small peak which will look just bad even after the coating process. In such a case I can recommend redoing the wrapping. Removing bits and pieces with a lighter or a scalpel usually does not work anyway.
To get even, identical sized wrappings, I measure the length of the first wrapping. So I will get the same result on the other guides of the same size. The same thing should be done with the strippers to achieve wrappings of the same width on both feet. In general even and very tight wrappings will look best. If one wrapping does not look too good try to rearrange it by using your thumbnail - or just redo the entire wrapping.

Aligning the guides |
Alignment of the guides
This is a part of the job which is very important and isn't too much fun to be honest.
If you have not applied too much power on the thread tension, you can move the guides carefully to align them 100%.
To do a proper job I recommend placing the rod or the section you intend to align on v-blocks which are placed on an even surface with enough light. Optimum is a table where you place the rod on v-blocks, aligning the guides along the blank while sitting calmly on a chair.
I cover one of my eyes to get a perfect view. Take your time for this part of the job, if you want a perfect result. Give yourself a break if there no progress and continue later on.
- Log in to post comments


Actually, I've taken
Actually, I've taken the tour at the Sage factory twice and watched the women wrap guides. They do all alignment of guides by eye, and it only takes about 30 seconds.
Have built a few rod
Have built a few rods & fuss & fume at my guide alignment & marvel at the perfect guide placement of commercial makers. So there must be a method to attain this perfection with guides & dots for perfect assembly. Heck mine look O.K. but not as good as theirs. You always want your baby to be perfect.
Do you have any arti
Do you have any articles on wrapping the tip top? I have no problems with single or double foot but the tip top ALWAYs gives me a problem. Thanks ...RTB