
Follow along as Harry Boyd takes us through the process of trimming the bamboo blank to the proper length, preparing and mounting your ferrules, and adjusting the fit of the ferrules. Many thanks to Harry for this well received series of articles.
The Global Fly Fisher Guide to Building Bamboo Fly Rods
Part 1 | Part 2 | Part 3 | Part 4 | Part 5 | Part 6 | Part 7
Part 7 - Trimming and Adding Ferrules

The author double hauls an original Everett Garrison rod at Merritt Lake, British Columbia in April 2004

Excess glue seen at each corner must be sanded away.

Measuring the slide of a 12/64's ferrule (different than the example in the text)

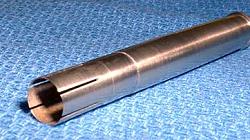
A set of quality ferrules from Bailey Wood at Classic Sporting Enterprises

These tips have been marked for trimming to length. The ferrule station has also been marked.

Cutting a marked ferrule station in the lathe with a jeweler's saw.

Sanding the station for a male ferrule in the lathe.
These ferrule stations have been properly feathered to a thin edge.

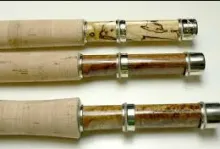
Properly crowned ferrules shown under clear wraps on a finished rod.

Feathering the tabs (serrations) on a ferrule in the lathe.

Feathering the tabs in a hand drill.
Thanks for sticking with me this far! Many readers have written to express their appreciation for the series thus far, and to share their anxiousness about seeing the entire series. Others have written with specific questions, and I'm thrilled to help any way I can. If you have questions, please contact me at maker@canerods.com.
Let's begin with a quick review. Setting out to build a 7' 6" two piece rod, we began with a 12 foot culm of bamboo which we flamed-toned and cut to length. We split that culm of bamboo into 24 pieces, then selected the twelve best tip pieces and six best butt pieces. We staggered the nodes and cut those strips of bamboo to the correct length. We soaked the strips for several days, then flattened and straightened the nodes. After getting the nodes under control, we rough planed each strip into an un-tapered equilateral triangle. We bound the strips into bundles of six pieces each, and heat treated the bundles. We set our planing forms, removed the enamel from each strip, and planed each strip to its final dimensions.
In our last look at the process, we glued the individual strips into a rod blank.
This article will describe all the processes necessary to sand away excess glue from the rod blank, straighten any stubborn bends and twists left from the glueing process, trim the rod sections to length, and prepare and install the ferrules. Some of these processes are straight forward with only one correct way to proceed. Other processes can be accomplished in numerous ways. My intention is to describe various methods while focusing on those I have chosen, allowing you to choose your own methods.
Removing glue
Removing the excess glue from the finished rod sections is a straight forward process. Place the rod section on a flat surface. I use a slab of marble on top of my workbench, though any truly flat surface will suffice. With 400 grit sandpaper attached to a hard sanding block, carefully remove most of the excess glue from one flat. While being careful to keep the sanding block parallel to the flat surface, work from the largest to the smallest end of each flat. The glue residue appears white. If the sandpaper begins to remove even a trace of tan or brown dust, you are sanding the bamboo rather than the glue. As soon as the tan or brown dust appears move to another area.
Proceed one flat at a time until all six flats have been sanded with 400 grit paper. Follow the 400 grit paper with 1000 grit sandpaper which will almost polish the bamboo. After all six flats have been sanded with 1000 grit paper, inspect each flat closely under a strong light to insure that no glue remains.
Stubborn twists and bends
Despite our best efforts to prevent twists and bends chances are good we will still have some small problems. Now is the time to eliminate those trouble. First we will remedy any twists. Begin with one of your tip sections on your flat surface. Gently press a fingertip down on each end. Remove one fingertip and observe the rod section as you do. If the rod section rotates even slightly, there is a twist. Moving our hands closer together and farther apart, up and down the section, will isolate the twist. We may well find more than one twist per section, and sometimes even
in opposite directions. Work only on one twist at a time. I suspect you will find that the problems are near nodes. Mark the direction to "un-twist" in pencil on a rod flat.
To eliminate the twist we will slowly heat the rod section to the point where it is pliable, and twist in the opposite direction, holding the bend we induced until the rod section has cooled. Do not wear gloves for this operation. Fingertips are our best guide to when the section is warm enough to be pliable. If the section ever gets too hot to hold with bare hands there is real danger of damaging the rod.
I heat the section over a heat gun on its lowest setting. The small end of tips take only five to ten seconds to get warm enough to bend when held about an inch above the nozzle of my Wagner heat gun. Again, our fingertips are our guide. Warm only a section of the bamboo the same width as the heat gun nozzle, constantly moving it away and feeling the section like a mother checks her child's forehead for fever. When it is warm to the touch, but not so warm it scalds, immediately twist and hold the section into an inverse twist, keeping the section as straight as possible. Hold things in that position for a minute or so, then check the progress on a flat surface. Taking things slowly here works much more effectively
than trying to go too fast.
Larger rod sections must be heated more slowly. Again, use the heat gun on its lowest setting but hold the section several inches above the heat source. Again, we use our fingers as our guide. Warm the section till it is almost as hot as can be stood without being uncomfortable. Twist and hold and inverse twist into the section. Remove all the twists before beginning work on any bends or kinks.
Bends and kinks are removed in a similar manner to twists. Start at the tip and locate the bends by slowly rolling the section on a flat surface while watching to see if the tip rises above the surface. Isolate the bend by pressing down on one flat at a time while moving your fingers up and down the rod section. Heat slowly, bend in the opposite direction, and hold that bend till the rod section is cool. Heat even more slowly as you progress to larger sections of the rod.
How straight is straight? Only you can answer that question. If I can find any bend or twist at all I keep working. Physics majors will tell us there is really no such thing as a straight line, but I want my rod sections as straight as I can possibly get them.
The process of removing twists and bends is not as tricky or as difficult as I make it sound. Be careful, work slowly, and take frequent breaks and you will produce sections which make you proud.
Trimming to length
Throughout this series of Articles we have used a 7' 6" 2 piece 5 weight rod as our example. If we divide 7' 6" in half, for our tips and butts, each section would be 45" in length. But if we cut the rod sections at 45" and install ferrules, when the rod is joined together it will not be 7' 6" long. The depth which the male ferrule inserts into the female must be considered.
| TipTop | 0.065" |
| 5" | 0.092" |
| 10" | 0.102" |
| 15" | 0.118" |
| 20" | 0.132" |
| 25" | 0.146" |
| 30" | 0.156" |
| 35" | 0.171" |
| 40" | 0.181" |
| 45" | 0.200" |
| 50" | 0.218" |
| 55" | 0.233" |
| 60" | 0.249" |
| 65" | 0.268" |
| 70" | 0.286" |
| 75" | 0.309" |
| 80" | 0.345" |
| 85" | 0.345" |
| 90" | 0.345" |
Our example uses a 7' 6" rod with a size 13, or 13/64ths, ferrule. The standard Super-Z nickel silver ferrule has a male slide .650", or approximately 21/32" long. Each rod section will therefore be 45" + 1/2(.650") long, or 45.325". Rods which require different size ferrules will obviously differ from these measurements.
Let me offer a note on ferrules here. You have many hours invested in making tools and rod sections. There is no good reason to try to save a few dollars by purchasing inexpensive ferrules. Good sources for quality nickel silver ferrules include Golden Witch Technologies, Angler's Workshop,
Custom Tackle Supply, Classic Sporting Enterprises, Rush River Rods, Wagner Rods and others. Please don't ruin your hard work by being a tight-wad now. Fifty dollars of more for a dual male set of ferrules seems expensive. Having made a few sets of ferrules myself, I can promise you that price is a bargain. For the purpose of this article, I will assume that you have purchased a quality set of ferrules patterned after the original "Super-Z" type originated by Louis Feireband. Do NOT buy cheap ferrules.
Begin trimming to length at the tip. Before any trimming our rod sections are 49" long. With dial calipers measure the tip and locate the point where the flat-to-flat diameter matches our 0" measurement, or .065". As a reminder, the taper we are using is in the table to the right.
Now we will cut the tip off at the point where it measures .065" across the flats. I recommend a Dremel Tool with a fine cut-off wheel to trim blanks, but carefully rotating the blank and cutting from each flat toward the center with a razor saw or a hack saw works well. After trimming to length, lightly make a stroke with a file on each flat to camfer the edge slightlyand prevent tear out.
Next we dry fit the tip-top to the section. Though a flat to flat measurement of .065 might seem to indicate a 4/64ths tip top, remember that the rod section is larger from corner to corner than from flat to flat. With this particular rod, a size 4.5, or 4.5/64ths tip top fits much better. Tip tops often vary slightly, so try several different tops to get the best fit.
Some makers allow their rod sections to vary by the length of the tip top ring. I prefer each section to be exactly the same length. With the tip top dry fitted to the rod section, measure exactly 45.325" down the rod shaft and make a pencil mark. Now measure the flat to flat dimension at that mark, and write it down to reference later. The mark we just made will be the final length of the rod section. If we cut the blank at that mark and install the male ferrule, the section will be over length by the width of the moisture seal plug in the male ferrule. Time for a little more measuring. First, measure the overall length of the male ferrule with dial calipers. Next use a toothpick or a stiff piece of wire and measure the inner length of the ferrule. Subtract the second number from the first to learn the thickness of the moisture plug.
(Overall male length - inner male length = moisture plug thickness)
The moisture plug is usually about 1/16" thick. Make a second mark above the first mark on your rod section, and carry that mark all the way around the rod section. (Now, just to be safe make all the measurements again - remember the carpenter's adage "measure twice, cut once") Once again, measure all three flat-to-flat dimensions, and record that measurement. Again, cut the section at that mark with a Dremel tool, razor saw, or hack saw and camfer the edges.
We cut the tip end of the butt section at the point where it is the same size across the flats, or one or two thousandths larger than the measurement at the mark you just made on the tip section. On the rod we are using as our example, we will be very near .200". I don't trim the butt end of the butt section until ready to install the grip and reel seat so that allowances can be made for the thickness of the butt cap on the reel seat.
Installing ferrules
Ferrules can be installed in several different ways. I cut my ferrule stations on a lathe using dedicated tenon cutters, but you may not have access to a lathe and tenon cutters. Should you wish to purchase a set of cutters I will be happy to share what I use if you will email me maker@canerods.com. Many of us install our first few sets of ferrules by hand, and it is quite possible to do good work that way.
Let's first install our male ferrule. Begin by laying the male ferrule next to the larger end of the tip section while allowing the ferrule to overlap the rod section by the length of the moisture plug. With a sharp pencil make two marks on the rod section. The marks are made at each end of the ferrule serrations. Carefully carry the marks around the circumference of the rod section.
Examining the standard Super Z type male ferrule shows us that the end of the rod section needs to be cut to only one diameter. Step down ferrules require two different depth cuts. Though I use step down ferrules on many of my rods, I recommend beginning with ferrules designed after the original Super Z's.
Any of several methods will suffice to cut the rod section down to a uniform size to fit inside the ferrule. I first learned of my favorite non-lathe method from Dave Collyer from Colorado. Dave suggests first masking off the rod above the ferrule station. Small strips of sandpaper are wrapped around the ferrule station with both ends of the sandpaper held in one hand. The other hand rolls the rod section across one's legs, forming something of a poor man's lathe. Make a few rolls, then stop and try the fit. Another method starts with using a file to carefully make the same number of strokes on each corner of the hexagon, the progresses to sandpaper. Still another method suggests a small hand-held scraper
rather than a file. Choose the method that seems best, and practice first on a wooden dowel. After spending many hours getting to this stage
we want to be sure our ferrule work is as good as possible.
The area between the two pencil marks (which will be under the serrations on the ferrule) on the rod section must be slowly tapered from fully hexagonal to the same diameter as the ferrules. I use a needle file to carefully make a few strokes on each corner of the hexagon. The ferrule to bamboo fit should be snug. Should the ferrule become stuck during trial fitting, a rubber jar opener or a piece of inner tube will give you enough grip to pull it free. Don't twist the ferrule while trying the fit. Though there is a tiny bit of room for error, the perfect ferrule to cane fit will bottom out with a click, and sound a clear "pop" as it is removed.
Once the male ferrule has been dry fitted to the tip section, we can progress to the butt section and the female ferrule. One nice design characteristic of Super Z style ferrules is that the part of the female ferrule which fits over the bamboo is exactly the same size as the male ferrule. I use the male ferrule to make pencil marks on the bamboo on both tip and butt sections. Of course, if our ferrules are not made exactly to Super Z specifications, that won't be possible. Just in case, let's use a toothpick or stiff wire to measure the length the bamboo will fit into the female. Use the toothpick or wire as a guide to mark your ferrule station on the bamboo. Make a second mark the length of the serrations, and cut the station to size the same way we did with the male.
Ferrule preparation and glueing
Ferrules must have a roughed interior surface to glue well to the bamboo. A needle file is used to lightly but thoroughly scuff and score that part of the ferrule which will be glued to the rod section. Use caution to avoid damaging the now delicate ferrule tabs.
Even the best nickel silver ferrules present some compromises in function, chiefly weight and rigidity. We cannot do much about their weight, but we can slightly ease the transition from rigid metal ferrule to flexible bamboo. Super-Z type ferrules are serrated at the bamboo end to ease that transition from metal to bamboo. Many of the best rod makers "feather" and "crown" the tabs of their ferrules to make the transition still less abrupt.
Feathering the tabs refers to the practice of thinning the very ends of the serrated tabs to the thickness of a sheet of paper or less. Here's how it is done. Begin by inserting a 13/64 drill bit backwards into the jaws of your lathe or electric drill. Wrapping masking tape over the flutes of the drill helps the chuck tighten securely. Slide the male ferrule over the ono-fluted end of the drill bit. Friction will keep it snug.
Run the motor at slow speed and be sure everything turns smoothly. Use a small piece of 400 grit sandpaper to then only the serrated tabs. Work only towards the open end of the male ferrule, concentrating on making a smooth slope. Check the progress constantly. When the open end of the ferrule tabs are paper thin, switch to 1000g paper to carefully remove the 400g sanding scratches. A few careful passes with 4/0 steel wool will bring back the mirror finish.
Crowning the ferrules refers to the practice of using sandpaper to shape each ferrule tab into a point. Affix one end of a 1/2" x 9" strip of 400g sandpaper in the jaws of your vice. I mark one serration with a Sharpie as a beginning and ending point. Two opposing serrations are threaded on to the paper. The edges of the ferrule tabs are then lightly passed over the paper a precise number of strokes. I usually make 6-8 strokes, then rotate to the next serration, always using fresh sandpaper. After I've worked my way completely around the ferrule I inspect my work. The tabs slowly take on a pointed look. When every tab comes to a rounded point, we move to the next step.
When installing ferrules, cleanliness is next to Godliness. All of the flux and cutting fluid left from making the ferrules, and all metal dust from feathering and crowning the ferrules must be removed. I use several cotton swabs moistened with acetone to thoroughly clean the ferrules before gluing. When the cotton swab comes out clean and white, I switch to denatured alcohol to remove any possible oils left from the acetone. Cleaning is vital. It only takes a few minutes more to do it well.
What's the best glue for attaching ferrules? Well, ferrule glues are a hot subject of debate among rod makers. Some rod makers use golf club shafting epoxy. Others suggest Accraglas bedding epoxy use by gunsmiths. Still others suggest using two-ton epoxy (not the five-minute varieties). Traditionalists often use Pliobond contact cement or hot-melt glues designed for installing nocks on arrows in archery. All of these will work well - if and only if - the ferrule station is well prepared and thoroughly cleaned. Because I sell rods, I also pin my ferrules, but that discussion is beyond the scope of this article. One type of glue I have used recently and recommend for its strength and ease of use and is a polyurethane based glue sold by Elmer's as Probond polyurethane glue. Another similar glue is sold as Gorilla Glue. If you choose the Probond, be sure to get the polyurethane glue, not the Probond woodworking glue.
Once you choose your glue, installing ferrules is a straightforward process. First dry fit the ferrules, and wrap the rod shaft above the ferrule with blue masking tape (the blue stuff is easy to remove). Remove the ferrule, and apply a thin coat of glue to the entire ferrule station. Slide the ferrule on, and spin it around a few times. Remove the ferrule again and inspect the interior. If any spots inside the ferrule aren't covered
with glue, use a toothpick to spread it around a little. Use as little glue as possible while still getting thorough and complete coverage.
Slide the ferrule on again. If the fit is good air pressure will tend to force the ferrule off. Push it firmly against your workbench or a wall, and listen for the air bubbles to pop. If the bubbles have not popped and the ferrule does not stay put in a few seconds, gently warm the ferrule with a Bic lighter, and push again. Carefully align the ferrule serrations with the corners of the bamboo rod section. Use the jar opener pad to help you grip the ferrule.
Finally, wipe away most of the glue which has seeped out with a paper towel moistened in denatured alcohol. Wrap nylon twine or fly-line backing tightly over the serrated tabs to clamp them firmly against the bamboo. Use firm pressure, and wipe away excess glue as you proceed.
Allow the glue to dry completely before you remove the binding cord. Though many glues set in 3-4 hours, it often takes a few days for the glue to completely cure. When the binding cord and the blue masking tape is removed carefully pick, sand, and steel wool away any glue which has seeped out.
Fitting ferrules
Male ferrules are usually made one or two thousandths of an inch oversized and must be honed to fit with a perfect friction fit so we get that pleasing "pop" sound when disassembling the rod. Though beginning rod makers are sometimes intimidated by this process, it really is not difficult. The key to good male-female ferrule fitting is again, work slowly and carefully.
The process we will use to fit the male to the female is similar to the process of fitting the metal ferrule to the bamboo rod section. We will use very fine sandpaper to slowly reduce the size of the slide portion of the male ferrule till we get a perfect friction fit with the female ferrule.
First, make a long "rope" of 4/0 steel wool and insert into the opening of the female ferrule, forcing it down. Thoroughly polish the interior of the female ferrule, removing any minuscule burrs or gouges left from the machining process. A few spins of the steel wool is all it takes. Clean the female with a cotton swab and alcohol.
We begin the actual fitting with masking tape. Mask the shoulder of the male ferrule so that it is not inadvertently sanded away. With a small strip of 800g paper, very lightly chamfer the corner of the end of the male ferrule, just enough so that its edge is not sharp. Cut a strip of 800g paper the same width as the length of the male ferrule slide. Wrap that strip of sandpaper around the male slide, and roll or twist the rod section around and around. This is a sand and trial fit, sand and trial fit process. Concentrate on the end of the ferrule that fits first into
the female. Sand and trial fit. Sand a few more turns and try it. As soon as the male begins to slide into the female a fraction of an inch, stop and polish the sanding marks away with 4/0 steel wool. Sand a few turns, polish with steel wool, wipe clean with a paper towel, then trial fit. Do not force the male in. The correct fit requires about as much pressure as tightening your belt one notch tighter than normal.
When the male will slide half way into the female, put away the 800g paper in favor of 1000g sandpaper. Make a few turns with the 1000g. Polish with steel wool. Wipe clean with a paper towel... and here's a trick. Lubricate with a drop of light oil (3 in One, or even WD-40) on a rag before attempting to assemble the rod sections. Again, do NOT force things. Patience is the key. Someone said the difference between a good fit and a sloppy fit is about the thickness of smoke. Soon you will find the male sliding all the way up to its shoulder into the female. Once the male slides fully into the female, I switch to 2000 g sandpaper till the pressurerequired feels "just right".
Congratulations
Congratulations! You have just made a bamboo rod blank! Have the beverage of your choice and drop me a note telling me of your success. Other pages in the rod making section of Globalflyfisher.com tell you all you need to know about installing grips, reel seats, and guides. I d suggest using the best components you can find on your new bamboo rod. This concludes my series of articles on making bamboo rods. Your rod will require a
few good coats of varnish to protect it from the elements, but I will leave finishing instructions to the authors of rod making books.
Thank you for your kind responses to this series of articles. Please let me know if I can answer any questions that might arise.
--
Harry Boyd (318) 435-2278
http://canerods.com/ Bamboo Rods
maker@canerods.com
http://www.fbcwin.com/ Our Church
hboyd@fbcwin.com
fbcwin@3g.quik.com
(318)435-4359
- Log in to post comments


can you advise me as
can you advise me as how to set the planing form with a dial indicator?
I build about 100 tu
I build about 100 turbular cane bamboo two piece fly rods a year, primarily for carp fly fishing on the Savannah River. The combo of rod, reel, backing, fly line, eyelets, leader, and flies, start at U.S. $100. These are also tested in the trout waters below Hartwell dam, The 15 weight rod is designed to fight fish 5 pounds and above,although I have landed 20 pound fish in these waters. If a large fish breaks a tip, triming the cane and installing a new top guide is no problem.
i bought a 7-6 5 pa
i bought a 7-6 5 paine 1oo blank two tips my son in law who build rods say that a small part of the butt has a green spot should i add a stain to the varnish and if so what collor should i add thanks bill
i have a crown bambo
i have a crown bamboo fly rob, its very old but i have no information about it , could anyone help? it says made in taiwan on it so it cant be worth much , but id just like to know more about it as it was left to me by an uncle who passed away
Where, in which coun
Where, in which country or manufacturer, can I buy a Classic bronze or super SD Nickel Silver ferrules? Thank you on share your art with us.
Thank you in advance.
LISSKA
Mr. Boyd,
A ve
Mr. Boyd,
A very well written series of articals. Since I was a boy growing up in the Smokey Mountains of Western NC, I've wanted to own a good 'cane pole' (my father's term). He and I fished the small streams of the western mountains until his death. After his death, I just lost interest in fly fishing. I guess after losing my fishing partner and mentor, the fun was gone out of it. Now that I'm retired and interested in revisiting my youth, I've got a fire burning in me to take up the art of fly fishing again. I'm a life long woodworker, having made everything from furniture to musical instruments. There is no excuse now for not possesing a fine 'cane pole' like my Dad's. Thank you for taking the time to share your art with us.
Charlie Harrell
Have followed throug
Have followed through your series and it makes a much clearer picture of what is required (ok - most of what is required).
I've been reading up on making fly rods (from graphite blanks through to raw 'boo culms) - and am now playing with some bamboo kicking about. It may not be Tonkin cane - but some properties should be reflective - which is fine for now. Starting slowly, building up as I go. But will definately be back off and on to see what's new.
Top notch series Harry - top notch. Thanks for sharing.
Very well written an
Very well written and informative - makes me want to have a go at building my own and for a fishing buddy.
I would like to build a one-piece 5-6 foot stick for 2-3-4 weight lines for our small overgrown trout streams in the south of Western Australia. Would the same methods apply to single piece rods? What about purchased forms - can they cope with 5-6 foot single lengths or would you have to make purpose-built forms for this?
I can see potential problems (and costs) with our Customs agencies when trying to import bamboo into our country. Do you know of anyone who already imports bamboo into Australia from Demarest ?
Thanks again for sharing your considerable experience with us (for free!)