
Learn about a novel loop knot for use in making loop-to-loop connections. This knot is simple, strong and streamlined.

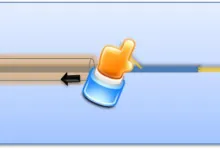
Loop-to-loop connections have become a mainstay for fly fishing because they afford easy and rapid changes of leaders and shooting heads. This connection (also known as a Handshake Knot) is shown in Photo 1. A unique loop knot for use in making these connections is the subject of this article. If you want better loops on your fly lines, shooting heads and running lines, read on.
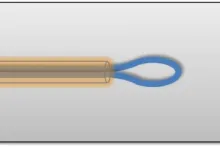
The sketch below shows the basic construction of a 5-turn Cliffs Loop Knot. The loop is an integral part of a variation on a nail knot. A single strand of mono is doubled to form the loop and the doubled strand that extends from the loop is wound into coils that bind the loop to the fly line. The most practical way to tie it is with a nail knot tying tool like the Tie-Fast Knot Tyer (see Photos 12, 13 and 14). A “turn” is a one complete wrap of the doubled strand around the toe of the tool. Each turn will encircle the fly line with two “coils” on the finished knot. A detailed procedure for tying the knot is given near the end of this article. If you suspect this loop knot should not be used for saltwater because the coating would strip off of the braid when fighting a strong fish, please deliberate over the findings presented herein and reconsider.

Six widely recognized ways that loops are made on fly lines and shooting heads are:
- Factory made or handcrafted welded loops
- Fly line tip folded back on itself and secured with nail knots
- Slip-on loops made from hollow mono braid
- A mono nail knot combined with a perfection loop knot
- Grays Loop (covered in detail at the end of this article)
- A loop constructed from the core of the fly line
None of these meet all my preferred criteria for a loop as listed below.

My preferred criteria for a loop are:
- Simple, easy to understand and make (completely done in less than five minutes)
- Strong, reliable and durable (tough and wear-resistant)
- Easy to inspect for defects, damage or wear that could lead to failure
- Most likely to fail gradually (the chance of a sudden failure should be very low)
- Adaptable to a wide range of fishing conditions (from panfish to billfish)
- Able to turn over a long leader with a heavy fly or large popper (no hinge effect)
- Very streamlined for slick passage through the rod guides and debris-laden water
- Big enough for large flies to go through it (easier to change leaders with the fly attached)
- Easily tied with loop lengths from less than a half inch to over six inches (12 mm to 15 cm)
- Approximately aligned with the center of the fly line or shooting head
- Replaceable while in the field using only a simple pocket tool
Cliffs Loop Knot meets all of these criteria for most fishing conditions. The one inch (25 mm) loop shown in Photo 2 was tied with 3 double turns of 16 lb Mason hard nylon (.021”, .53 mm).

Three double turns of 12 lb Mason hard nylon (.018”, .46 mm) were used for the smaller (5/8 inch, 16 mm) loop shown in Photo 3. Both of these will easily unroll a 9 ft leader to deliver a 1/0 Clouser with a long roll cast from a 9 foot, 7 weight rod.
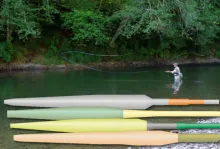
As Photo 4 shows, the loop-to-loop connection works best with mono loops and is optimal if the loops are made from mono lines of about the same size.

The close-up in Photo 5 shows how the coils gripping the fly line should look on a 3-turn loop that has 6 coils.

Photo 6 shows the finished 3-turn loop with the UV sealant applied. Note how the loop strands are held near center by the cured sealant.

The strength of Cliffs Loop Knot depends on seven things:
- The thickness of the coating
- The strength (toughness) of the coating
- The plasticity of the coating
- The bond of the coating to the core
- The size of the mono used
- The number of coils tied in the knot
- How tightly the knot is seated
Once the fly line is selected, only items 5, 6 and 7 are under our control. For item 5, the strength of the loop increases with the diameter of the mono up to a practical limit of about .027” (.46 mm) for larger size fly lines and up to around .018” (.46 mm) for thin running lines or fly line tips. For item 6, the strength increases with the number of coils up to a maximum of 6 for freshwater or 9 for saltwater. For item 7, following lubrication of the coils, about 10 pounds of pull should be applied to draw the knot finally down. The largest variable for strength is the coating.
When a pull test is conducted to determine breaking strength, one of four things can happen:
- The loop breaks
- The coils are pulled off of the fly line
- The coating inside the coils is stripped off of the core of the fly line
- The loop holds and the fly line breaks
Testing thus far indicates that failure modes 1 and 2 rarely occur.
For saltwater use at the leader connection, a loop knot of 5 or 6 double turns tied with .020” (.51 mm) or larger mono is recommended. Such a loop that tested to be stronger than the fly line is shown below in Photo 7. This was tied to a Cortland 444 DT9F line with 50 lb oval green Rio Slickshooter (.017”, .43 mm X .027”, .69 mm). The same loop was tied to the tip of a Rio WF10F OutBound shooting head and held to 30 lbs before the coating under the coils stripped off. This compares to failure of the new welded loop on this line at 31 lbs.

Based on breaking strength testing, Cliffs Saltwater Loop Knot should be good for pull forces between 20 and 30 lbs unless the fly line has an unusually weak coating. This compares to 20 to 40 lbs for the breaking strength of most 8 weight and lighter fly lines.
The standard Cliffs Loop Knot (with 3 double turns) should be OK for pull forces in the range of 14 to 18 lbs. This should be suitable for most freshwater fishing with tippets testing less than 12 lbs.
So far, we have been mostly concerned with loops at the leader connection. Now, let’s go to the back of a WF fly line or to the connection from the shooting head to a thin plastic coated running line. Lighter weight and less stiff mono or can be used for these loops. The streamlined loops really excel here. See Photo 8 where a shooting head (made from a DT9F fly line) and a thin running line (.035”, .89 mm) are connected. Both the red and green loops are 15 lb Amnesia mono (.016”, .41 mm). The maximum uncoated diameter of the joint is only .05 inch (1.3 mm) larger than the shooting head. The rod guides don’t even know that a connection is flying thru them. The length of the loop on the running line or back of the head could be about 6” (15 cm) so it would pass over the reel when changing out heads. Because of the small diameter of the mono and the thin coating on the running line, the strength of this knot would be in the range of 14 to 18 lbs.
If the length of the head and/or the casting method causes the connection to travel repetitively through the rod guides, the UV sealant may not be durable enough. More on this later.

For saltwater use the loop on a plastic coated running line could be tied with several double turns of mono with a minimum diameter of .016” (.41mm). Photo 9 shows a loop like this tied with 9 turns (18 coils) of 25 lb Kast King copolymer line (.017”, .43 mm) to a thin SA AirFlo running line. When tested, the running line broke somewhere above 29 lbs while the loop held.

Braided Dacron, Spectra or Dyneema fishing line can be used instead of mono to tie Cliffs Loops except for the leader connection (where it would be too limp). Braid testing around 80 lbs with a diameter larger than .019” (.48 mm) should be used to avoid cutting too deeply into the fly line coating. Wind one or two additional turns (more than for the mono). Nine turns of 80 lb TufLine Spectra braid (.020”, .50 mm) was used to tie the 2.5” (6.5 cm) loop shown below in Photo 10. It was tied to an Orvis 0.040” (1 mm) diameter running line. In a pull test, the coating stripped at 23 lbs. The same mono loop knot as shown in Photo 9 was good for 22 lbs on this Orvis running line.

Braided mono shooting line can also be used to make Cliffs Loop. This line is made by Cortland, Gudebrod, Scientific Anglers and others. It comes in sizes from 25 to 50 lbs. The 2" loop in Photo 11 was tied with Gudebrod 35 lb braided mono shooting line. Nine turns were made around the tip of a Cortland 444 WF8F fly line. When subjected to a breaking test, the coating stripped off the core at a pull force of 28 lbs. This compares to 31 lbs for the breaking strength of the fly line.

Before getting into the tying procedure for the new knot, let’s take a look at some nail knot tying tools. Three of these are seen in Photos 12 and 13. The tool at the top was made from rectangular brass extrusions bought at a hardware store. The other two tools can be purchased from most fly fishing suppliers. The lower tool is the popular Tie-Fast Knot Tyer (www.tie-fast.com) that has long been used by many fly fishermen for tying the basic nail knot and other fishing knots. Recently, a Magnum version of the Tie-Fast tool has been made available. This new tool is better for use with larger diameter mono and/or heavy fly lines or shooting heads. The small red circles in Photo 12 mark the anchor points for tying Cliffs Loop Knot. Notches can be filed across the tools at these locations to hold the loop during the tying procedure. The edges of these notches should be burnished with a folded piece of fine emery cloth to prevent the mono from being nicked.


Some supplemental Information for tying Cliff’s Loop Knot follows below. These items are offered prior to the step-by-step procedure to keep procedure more concise.
Modifying the tool: Addition of one or more notches to your nail knot tool for anchoring the loop is highly recommended (see Photos 13 and 14).
Selecting the mono and number of coils: Refer to the following table for general guidance. This table was compiled based on over 100 individual tests but you may find something better. Some applications may not be covered in the table (a loop for attaching a 12 foot 8X leader to a 4 weight line might use 10 lb mono if it’s stiff enough). The stiffness of the mono will influence the selection. Stiffer mono should be used to compensate for longer loops to insure good energy transfer across the connection. When the loop-to-loop connection is complete, grasp the butt of the leader a few inches from the loop and hold it up with the fly line hanging free. Ideally, the connection should make a gentle curve over to the fly line.
| Mono size in pounds | Number of turns | |
| Freshwater - Fly Line/leader | 12-20 | 3-4 |
| Freshwater - Head/Running Line | 12-15 | 5-6 |
| Saltwater - Fly Line/Leader | 20-50 | 5-6 |
| Saltwater - Head/Running Line | 15-30 | 7-9 |
When you get up beyond 7 coils on the tool, it may be difficult to make them jump off the toe and stay lined up in a neat bundle when they land on the fly line. Lubrication can help with this. A special knot lubricant called Knot+ Formula (available on eBay) works well as does standard fly line dressing (the fly line doesn’t like petroleum lubricants). Put a small drop of lubricant between your fingers and run the mono through it before you start winding onto the tool.
Getting the fly line tip through the coils: Cut an angle on the tip of the fly line or head to help get it started into the coils. You will have four strands of mono inside the coils. If there is not enough room to push the fly line tip through, you may need to bend the walls of the channel on the toe slightly outward. Just lay the shank of a 5/32 inch (4 or 5 mm) drill bit in the channel and tap it with a small hammer. The Magnum model of the Tie-Fast nail knot tool has a wider channel giving more room for the mono strands and fly line tip inside the coils.
Aligning the coils: When you jerk the coils on to the fly line, some of the coils may be separated and the fly line may tend to buckle between these coils as you tighten the knot. You can deal with this by clamping the tag end of the fly line in a small vise (a tying vise will work). Now you can pull on the fly line to keep it straight while pushing the coils neatly together with your fingernails.
Tightening the Knot: Get ready for the final pull that seats the knot by applying a drop of lubricant (see above) on the coils. Because this is a constriction type knot (the harder the pull, the tighter it gets) it works best when lubricated. The use of superglue is questionable and should not be applied until after the knot is fully seated.
Applying the Sealant: Application of a UV sealant (such as Loon Knot Sense) is optional. The benefits of the sealant are that it keeps the loop in alignment with the fly line, reduces friction and seals the tip of the fly line against absorbing any water. This Loon product is very easy to work with and cures under a UV light in less than 30 seconds.
If the loop-to-loop connection between the head and the running line will be running through the rod guides constantly, something tougher than UV sealants like Loon Knot Sense may be advisable for long lasting durability (thanks to Martin J for pointing this out). With short shooting heads (less than 40 feet) this should not be a problem because casts are made without shooting the knots through the guides.
Several sealants with more durability are available. Among these are marine and industrial grade UV sealants such as 3M 4000 UV Fast Cure Sealant. Other 3M marine sealants with even greater toughness at the expense of longer curing times are (listed in order of strength, lower to higher): 4200 Fast Cure Sealant, 5200 Fast Cure Sealant and 5200 Sealant. The flexibility of these varies inversely with the strength. A wide array of two-part epoxies could be also considered to be used alone or as hard shield over the UV sealant. Without enough testing and evaluation, no specific recommendations can be made at this time.
Testing: Test the loops you have made two ways. First, check the strength to make sure the fly line coating is not going to strip off in use. Second, make sure your loop-to-loop connection will turn over your leaders and flies to your liking.
Inspection: Before use, check the fly line coating next to the end coil (away from the loop). If you see a crack all the way around the circumference large enough to indicate that the coating is beginning to strip off of the braided core, the loop should be replaced. A Cliffs Loop has another advantage in that its eventual failure tends to be gradual instead of sudden.
Experimentation: This article is not intended to offer conclusions about the best way. You should view this as more of an introduction that could lead you to find some loop knots, using the basic concept of Cliffs Loop, that are best for your own equipment and way of fly fishing. If you have the time, try as many different things as you can think of. As always, using the old trial and error method will produce the best results.
For many who have already been tying nail knots, a look at Photo 14 may be all they need to start making a Cliffs Loop Knot. 14 coils of 20 lb red Cajun mono (.018”, .46 mm) are on the tool.

The procedure for tying Cliffs Loop with a nail knot tool is as follows. Substitute “braid” for “mono” if that is what you are using.
- Cut a piece of mono about 18 inches (50 cm) long, straighten it and trim off any kinks.
- Double the piece of mono and line the ends up evenly (optionally, lube the mono).
- Position the loop for the length you want and anchor it on the tool or secure it with your thumb if you can’t hook it on the tool. The loop will lengthen some when tightened.
- Lay the two strands of mono down in the channel of the tool, pull them out straight and hold them close together.
- Hook the doubled strands snugly in the notch on the bottom of the toe.
- Wind the double strand tightly around the toe. Refer to the table above for general advice about the number of turns to use. Maintain tension. Keep the coils from overlapping.
- Hold the coils in place with your index finger. Push the tip of the fly line into, through and out of the coils far enough so it can be held down with your thumb. Tweezers can help to pull the tip out.
- While continuing to hold the coils in place, pull the slack out of the mono loose ends so that all the coils are lined up in a neat bundle. Bring the free ends of the doubled strands around; poke them thru the coils and out of the toe one at a time. The first one through should come from the next to the last coil to prevent the last two coils from overlapping. Cut an angle on the ends of heavy mono to help get it started. If using braid, stiffen the ends with superglue to help them get through the coils.
- If the loop was anchored, unhook it so it can slide toward the toe but press down with your thumb to hold the loop. Photo 14 was taken after this step.
- Pull the free ends of the two strands out straight and even; then, jerk the loop from under your thumb and the coils off the toe onto the fly line (don’t be timid). This technique will improve with practice. Lightly lubricate the toe if the coils are too hard to pull off.
An alternate way to get the coils onto the fly line is to grasp the coil bundle and simply back the tool away from the bundle. Pull some of the slack out while still holding the bundle; then, gradually tighten the knot as you carefully prevent any overlapping. - Lubricate the knot, work the coils into proper alignment, cinch it (once the coils are properly aligned, seat the knot very tightly – around 10 pounds of pull), trim it and wipe it dry of any lubricant. When tying braid, wet the knot instead of using the lubricant because the oil can soak into the braid fibers and cause the coils to pull off of the coating.
- Apply a thin coat of UV sealant with a small artist brush. Put a very small drop of sealant at the tip to cover the entry of the mono strands to the first coil. Anchor the loop and pull tightly on the fly line to keep the loop centered while brushing on the sealant. Keep the line tight until the sealant is cured with the UV light. If you used braid, put some superglue at the end of the loop after the knot is tied to help keep the loop-to-loop joint from capsizing.
This procedure is nearly the same as that used for tying an ordinary nail knot. Cliffs Loop Knot may be easier to tie than a regular nail knot because of how the anchored loop allows more tension to be applied as the coils are wound. This makes for a tighter and more secure bundle of neat coils.
Thus far, nothing has been found online or in print about the previous use of this particular loop knot. The manufacturer of the “Tie-Fast” nail knot tool is aware of a few fishermen who have used this knot, but has not seen anything published about it. Evidently, those who have been tying this knot haven’t let it be known (or given the tying instructions) to the general fly fishing community.
The names Cliffs Loop, Cliffs Loop Knot and Cliffs Saltwater Loop Knot are being used based on the presumption that this is the first public disclosure about this specific knot. If this is incorrect, the relevant information should be made available.
Similar knots called Grays Loop and Grays Quick Loop provide ways to attach a mono loop to the fly line tip. Mr. John Gray is to be commended for introducing these knots that are described on
Scottish websites here and here. An advantage of Grays Loop is that no tools are needed to tie it. However, unlike Cliffs Loop Knot which is tied the same way as a nail knot, Grays Loop is tied like a Duncan Loop (uni-knot) causing the tag ends to come out of the back coil at an angle instead of laying flat against the fly line. It’s hard to make a short loop because the distance between coils and the loop lengthens as the knot is tightened. This problem increases with the number of double turns
attempted. Also, heavier mono is more difficult to work with.
The Grays Loop shown in Photo 15 (tied with only 3 double turns) started out with a very short loop but after the coils were pulled together the length extended to about 3 inches (75 mm). The mono used for this knot was 30 lb green Ande (.021, .53 mm) to better show the details of the knot.

In comparative breaking strength tests using this same Ande mono, a 4-turn Cliffs Loop was stronger than a 4-turn Grays Loop. Since only a few tests were run, this should not be considered
conclusive.
Best wishes to all my fellow fly fishers and knot tyers. Your comments, questions and criticism about this article are welcome. When commenting that your grandfather taught you this knot 40 years ago, please explain why you never told us about it.
None of us knows everything about anything. Searching for a better way is what keeps us going.
Hand picked for this article
- Log in to post comments

Video of the knot tying
It would be great to see a video of the knot tying sequence and the use of the indents filed into the knot tying tools. I have tied this type of knot on to a couple of my Fly Lines and they worked very well. I did this on a fishing trip where the welded tip broke off and I needed to replace the loop.
Comment Notice
Get email notices when comments are posted
Cliffs Loop Demo Video
For Joel and any others who are interested - here are some Dropbox links to a non-professional demo video.
wmv file for Windows ( https://dl.dropboxusercontent.com/u/33063725/Cliffs%20Loop%20Demo.wmv )
mp4 file for Mac OS X ( https://dl.dropboxusercontent.com/u/33063725/Cliffs%20Loop%20Demo.mp4 )