
You can buy ready-made rod holders for your car, but you can also go the DIY way and get some excellent holders for a very fair price.

If you are the kind of angler who often moves from spot to spot during a fishing day, you will definitely want some rod holders to mount on the outside of your car. Such contraptions are available in many forms, and come both with suction and magnetic mounting. They aren't exactly cheap, so Danish angler Jesper Barsholm did what any good handyman would do: he made some himself.
Bathroom grab rails
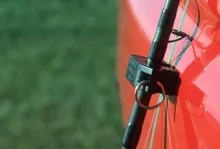
Jesper's construction is based on a set of grab rails or grips, meant to be used on a smooth surface in a bathroom. You press the rail against a smooth surface, tip a lever in each side and the grip sticks to the wall like it was screwed on there.
These rails are widely available in shops that cater to elderly people or the healthcare sector, and the ones Jesper found are branded Careosan and bought in the European builder's market chain Bauhaus. The exact same rails are also found under other brand names such as Drive DeVilbiss (Model 13063) or Mobeli. Search online for the various brand names and the terms "suction grips" or "grab rails" and you will find many, and quite a few exactly like the ones used here, possibly in a local brick and mortar store or an online store that mails to your location.
Good grip
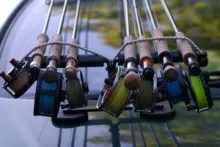
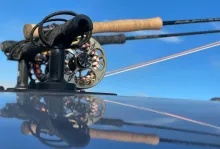
Jesper tells me that the suction cups exert a really powerful vacuum, which ensures that they stay put, even under duress. The rubber coating on the suction cups is very soft and flexible and leaves no marks or scratches. Make sure both surfaces are clean before mounting the cups. Jesper always brings a microfiber cloth to clean the car and suction cups before mounting the holders on the car. One holder goes on the hood (bonnet) and one goes on the car roof, and you mount the rods with the reels down and the rod tips going rearwards over the roof.

Jesper paid DKK 185.- or about 29 US$ for the handle, but prices vary substantially - and being a healthcare commodity, these rails are priced very high in some places. Make sure you get the short, fixed model, and not the extendable ones also found. You will cut into them anyway, so the simpler and less expensive the better.
Other brands and models may work, but then Jesper's instructions can't be followed 100%.
Plastic pipes
Jesper purchased the PVC pipes and fittings in a shop that sells everything used for saltwater aquariums. It's the place he has been able to find the parts at the most reasonable prices, and these stores often have a large selection. Expenses for PVC are very limited.
There is 1 meter of 25 mm tube for a couple of dollars, two 25 mm T-pieces also at a couple of dollars each and six 25 mm end sleeves/plugs for about 10 dollars for them all. Add to that 2 meters of elastic cord Ø5mm, which was also a couple of dollars.
So Jesper's expenses ran to about 300 DKK or some 45 US$ for the bits.
Apart from that you will need some glue, a few bolts, nuts and washers, a bit of sandpaper, a hacksaw and a fine file and other assorted but common tools.
In use
Jesper tells me:
"I use these racks several times a week for my fishing trips. I often change places and get ready quickly when I arrive at a new spot. There is plenty of room for 4-6 rods on these rod holders."
International readers may want
to search for local sources.
You will need
- 1 Suction cup grip
- 6 PVC end cups
- 2 PVC T-joints
- 1 meter/3 feet of PVC tube
- 2 meters or 6' of 5mm elastic (bungee) cord
- Glue or silicone to secure the connections and optionally some cleaner to clean the PVC before gluing
- Optional soft tape to cover the tubes where the rods touch. Tape for tennis rackets or bike handlebars can do the job
All PVC tubes and fittings are 25mm or 1"
Instructions
The parts are few and not particularly expensive, and you only need simple tools to make the rod holder.

The end plugs for the tubes need to fit as tightly as possible into the suction feet.


You cut the grip into two by removing the "handle".


After separating the feet, you can trim the surplus plastic from the locations where the tubes will be mounted.


Two end caps will serve as brackets for the vertical tubes, and need to be secured with a bolt and nut and some glue.


Measure and cut the tube. You will need six parts.
Two for the vertical sections and four for the crossbar in the T's.
Measures aren't critical as long as they are identical two and four.
Jesper used 2x15 cm (2x6") and 4x18 cm (4x7") for his holders.


Sand the ends of the tubes and glue and mount them to form the T's.
Then clean them and glue them into the sockets.


The remaining four end caps need two holes each. Use a drill the same diameter as the elastic cord.
Tie a knot on a cord, pass it through the cap from the inside, loop it and pass it back through the other hole.
A knot and a trim, and the loop is done. Make each loop slightly shorter than one branch in the T.


Slip the caps over the ends of the bars. They don't need to be glued.
Friction and the elastic cords will keep them in place.
Omitting the glue also allows you to slip them off to tighten or exchange the cord.
You can wrap the bars with a soft tape to protect your fishing rod handles and increase friction.


The last thing you need is something to hold the cords over the rod handles.
Drill a couple of holes vertically into the center of the T and screw and glue in a bolt into each T.
When mounting the fishing rods, you slip the elastic cord over these bolts to hold the rods securely.


Hand picked for this article
- Log in to post comments


Cool! What about fly rods?
Thanks for this great DIY post! I would love to try it. But what about fly rods without butts behind the reel seat? I would not feel comfortable positioning the reel *below* the bar. Seems like an adjustment to the recipe is needed. Any ideas? Maybe an additional set of bungees that loop behind the reel stem?