
This article covers loops used for connecting fly lines to backing and leaders and shows you how to make them and use them.
This article covers how to make and handle loops used to connect the various parts of a fly line setup - baking to fly line to leader.
Braided loops
These loops are often refered to as Orvis loops. I don't know if Orvis invented them, but they do sell them -- and at high prices too.
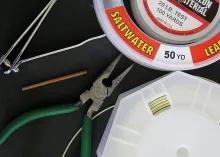
There's no reason to pay money for something you can make for free yourself. All you need is a large needle and some scraps of braided dacron backing. Add to that scissors, a lighter (or a candle or matches) and some superglue.

DIY
Look at the drawing and follow the instructions below. You can now make your own loops. See below how to use them and how to join two loops. These loops can be used loose to mount on fly lines using silicone tube as shown below or they can be made on braided backing and braided leaders to use for connecting to fly lines. You can even make these loops directly on most fly lines, which is also described.
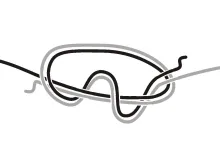
The first prescription is how to make a loose loop than can be mounted on a fly line:
- Use fairly thick braided backing off the stiff dacron type - 20 or 30 lbs
- Do not cut the backing yet, but work with the whole length
- Be carefull that the backing doesn't become 'unbraided' in the process
- Stick a thick needle into the backing app. 10 cm. (4") from one end.
- The backing is hollow and the needle point should end up in the center
- Thread the short end of the backing through the needle eye
- Secure the loop formed with a pencil
- Press the needle out through the backing again 5 cm. (2") further down the backing
- Pull the needle and the loose end through the hollow center and out though the side of the backing
- Pull loop fairly tight
- Remove needle and cut backing leaving a small piece (1cm/0.5") on the outside
- Burn lightly over a flame and pull the still warm and soft end into the backing, by expanding the loop
- Put a drop of superglue on the double backing
- Stop the backing from becoming 'unbraided' by sticking a needle into the hollow center and applying light heat.
- Cut to appropriate length and thread a small piece of silicon tube over the end
- The loop is ready
Braided sleeve and silicone tubing
No split ends
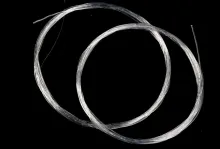
When you use braided backing for backing or loops, you will probably experience a lot of irritation over the fact that the ends of this line will split. If you want to use silicone tubing for joining braided backing with other types of line. These split ends will make it very difficult to thread the silicone over the backing. Avoid this by burning the end of the backing after a needle has been stuck inside the hollow backing. Warm the needle lightly and the backing will melt around it. Trim the excess afterwards.

Melting a braided sleeve to keep it from fraying.
The silicone trick
There's an easy way to attach the leader or backing to the fly line, and that's by using a piece of silicone tubing. This can be bought in running lengths and cut to pieces. Sometimes it's included with braided leaders.
The tube is cut into small pieces and mounted as shown above. The tube will hold the leader and pull in the leader will make the hollow braided line grab the fly line.
I fished with this solution for some years and never experienced any problems. Some fishers are sceptic though, and some seem to be of the opinion that the link will give in.
If you have this fear or need to change your fly line on the same backing - maybe because the spool of your reel can't be changed - you can consider using "the large loop solution".
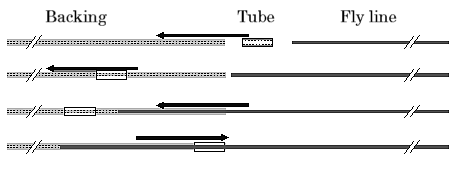
Fitting the braided loop over a fly line, securing it with a piece of thin silicone or plastic tube.

Loop on a fly line
This is a way of making a loop on a fly line that will give you a very neat and tiny loop and a smooth transition between the different parts of a rig. The loop is very strong and actually quite easy to make.
You will need a threader of the type that is normally used for getting tying thread through the tube of the bobbin holder.
It has to be the type made from metal thread (piano wire) - the ones made from thick monofilament will not do.
Do try this at home
Start doing this on an old piece of fly line or on the reel end of a new one. Not all lines have the hollow, loosely braided core needed for this and you might fumble the first time. Spare the front taper of your favourite line till you have some practise.
Some lines have very dense cores or even monofilament ones. These can not be made into loops using this method.
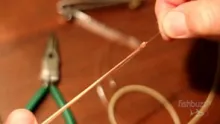
- Dip the end of the fly line in acetone (nail polish remover is the same, but more expensive) for 10-30 seconds
- Remove the softened coating from 5-8 cm (2-2 3/4") of the fly line, revealing the braided core
- Stick the tip of the threader into the core as close to the coating as possible
- Pass the threader through 2 cm (3/4") of the core and push it out through the line again
- Thread the tag end of the core into the threader
- Pull approx. 2 cm (3/4") of line into itself and form a sufficiently large loop (secure the loop with a thin pencil in necessary) and remove threader. If the tag sticks out of the side, cut it as close as possible, and pull the rest into the center of the core.
- Apply a little Aquaseal or similar on the braid, reaching from the coating and to the base of the loop. Smooth it with wet fingers and let cure for 24 hours.
- The loop is ready

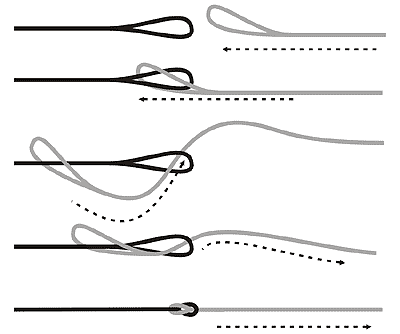
Putting two loops together
The loop system has the advantage of being very flexible. You can easily join two sections of the fly rig, when you have loops on each section.
Especially if you want to change leaders, the loops will make the process very easy. More seasoned fishermen might find the joint too stiff or find that it has a so called 'hinge effect', but for the beginner, who often ends up with a leader with wind knots or forming a gigantic bird's nest, the ease of changing the fouled leader is of great benefit. This combined with cheap, home made knotted leaders, will make the learning curve much less steep.
Using the loop system
When I first started fishing with a fly rod, I spent a lot of time tying complex knots to join the different part of the rig. I wish someone had told me about loops when I started, because they would have saved me a lot af pain and frustration. I do not think that loops are the best way to join two parts of the fly line set up, but they sure are easy to use, and until you are really competent with a flyrod, you'll be pleased to know that a leader can be changed in a jiffy, without tying any knots. The loop-to-loop connection makes it so much easier to change that wind-knotted leader or have several fly lines that has to go on one reel.
As you become a better fly angler and more confident with knots, you can always return to knotted connections, which in some cases can give better performance and smaller and smoother connections than loops.

Large loop connection
Large and small
For convenience you might want to use a very simple large loop connection between the fly line and the backing. This consists of two loops - a large one on the backing and a small one on the fly line. The large one should be large enough to let the whole reel pass through it, and the small one on the fly line large enough to let the doubled, knotted backing pass.
Use the braided loop style for the loop on the backing or just make a huge Surgeon's loop on it, and utilize the "loop on a fly line" style for the fly line or a seperate braided loop as a second option.
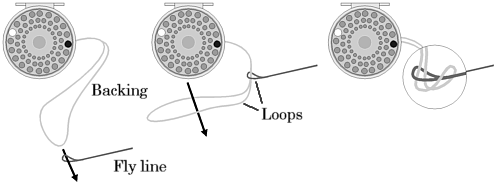
Connecting the fly line to the backing with very little hassle using a large loop on the backing.
Thread the large loop through the small one and let the reel pass through the large loop. Now tighten the loops and arrange the 'knot' as neatly as possible. The loops come easily apart even after a long time of hard use.
- Log in to post comments


No reason to be skeptical
Steve,
There's no reason to be skeptical! This system works just as described and creates a very durable and smooth connection, which has been used by thousands and thousands of anglers. It can fail, of course, but so can any connection. Lines get worn, coating cut through and knots slip. We've all been there.
I used this method for many years when I started fishing, but use a needle or Albright knot nowadays. I have no problem recommending the system to novices who might find the knots a little intimidating or need to be able to easily change the fly line on a reel without cutting any line.
Martin
Loop made on the core
John,
I use the method with a loop made on the core of the fly line as described above. Using Aquaseal or a similar glue makes the loop very smooth and it can be kept small. Not all fly lines have cores that are suited, but most have.
Martin
Let me thank you for
Let me thank you for this wide description how to solve the problem with the loops!
The only problem that remains is how to get a spool of 25 m I can use to make myself my own loops at home!?
Thank you.
Anonymized commenter
Anonymized commenter,
I have had several types of Dacron backing, and most the stuff you can boy nowadays is too thin and soft to work. I do have an old coil of thicker and stiffer backing around that I can cut from when I need it.
I'm sure braided mono will work just as fine. It's the hollow braid that's the key, and yes it is exactly the "Chinese fingercuff" phenomenon that does it. The harder you pull, the more it tightens.
Martin
Just seen this and,
Just seen this and, yes, I am a bit sceptical. I've always attached backing with an Albright knot.
Thanks for getting b
Thanks for getting back to me Jan
Thanks. If you were
Thanks. If you were to make a loop at the tag end of the fly line which one would you make?
Have you actually
Have you actually had success with braided Dacron? (Every other reference I've found calls for braided monofilament.) I'd love for Dacron to work since I already have it around.
Using 30 lb. test braided Dacron, I formed a nice, textbook-looking loop. Unfortunately, even a needle will not thread up in there very far, much less a length of fly line.
Is the "Chinese fingercuff" gripping action supposed to come into play here, or is that a mono-only phenomenon?
I have always used a
I have always used a needle knot. Its never failed me.
Ripley
John,
If you mean
John,
If you mean for attaching the leader to the fly line, I recommend a nail knot, a nailless nail knot or an Albright knot.
Hope this helps
Martin
Mark,
Provided yo
Mark,
Provided your backing is hollow and "loose" enough in the braid, no problem.
Most modern backing is too thin, though and an overhand loop is the easiest way to create a loop on the thin, supple backing.
Make it sufficiently big for the reel to pass through, and you will save yourself having to pull all the line through the loop when you attach or change it.
Martin
Tony,
I honestly
Tony,
I honestly don't know... the tube has to fit very snugly over the fly line and the braid. So tight that it's on the mlimit of being possible to press it over. You kind of "massage" it in place. The tube I have used has been bought in fly stores and was sold for the purpose.
I have no tube right here to measure.
Martin
Hi
What size tubing
Hi
What size tubing are we talking .5mm?
Regards Tony H
Can you advise what
Can you advise what knot and how to tie at tag end of fly line?
Can you use this met
Can you use this method to create a loop on the end of your backing line too?
Jan,
I personally
Jan,
I personally use the needle knot about 90% of my fishing these days. I have loops on a few lines, which I use for salmon fishing where leaders are changed from floating to sinking or on some trout lines where I use furled leaders. All my plain day-to-day lines and shooting heads now have plain needle knots and knotted or monofilament leaders.
Martin
In case someone else
In case someone else needs the instructions, here they are:
1. If the shrink-wrap tubing is already on the braid, move it up to the loop before starting (if it's not on the braid, thread the shrink-wrap onto the braid first)
2. Insert the end of the fly line into the open end of the braid and use the "inchworm" technique to move the braided sleeve down the flyline. Make sure 1" of the fly line is inside the braided sleeve.
3. Move the shrink-wrap down so that 1/2 is on the fly line and the other 1/2 is on the braided line.
4. Using a heat source (not an open flame), shink the tubing to secure the connector.
Now go fishing.
hi Martin do many pe
hi Martin do many people use the needle knot, i have gone back to it, i think the presentation seems better what do you think please
You are not the only
You are not the only one with this problem. I received the same sort of kit and no instructions. I assume that one has to tease the end of the braided loop and push the fly line into it and then pull the tube/sleeve supplied over the join?? Using glue would seem to be useless as the tube would stick to the join, I have experimented with a bit of tube and this is the case. There seems to be an assumption by the line suppliers that we are all experts?
hi there
I am just
hi there
I am just about to embark on my first ever fly fishing season. I have got myself a basic kit to get me started, but the fly line that came with the rod does not have the loop connector at the end. I don't feel confident enough to create my own loop, and the rod also came with a couple of braided loops...but it came without any instructions as to how to attach the braided loop to the fly line in order that I may use the loop-to-loop system for attaching my leaders I have. I've searched everywhere for info on this, but can't find it anywhere.