One day last year I was thinking about how best to illuminate flies for photos when I thought of using a LED flashlight as a sort of spotlight. They were very cheap - $3 at the checkout of any office supply store - but pretty wimpy. I started checking to see what other options were available and was surprised to find that LED lights are already very popular among photographers.
Ever since I attempted to photograph flies for the first time with my ancient 1MP Fuji Finepix camera (1MP is like 8-track tapes or rotary phones these days), I have had a constant struggle with light. I'm sure this is true of anyone who has photographed flies - or anything for that matter - the light never seems quite right. I have used one, two and three desk lamps in various combinations, a cardboard and tissue paper light tent, natural window light, natural sunlight on the back deck, flash, oh and probably a bunch of other things I can't think of right now. They have all had their pros and cons, but none have been totally satisfactory.
For me, a lighting system for photographing flies needs the following attributes:
- Ease of use. There are times when I want to photograph a fly fresh off the vise, so I need to be able to apply the lighting I want with minimal fuss and setup. It has to be ready and within reach, or chances are high that the photograph will not be taken. This has been the number one consideration - as a fussy light source will prevent the image from being made - so all other considerations are moot.
- Even distribution of light. I do not take what might be considered "art" photographs. My goal is to present the fly in a documentary fashion - well lit front, back, top, and bottom - with all important parts in crisp focus. The ideal setup is three lights - top right, top left, and bottom middle - three lights distributed at 10:00, 2:00, and 6:00 on a clock face.
- A balanced color. When Martin visited me last summer and we took some photographs together, he showed me how obvious (and annoying) it is when two incandescent lights do not emit the same color light. We were using a white background and it was causing so many problems that I eventually swapped out all the lightbulbs with fresh ones from the same box. Given how modern digital cameras can easily measure light color and adjust accordingly - I don't really care what the color of the light is as long as all sources are identical - or at least indistinguishable in the photo.
- The subject (the fly) has to be easily accessible. While I often take one-off photos of a single fly, more often when I am taking pictures, it is of a batch of flies. The difficulting in reaching in for the fly and changing to a new one is a major factor in how well the system works. If I'm constantly bumping into the camera or lights or knocking things over, the system will not get used and I'll be back to square one. With the ideal system I should be able to reach in and change flies quickly and easily without much required in between-shot setup adjustments.
- Cool. There are times I have setup a couple desk lamps to light up some flies and put my compact camera on a little tripod right next to them and the heat was pretty impressive. I got a little nervous about my camera and more than once yelped when touching the lamp shield. I don't mind the heat from normal light bulbs when tying because my room is usually cool and they warm up the desk top, but when taking photos I'm a little too close for comfort. In addition, hot lights limit what you can use as a diffuser. I remember being a little worried about the tissue paper in my cardboard light tent.
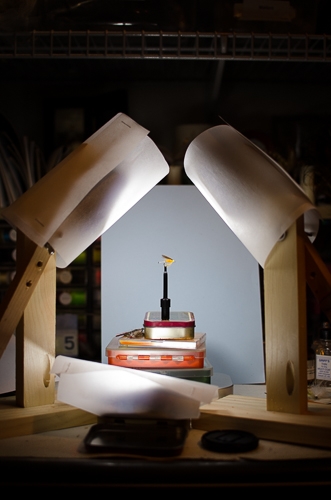
A simple three light setup using cheap LED lights with parchment paper diffusers and homemade wooden boom stands. They will not win any beauty contests, but they are functional, easy to use, and readily available at my tying desk.
Last year I bought a ready made collapsible light tent. I thought it would be the ideal solution - collapsible so that I could keep it near my tying desk - but also allowing a perfectly soft and even light on the fly. I had built a light tent from a cardboard box and some tissue paper that I liked - but I had nowhere to store it and the fragile tissue paper eventually tore and fell apart. I didn't make another one. I thought the "real" tent would work much better - it didn't. For one, it took up a ton of space once expanded to full size, so I had to clean off my desk and make room for it - who wants to clean off their tying table? For another thing - because the camera I had required such close working position - the camera was inside the light tend so changing flies was a total headache. It was no fun to use, so back it went. Thank God Amazon has such a good return policy. I gave up on the idea of light tents.
A couple years ago I did an article with bucktail flies and all those were shot in my living room on the couch using natural light from the window. That worked - but broke the first rule of ease of use. Since it was a special project it was worth the effort to setup and tear down, but it definitely was a one-off. I wouldn't take my stuff upstairs every time I wanted to take a picture of a fly and I had to keep an eye on the cats at all time, 'cause Lord knows the drama I'd encounter if one got stuck with a fly. I definitely want to take photos at my tying desk, where all my stuff is, behind a closed door.
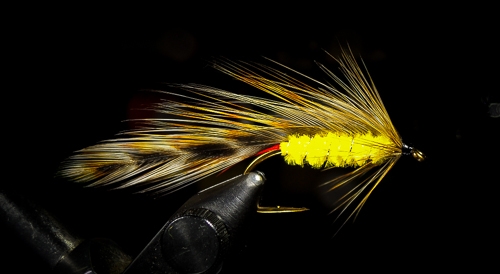 The first attempt with the new light system. Not a bad shot for no background and automatic exposure hand held(!) with a compact digital. With a little finesse it could work out nicely. It was less than an hour from the start of the project to this image.
 One day last year I was thinking about this trying to work it out in my mind (yeah - what a nerd - who thinks of this stuff) when I thought of using a LED flashlight as a sort of spotlight on the fly. They were cheap - $3 at the checkout of any office store these days. I had in mind building a little adjustable stand for a couple and starting shopping online to see if I could find a cheaper source. That is when I found these 24-LED lights. Wow - more light - more distribution of light - and cheap enough to be disposable.
Along with the lights, I wanted an adjustable way to hold them above the fly, so they could be moved around to suit the needs of the situation. Using some scrap woods and a few bits of hardware bought from Lowes, I came up with what is basically a boom arm support for the lights.
A word about the bottom-front light. I didn't make anything for it - and after using it a bit I think I will end up doing something. Right now it is sitting in an Altoids tin filled with wet flies - but that's hardly a good idea. I think a little cradle where the light can rest back at 45 degree angle would be perfect. Next time the garage is free (and warmer), I'll cut something out of another spare piece of wood. Or maybe something from cardboard and masking tape will do, who knows.
This lighting system satisfies the first goal listed above - ease of use. They stay on the floor next to my desk when I'm not using them. When I want to take a photo, they are on the desk, in position, and ready to shoot in less than a minute. Hard to get it any easier. When properly positioned, they provide an even distribution of light around the fly so there are no obvious shadow areas. Since they are free standing, it is easy to reach in and change flies - no walls of a light tent to deal with. They can be used with a simple diffuser or plain for whatever is needed. The color is even among all lights, and LED lights are cool to the touch. Perhaps this system will stick around for awhile.
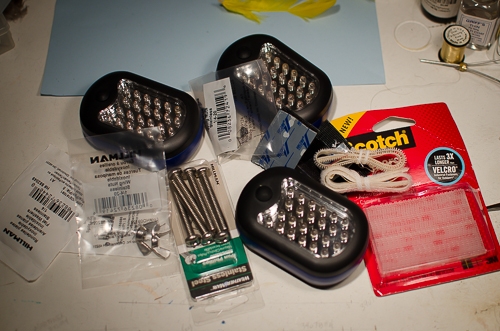
The hardware required is simple. Three 24-LED battery powered lights ($3-$4 apiece online), a couple 1/4-20
bolts, washers, and wingnuts, and some sticky back velcro. That's it.
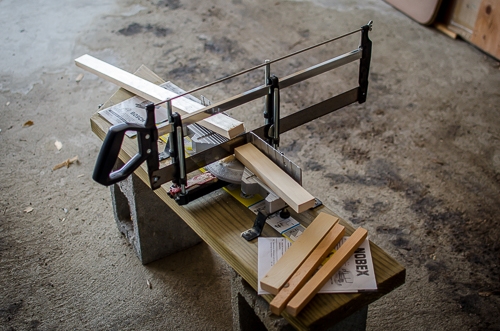
Oh yeah - some scrap lumber too. (Gotta love that temporary mid-February workbench). Six pieces of wood are needed in total - three for each stand. One piece for a base, one for the vertical column, and one more for the adjustable boom. Size them according to how you plan to hold the fly during photographs. I made mine so they could shine light down on a fly held in my vise.
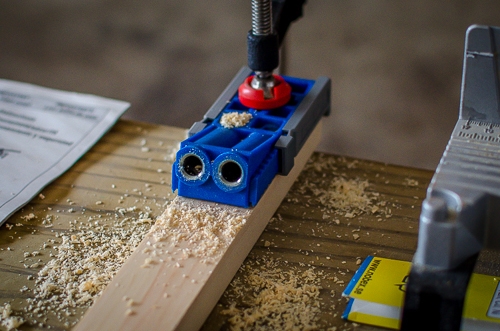
Pocket holes are drilled in the vertical colums to attach to the base.
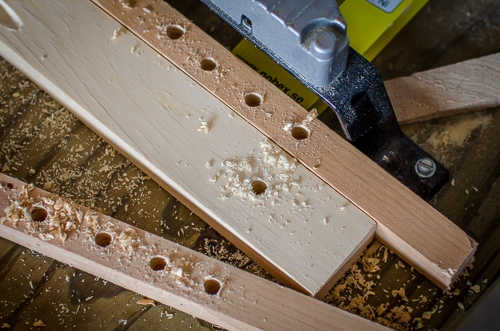
The vertical colums get one hole for the boom, and the boom gets a few extra holes to allow adjustments. I just guessed here - it's not rocket science.
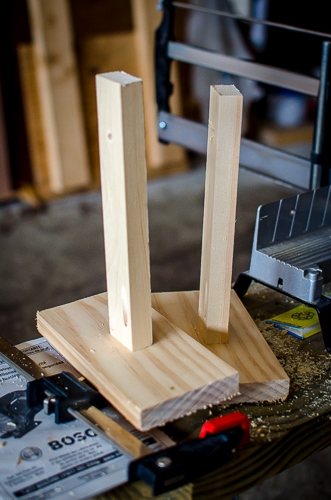
The vertical columns attached to their base. I supposed I could have sanded and finished them, but then it'll be a multi-day process.
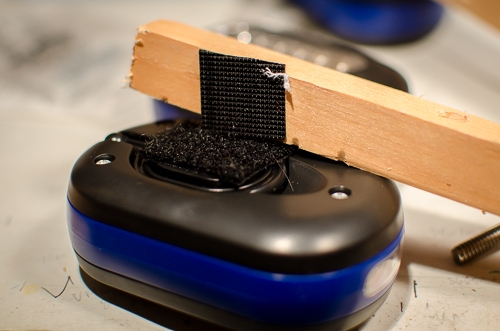
The lights are attached to the booms using sticky back velcro. This allows for easy batteries changes, unlike tape or something more permanent.
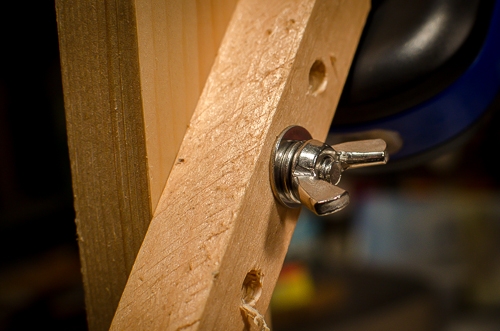
A washer, locking washer, and a wing nut are what is used to tighten the boom. Simple finger pressure is all that is needed to hold the lights in position so they won't droop.
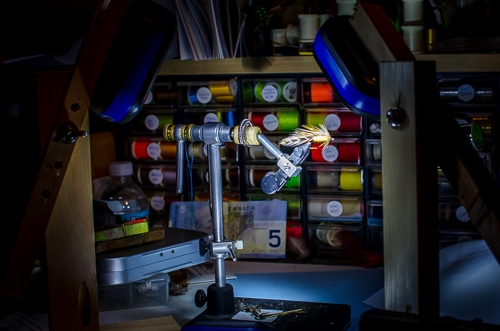
The finished system in work. Notice the extreme blue color of the LED lights. Most modern digital cameras allow for measured white balance adjustments, making this a non issue.
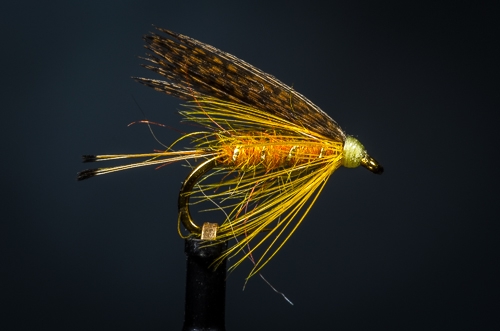
A sample photo of a Golden Olive wet fly taken with no diffuser in place. The light is a little harsh on top of the wing and on the head of the fly, but since the light is so focused on the fly itself, the background darkens dramatically and the fly jumps out of the image. I kind of like this. Care needs to be taken with exposure to ensure the fly is not blown out by the dark background. Always take a few test shots and check before shooting a bunch of flies.
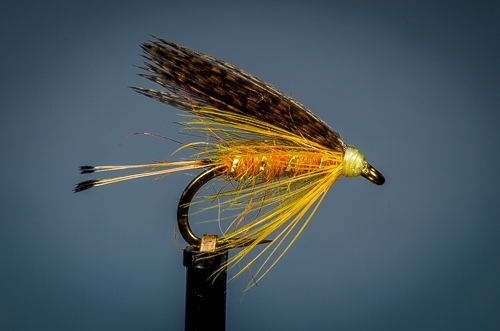
Same fly, but this time the lights were covered with parchment paper diffusers. There is much less direct light on the fly, so the background gets a fair share of exposure. Notice in this photo as with the previous how the color of the LED lights was easily overcome - I had to do no color adjustment in post processing.
- Log in to post comments



Wonderful picture. L
Wonderful picture. Love the parchment technique.