The article showed and listed them, but here are the material lists and tying instructions for a bunch of them.
You will find many more flies in the Red Tag uniform in the article linked above.
Red Tags
Martin Joergensen
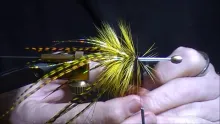
Red Tag Klinkhåmer
Red Tag Klink
Martin Joergensen
Red Tag Klinkhåmer
Emerger
Hans van Klinken
grayling
rainbow trout (landlocked)
Hook
Partridge Klinkhamer GRS 15ST #18
Body
UNI 8/0 tying thread, red
Thread
Semplerfli Nanosilk, black
Wing
Antron yarn, white
Hackle
Brown badger cock hackle, slightly oversize
Thorax
A couple of peacock herl
Start the red thread a couple of eye widths behind the hook eye.
Wrap the thread in touching turns well into the bend of the hook and back. Repeat.
Whip finish and cut the red thread.
Start the black thread right in front of the red.
Tie in the wing pointing forward over the eye, leaving a little bare shank in front. Make it fairly sparse. It can be too long since it will be trimmed later.
Build up a small wall in front of the wing to get it perpendicular to the shank.
Tie in a couple of peacock herl behind the wing, pointing to the rear of the fly.
Wrap a thread base around the wing post, about 1-2 eye widths high.
Strip barbs off the hackle to have some bare stem.
Tie the hackle in by the stem on the top of the hook shank in front of the wing.
The hackle should have the shiny side up and point away from you.
Wrap the thread over the stem up the wing post base and wrap the thread down again.
The hackle now sits at the top of the wing post base.
Wrap the hackle down towards the hook, counterclockwise when seen from above.
4-5-6 wraps will create a fairly dense parachute hackle.
Tie down the hackle in front of the wing and trim.
Wrap the herl to create a thorax under the hackle.
Tie down in front of the thorax, trim and whip finish.
Add a smidgen of varnish on the finishing wraps.
A little difficult
Red Tag Once and Away
Red Tag Once and Away
Martin Joergensen
Red Tag Once and Away
Emerger
Hans van Klinken
brown trout
rainbow trout (landlocked)
Hook
Partridge Klinkhamer GRS 15ST #18
Body
UNI 8/0 tying thread, red
Thread
Semplerfli Nanosilk, black
Thorax
A couple of peacock herl
Wing
3-4 small, natural or brown CDC feathers
Start the red thread a couple of eye widths behind the hook eye.
Wrap the thread in touching turns well into the bend of the hook and back. Repeat.
Whip finish and cut the red thread.
Start the black thread right in front of the red.
Bundle up the CDC feathers to form a small tuft with aligned tips.
Tie in the CDC bunch pointing to the rear of the fly. Make it long enough. The length isn’t critical since the wing is trimmed when done.
Tie in the herl in front of the CDC and wrap to form a small thorax.
Tie down and trim herl.
Bend the CDC forwards over the thorax and tie down right behind the hook eye.
Lift up the wing and form a small “thread dam” to force it upright.
Whip finish and cut thread.
Varnish gently on the final wraps.
Trim the wing to the desired length, typically 2/3 of the shank length.
Medium
Red Tag Spider
Spider Red Tag
Martin Joergensen
Red Tag Spider
Wet fly
Martin Joergensen (sort of)
brown trout
grayling
Hook
Wet fly down eye size 10-14
Body
UNI 8/0 tying thread, red
Thread
Semplerfli Nanosilk, black
Thorax
A couple of peacock herl
Hackle
Light brown hen hackle
Start the red thread a couple of eye widths behind the hook eye.
Wrap the thread in touching turns to just in front of the bend of the hook and back. Repeat.
Whip finish and cut the red thread.
Start the black thread right in front of the red.
Tie in the herl and wrap to form a small thorax, just leaving space for the hackle.
Pick a hackle with barbs about 1.5 times the shank length.
Remove the fluffy barbs.
Hold the hackle by the stem curved side up, tip pointing away from you.
Remove all barbs on the right side of the hackle.
Tie it in by the stem right in front of the thorax pointing away from you, the remaining barbs pointing to the rear of the fly.
Wrap it a couple of times to form a very delicate and sparse “umbrella-like” hackle. Less is more.
Tie down and trim the tip off.
Whip finish and cut thread.
Varnish very sparsely on the final wraps.
Medium
Red Tag Intruder
Red Tag Intruder
Martin Joergensen
Red Tag Intruder
Steelhead fly
Martin Joergensen
sea trout (sea run)
steelhead (sea run)
Shank
DIY hair pin shank
Wire
Red intruder wire
Hook
Stinger size 4
Thread
8/0 black
Tail
Red wool yarn
Rear collar
Lady Amherst pheasant fibers dyed red
Body
6-8 peacock herl
Front hackle
Light brown cock hackle
Front collar
Lady Amherst pheasant fibers dyed tan
Do not trim the shank, but leave the surplus to mount in the vise.
Position the shank so that about 3 centimeters stick out in front of the jaws.
Cut an 8-10 centimeter piece of wire.
Thread the wire double through the hook eye and loop around the shank to form a straight wire connection.
Start wrapping thread on the rear of the shank.
Lay the doubled wire along the shank and tie down in the full shank length with touching turns and return the thread to the rear of the shank.
Trim off the excess wire.
Varnish or glue the thread, wire and shank and let dry.
Cut a number of 1 centimeter pieces of red yarn – 6-8 pieces should do.
Tie them in so that they protrude to the rear, distributing them around the shank.
Pull them back in a bunch and trim them.
Brush the yarn open and fluffy with stiff brush or a Velcro stick.
Tie in 8-10 single barbs of red Amherst pheasant, forming a very open collar of “feelers”. These can be fairly long and reach the hook or beyond.
Tie in the herl right in front of the tail.
Twist the tying thread and the herl to form a rope, clockwise when seen from above.
Grab both thread and herl and wrap forward in touching turns. If the rope gets too tight, let it unravel a bit before wrapping on.
Tie down the herl and trim excess.
Prepare the brown hackle by removing the fluffy barbs. The barbs should be about the shank length.
Tie in by the stem, curved side forward and wrap 2-3 times forming a swept back collar.
Tie down and trim.
Tie in 8-10 single barbs of tan Amherst pheasant, distributing them around the hackle, forming a very open collar. The barbs should be longer than the hackle.
Form a head, whip finish and trim.
Varnish to give a glossy surface.
Remove the shank from the vise and cut off the part of the shank sticking out under the wire using a pair of side cutting pliers.
A little difficult
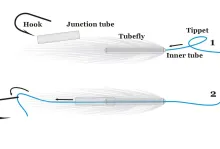
Red Tag Tube
Red Tag Tube
Martin Joergensen
Red Tag Tube
Tube fly
Martin Joergensen
atlantic salmon (sea run)
sea trout (sea run)
Tube
Neutral plastic tube, 3mm diameter, length about 4 centimeters
Junction tube
Red silicone tube
Thread
8/0, black
Tail
Red wool yarn
Rib
Narrow, flat copper tinsel
Body
Peacock herl
Rear hackle
Red hen hackle
Center hackle
Brown hen hackle
Front hackle
Brown cock hackle
Push the silicone tube over the rear of the rigid tube.
Mount the tube on a tube needle in the vise or in a tube vise.
Start the thread just in front of the junction tube.
Cut a number of 1 centimeter pieces of red yarn – 8-10 pieces should do.
Tie them in so that they protrude to the rear, distributing them around the tube.
Brush the yarn open and fluffy with stiff brush or a Velcro stick.
Trim the yarn to form a fairly large brush-like tail circumferencing the tube.
Tie in the rib. Make it long. There’s a bit of way to the front when the fly is ready to be ribbed.
Tie in 4-5 peacock herl and take the thread forwards to just shy of the first third of the tube.
Wrap the herl in touching turns to cover the rear third of the tube.
Tie down and trim.
Tie in the red hackle stem first, curved side forward and wrap 3-4 times.
Tie down and trim.
Tie in 4-5 peacock herl and take the thread forwards to just shy of the second third.
Wrap the herl in touching turns to cover the middle third of the tube.
Tie down and trim.
Tie in the brown hen hackle stem first, curved side forward and wrap 3-4 times.
Tie down and trim.
Make another herl section, covering the last third.
Wrap the rib forwards, about three turns in each section, taking care not to squash any hackle barbs.
Tie down and trim.
Tie in the brown cock hackle stem first, curved side forward and wrap 3-4 times.
Tie down and trim.
Form a short head in front of the last hackle, whip finish and cut thread.
Cut the tube 1-1.5 millimeters in front of the head.
Melt the tube to form a collar right in front of the head. Make sure that the hole in the tube is still open.
Varnish the head several times to a shiny and smooth finish.
Medium
Red Tag Copper Salmon
Red Tag Copper
Martin Joergensen
Red Tag Copper Salmon
Modern salmon fly
Martin Joergensen
atlantic salmon (sea run)
sea trout (sea run)
Hook
single salmon, like Partridge Patriot, #4
Thread
8/0 black
Tail
Red wool yarn
Rib
Narrow copper tinsel
Body
6-8 peacock herl
Front hackle(s)
One red and one light brown cock hackle, barb length as hook length
Start the thread in the front the hook shank, leaving space for hackle and head.
Cut a piece of red yarn. Double it depending on thickness.
Tie it in in the front of the hook shank and cover it in close wraps to the hook bend over the barb.
Tie in the rib under the hook.
Return the thread to the tie in point in close turns.
Trim the yarn so that the tail reaches the hook bend.
Brush the yarn open and fluffy with a Velcro stick.
Tie in 6-8 peacock herl and cover the butts in close turns down to the tail.
Return the thread to the front.
Wrap the herl in touching turns to form an even body.
Tie down and trim the surplus.
Counterwrap the rib over the body in 6-7 open turns.
Tie down and trim surplus.
Prepare a red hackle by removing the fluffy barbs.
Tie in by the stem, curved side forward and wrap 2-3 times forming a swept back collar.
Tie down and trim.
Prepare a brown hackle by removing the fluffy barbs.
Tie in by the stem, curved side forward and wrap 2-3 times forming a swept back collar right in front of the first one.
Tie down and trim.
Cover the bases of the front hackle with some tight turns to get it to sweep back.
Form a head, whip finish and trim thread.
Varnish the head 2-3 times to form a glossy and smooth surface.
Easy
JC Red Tag Salmon
JC Red Tag
Martin Joergensen
JC Red Tag Salmon
Modern salmon fly
Martin Joergensen
atlantic salmon (sea run)
sea trout (sea run)
Hook
single salmon, like Partridge Patriot, #4
Thread
8/0 black
Tail
Red wool yarn
Rib
Flat medium silver tinsel
Body
6-8 peacock herl
First hackle
Brown cock hackle, barb length 1.5 times hook length
Second hackle
Red soft cock hackle, barb length as hook length
Cheeks
Jungle Cock or substitute
Start the thread in the front the hook shank, leaving space for hackle and head.
Cut a piece of red yarn. Double it depending on thickness.
Tie it in in the front of the hook shank and cover it in close wraps to the hook bend over the barb.
Tie in the rib under the hook.
Return the thread to the tie in point in close turns.
Trim the yarn so that the tail reaches the hook bend.
Brush the yarn open and fluffy with stiff brush or a Velcro stick.
Tie in 6-8 peacock herl and cover the butts in close turns down to the tail.
Return the thread to the front.
Wrap the herl in touching turns to form an even body.
Tie down and trim the surplus.
Counterwrap the rib over the body in 6-7 open turns.
Tie down and trim surplus.
Prepare the brown hackle by removing the fluffy barbs. The barbs should be able to reach beyond the hook bend.
Tie in by the stem, curved side forward and wrap 2-3 times forming a swept back collar.
Tie down and trim.
Prepare a red hackle by removing the fluffy barbs. The barbs should be slightly short than the first hackle and just reach the hook bend.
Tie in by the stem, curved side forward and wrap 3-4 times forming a collar right in front of the first one.
Tie down and trim.
Cover the bases of the front hackle with some tight turns to get it to sweep back.
Prepare two JC feathers by removing the fluffy barbs.
Tie in one on each side, reaching half way down the body.
The Global FlyFisher has been online since the mid-90's and has been free to access for everybody since day one – and will stay free for as long as I run it.
But that doesn't mean that it's free to run.
It costs money to drive a large site like this. See more details about what you can do to help in this blog post.