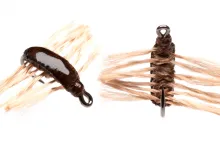
This scud pattern uses a simple sewing technique to add the legs that are a common trait for these widespread crustaceans, which are high in the fish menu in both fresh- and saltwater

Shrimps, scuds, or whatever the many species of Gammarids are called in your part of the world, have lots of legs; thirteen pairs to be precise. Life is really too short to being tying twenty-six legs onto a life-size imitation, and most shrimp patterns use teased out dubbing under a shellback to imitate the little critters.
Another way to do it is to wind a spiral skeleton of a round material up the hook followed by the material to represent the legs in the groove. I’ve designed a few shrimp patterns on this basis using elastic bead cord or hollow braid with wire inside as the skeleton and a dubbing loop or stripped organza ribbon for the legs. These methods make good shrimps, but they are not always scalable across a large range of hook sizes. The diameter of the material used to wind the skeleton may allow only a few turns on a small hook or may be too bulky to work at all.
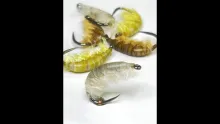
The Stitch-Up is designed to be tied across a range of hook sizes to imitate a diversity of shrimp species. Some shrimps are tiny, but not all. Under optimum conditions adult male Gammarus pulex grow to 20 mm/0.8 inches, and the females to 13 mm/0.5 inches, so an imitation on a #8 or #10 grub hook wouldn’t be out of the question. Where I live, I’m only likely to see a shrimp that size in a frozen packet at the supermarket. My imitations are a tad smaller; a #14 hook generally suits my needs.


Tungsten rubber tube is used by carp anglers to pin their line to the lakebed and is available from most fishing shops. If you don’t want to add weight use a piece of the plastic tube from an old ballpoint pen to form the humped back or build up the body with dubbing.

You can, if your day job is in neurosurgery and you have the patience, sew in thirteen pairs of legs. Fortunately, fish can’t count so I generally settle for between six and eight pairs. As far as choice of thread goes, you are free to use whatever you like, it is your shrimp after all.
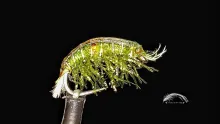
I use UTC 140 denier (6/0) thread for many of my shrimps, including the dark olive #14 shrimp shown at the top of the page, which is 10mm/0.4 inches long. This thread gives soft flexible legs which fill out the shrimp profile with the minimum of stitching. For smaller sizes, or more definition in the legs you can use 12/0 tying thread or borrow some fine sewing thread. If you use a fine thread sew with a loop of thread knotted together at the ends so you add two legs with each stitch.
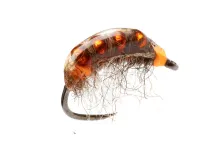
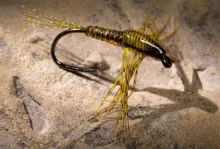
As far as matching any given natural shrimp goes, varying the colours of the shell, body and legs give you pretty wide scope. Narrow 3mm organza comes in a range of colours, or you can use cream ribbon and colour it with a permanent marker pen. White or cream ribbon goes transparent when coated with UV-resin allowing the colours of the dubbing body and legs to show through the shell as in the shrimp below.

- Log in to post comments