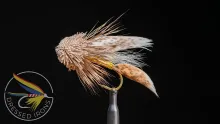
This is a muddler design type of fly that is more or less a derived idea based on something that has been copied many times, but never the less an efficient fly that has caught the author many fish.


I was looking through an old magazine I had and discovered a pattern that I tied and fished several years ago. I caught some smallmouth on this fly, some largemouth and more than my fair share of browns, rainbows and yes a few bluegills. I also like this pattern for fall lake run salmon. I had forgotten about the pattern (more likely the name and the inventor) and remembered it was a kind of a cool fly after rereading the article.
This is a muddler design type of fly so I don't think that the originator can really claim that this is an innovative pattern, it is more or less a derived idea based on something that has been copied many times. In any case, my pattern is not exactly identical either... so in a sense this is my version of something.
The original pattern I copied was called the Polar Muddler. It was created by Paul Miller for an article about fly fishing in British Columbia. This article was called "Winter Ghosts of Lower B.C." and was contained in the now defunct "Art of Angling Journal, Volume1, Issue 4".
I selected this pattern to show you because it teaches several things about working with hair. This is a very difficult pattern for many tyers so don't become too frustrated if you aren't able to master this pattern right off. I think it is an excellent design and has some great looking qualities.
My pattern is a bit smaller, more dense and contains different materials than the pattern created by Miller. The original Polar Muddler was made of polar bear, which is almost impossible to get. If I had some, I would also feel bad about using the stuff and I would prefer not to use such a rare material just to make some fishing flies. I substituted bucktail and used all of the most common basic materials so I don't think you should have a hard time finding the stuff to make this.
|
|
|
|
|
|
|
|
|
|
|
|
|
|
|
|
|
|
|
|
|


Step 1 Begin by putting the cone on the hook. Slide the cone with the narrow end over the hook point first.
Step 2 Start thread and wrap thread back along the top of the hook shank. Stop when you get to a spot even with the point of the hook.
Step 3 Next I cut a bundle of bucktail about the size of a pencil, maybe 20 fibers or so. I use a giant saltwater/bucktail hair stackers to even the ends. (In this case, my stacker is a Terra stacker from Hareline) I drop the hair in the flared end and tap it on the table top. Next I slip the top piece up while tilting the base.
Step 4 As I pull the hair out of the stacker, I move the end over. I will grab the evened bundle out of the top end. If you mess this up, put the top half back in the bottom, tap on the table a few more times and try removing the hair again.
Take the bundle and measure the length of the tail. You want to set the tail equal to the hook shank. Miller's original had very long tails (which you might try). In any case my tail is equal to the hook shank and wrap the fibers along the top of the hook shank. I clip the end tight the edge of the cone and wrap over the butts to level out the body. If you make the body lumpy or odd shaped, the tinsel used in the next step won't cure a mess of a body. Keep the body level and even.
Step 5 Next I tie in a strip of tinsel about 2 1/2" long. Catch the strip with your thread and tie flat along the shank of the hook. It helps to pull back with your other hand to add tension and keep the tinsel tight.
Wrap the tinsel forward in even touching turns. I use my other finger on the back of the hook to keep the tinsel from slipping. When you get to the head, make a few wraps and tug on the tag to snug it up. Clip off the tag and make a few wraps to cover the cut end.
Step 6 Cut a small bundle of Krystal Flash by folding it over several times. I fold about 5 strands, 4 times and cut the loops. I cut the size of the bundle down by using only about 7-10 strands. Tie the bundle on top of the hook so that the tips touch the end of the tail. If your flash is too long, you can pull it forward or nip the ends off with your scissors.
Step 7 Cut another bundle of bucktail. Again even the tips by stacking the hair. Tie the wing on top of the Krystal Flash and make sure that the tips of the wing are even with the end of the tail. This will help your fly look neater.
Step 8 Tie in one hackle on each side of the wing. You want the tips of the hackle to touch the edges of the wing with the good sides facing out on each side. In this case, I tie in one side, then the other. I also look for hackle that has round tips. I use Grizzly Capon or Saltwater capes since the hackles have round tips. You can also use regular neck hackle or strung grizzly variant saddle hackle. Some of the tailing material on some necks such as spade hackle is ideal for the wings. Pointed or narrow wings look bad, try to use about a size 6-8 hackle if you can. In a pinch just omit this if you wish.
After I tie the wing in, I pull all of the fibers together and pull the wing over the cone. I want the wing to slant up. Make a few wraps and the wing will be locked in.
Step 9 Next I cut and clean a bundle of deer belly hair. I stack it to even the ends. I tie in a bundle about the size of pencil on top of the hook. I leave about 1/2" sticking out as a collar and tie the tips facing the tail.
Step 10 I make about 2-3 firm wraps with the thread. If you find that you are breaking the thread off, you can use a heavier thread of say 3/0 before you begin making the head. Most likely if you break the thread, you are pulling too hard or you are nicking the thread against the hook point.
Step 11 Next tie another bundle on the bottom side of the hook. You want the tips of the second bundle to be even with the tips from above.
Step 12 I make several tight z wraps by wiggling the thread back and forth a bit and making firm wraps. The uneven, odd shaped wraps will force the thread into the hair and lock it down firmly. I then make several wraps behind the cone and force the thread to lock the collar back. It helps if you stroke the hair by making a small circle with your right hand, while pinching the tail with with your left. If you do this the bundle will flare out.
Step 13 Next make a whip finish around the cone. I make a large triangle and whip around the back of the cone. Be careful or you can cut your thread by pulling against the edge of the cone. Cut the thread off after you make your whip finish.
Step 14 Again stroke the fibers of the hair. I try to get the longer hair to stand out at right angles. Next I use a pair of curved scissors and clip the hair in a circle. The smaller collar hair is compressed against the body and is shorter. I clip only long hair that sticks out. I tied commercially for many years and I can make a small round head in about 10 cuts. Nip the packed hair tight. If the head is uneven try making a small twist to cock the head even. I add some drops of head cement to the spun hair. This is another secret to making it " feel" dense. I use glue... so that is how you get a really tight head? Yep! You cheat and glue it.
About Mike Hogue:
Mike is the owner of Badger Creek Fly Tying. You can reach him on the internet at www.eflytyer.com. Mike lives in upstate NY with his wife, 3 cats and yes 5 dogs. You can often find him at fly fishing across the Northeast. More about Mike and his GFF articles here.
More conehead muddlers
- Log in to post comments