
It's a beadhead, no, a hare's ear, no... How about a flashback pheasant-tail... could be sort-of-a prince nymph, maybe a copper-john-alike or a biot-bug; whatever it is, it's versatile!. This is the Universal Nymph by GFF partner Steve Schweitzer.

The Universal Nymph takes signature attributes from the prince nymph, hare's ear, a beadhead, a pheasant-tail and a flashback to create a truly versatile searching nymph.
Some nymphs work, some nymphs don't. It depends on the water you are fishing and the bug life the water sustains. But in nearly all water worldwide, a versatile searching nymph pattern is hard to beat when you scratch your head on what to use. Enter the Universal Nymph. We in the Labs at Global Fly Fisher did some expirimenting by taking the most famous parts of the world's best generic nymphs: hare's ear, prince nymph, biot-body, copper john, flashback, and pheasant tail. What did we get?! The Universal nymph! Certainly we aren't the first to figure this out, but we thought it would be nice to be the first to share our latest creation from the Lab!
While the fly looks complicated, it really isn't. Follow along in the steps below and learn a few tying secrets on how to make your nymph tying better.

In addition to a hook and a bead for the head, the materials are simple: fine copper wire, some sort of small brown feather (a partridge feather is shown stripped and prepared for tying to the middle-right), holographic mylar, golden goose biot, and some rabbit or squirrel fur dubbing.
The Universal Nymph Materials
- Nymph hook
- Brown 6/0 thread
- Bead for head (optional)
- Natural rabbit or squirrel dubbing
- Grouse, partridge or chinese hen feather
- Holographic or pearl mylar
- fine copper wire
- Gold goose biot
Step 1.
TYING TIP
To speed the tying process, prepare 6-12 hooks with beads all at once.
In our tying example, a #14 hook, de-barbed, is used. Place a bead (if desired) on the hook prior to tying on the copper wire. Tie the copper wire on the top of the hook. This will aide in wrapping the wire over the biots as shown in the next few steps.

Step 2.
TYING TIP
Taper your dubbing to get a tapered body. Try not to overlap dubbing turns as you build the body. This will only make it harder to pick out later.
Using hare's ear or hare's mask dubbing, dub a tapered body directly up to the bead. Use a little extra dubbing next to the bead to ensure it won't move about by 'wedging' it in place.

Step 3.
TYING TIP
Biots can be tricky to seat correctly the first time. Be firm with your thread wraps using ample tension to seat the biots correctly the first time.
Match two biots together so the points flair outward. Place them on the side of the dubbed body, pointing rearward. Tie in at the bead to secure the biots in the proper position.


Step 4.
TYING TIP
There is no need to wrap the fine wire tightly: it's purpose is to hold the biots in place and provide a ribbing effect.
Now, wrap the wire forward in a palmered fashion to secure the biots to the dubbed body. Trim off excess biot.

Step 5.
TYING TIP
Proper nymph proportion suggests that the thorax should start at the mid-point of the hookshank.
Using holographic mylar, wrap a small piece to the top of the dubbed body from the bead back to the mid-point of the hookshank.

Step 6.
TYING TIP
To obtain a bushy dubbed body, loosely apply dubbing to the thread.
Loosely dub a thorax using dubbing from a hare's ear or hare's mask. Pick it out using a toothbrush or bodkin to desired "buggy-ness".

Step 7.
TYING TIP
Prepare a few grouse feathers in advance to have them ready when you need them. See the materials picture above to get an idea on how to prepare the feathers.
This is arguably the most difficult part of the fly. Use a prepared grouse (or suitable hen feather) feather as shown above in the materials listing section. Place the 'V' of the feather straddling the beadhead as shown in Step 7a. Secure it in place with 2 firm wraps. Now, pull the feather stem away from the beadhead to obtain the length of leg hackle you desire as shown in Step 7b.. There really is no wrong or right length here, just personal preference. Trim off excess feather and stem.

Step 7a.

Step 7b.
Final Step.
TYING TIP
Apply a drop of thin head cement on the UNDERSIDE of the fly to secure the thread wraps. Placing a drop on the top mylar will do little to making a durable fly.
Bring the mylar over the top of the dubbed thorax, tie off at the beadhead, trim and secure with a good whip finish.

The finished Universal Nymph.
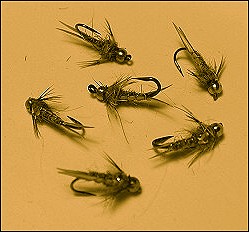
A batch of Universal Nymphs looks downright buggy looking. They can easily imitate a stonefly or a mayfly, or, just be a really effective searching nymph.
- Log in to post comments


Always catches fish
Always catches fish for me, period, great lets see if theyre hungry pattern. Tie some and go catching!
It is nice to see an
It is nice to see an old pattern from my nymph box on the web. I can vouch for the effectiveness of this dressing from many parts of Europe, Iceland, Pharoe Isles, all over Scotland (the land of my birth till my mid forties), England, Wales and here in California. I would not feel right if they were not in my box. Fish them with confidence.
Can i buy these anyw
Can i buy these anywhere online??? i do not tie my own flies, and would like to purchase some of these
This was the only pa
This was the only pattern which caught fish. Tie in with Olive, Black, Natural hares ear, and Grey to match your local waters.
Again another well w
Again another well written arctile,This fly is the results of leaving a box of nymphs alone in the dark wierd things result from innerbreading you mix a biot bug with a flashback hares ears,and throw in a bead head and wala you have a universal nymph good fly use both the hare's ear,black,and dark olive version with great results keep up the good arctiles.
David Swart
Being a long time st
Being a long time steelhead nympher, I've tied a lot of beaded hares ear's over the years, but this was the first time incorperating the biot body and tail sytem of this pattern. That immediately caught my attention, and lucky enough, that of some recent fall rainbows also. I found it a great little twist on one of those days when "Old Reliable", was having a bad day. Keep a few around for lunker smallmouth bass as well! An easy to tie and durable pattern. Ray Baxter, London Ontario
I use it every fishi
I use it every fishing day, my first choice nymph pattern... and fun to tie. thank you.
I tied several of th
I tied several of this nymphs last year, and I'm just returned from one week of grayling fishing in Norway (Glomma). Together with a green parachute dry fly I catched app 40 graylings. This pattern will always have a place in my fly box.
Per Lundberg, Copenhagen, Denmark
This pattern has bec
This pattern has become my go to pattern. It has taken many fish from brown trout on Central Ohio, Rainbows in the Smokys, to Great Lakes Steelhead. You can't buy it and any shops and not many folks know about it. My fishing buddy and I never give out the pattern name or recipe. It is our secret weapon and hard fished waters. Thanks for the pattern.
Hello from Germany,
Hello from Germany,
i use this Nymph here in some streams in the Black Forrest, and it rocks the Brown Trouts are realy wild for this nymph!
TL Daniel
This has become a co
This has become a constant producer and a major staple in my box. As a trailer, I tie it with a glass bead. Slays them on the White River System
I stumbled across th
I stumbled across this pattern a couple of years ago and it has become my most productive nymph pattern. I use it on large tailwater streams in georgia and small wild streams in the southern appilachians with equal sucess. Now i'm going to try your blackout kluting on Largemouth and other warmwater species.Got to love the flow of knowledge the web provides ,thanks for your part in that and keep up the good work.
Mike Duncan Atlanta,Georgia
I stumbled across th
I stumbled across this pattern a couple of years ago and it has become my most productive nymph pattern. I use it on large tailwater streams in georgia and small wild streams in the southern appilachians with equal sucess. Now i'm going to try your blackout kluting on Largemouth and other warmwater species.Got to love the flow of knowledge the web provides ,thanks for your part in that and keep up the good work.
Mike Duncan,Atlanta,Georgia
This is a great look
This is a great looking nymph. I just tied up a bunch, and they look like they will work well. Nice job on the instructions as well.
I tied some of these
I tied some of these up, went fishing on the South Fork of the Snake River south of Jackson Hole, Wy and caught quite a few fish in an afternoon. Nice pattern.
this looks like a gr
this looks like a great pattern! I will tie some!