In the most simplistic terms, a flytying kit must only have the tools and materials necessary to tie the flies you may use on a single trip or a single river. However, like most of us, a travelling flytying kit consumes more space than 26 high-schoolers crammed in a Volkswagen Beetle.
What you should really pack
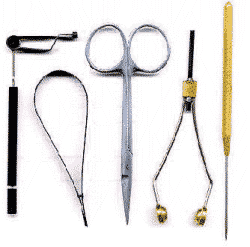
The basic tying tools: rotating hackle pliers, tear-drop hackle pliers, serrated scissors, thread bobbin and a dubbing needle. In the most simplistic terms, a flytying kit must only have the tools and materials necessary to tie the flies you may use on a single trip or a single river. However, like most of us, a travelling flytying kit consumes more space than 26 high-schoolers crammed in a Volkswagen Beetle.
Of Dresses And Bugs
 Before I begin, let me divest some prerequisites. This article isn't for those who have the inane desire to hold a size 18 hook in hand and fasten hairs and feathers with thread the diameter of human hair. If you are such a person, a flytying kit probably isn't of much interest to you. This article is for those of us who "accessorize", "coordinate", and "collect"...for those like me who want to make sure all materials are appealing in color and consistent in property. Essentially, fly tying is like indulging in women's fashions; therefore, don't ever scorn your wife for wanting to color coordinate and accessorize. She just wants to "Match the Patch" and look her best. Kinda like you do with bugs.
Bag 'Em, Danno
First of, you will need something to stuff and carry all of the paraphernalia I am about to mention. You don't have to be elaborate. How about a paper grocery bag? Don't laugh. I used one for over a year, until I began to loose spools of thread and tying tools through the worn paper. My brother, an aggressive business person and aspiring executive, carried his work papers and MBA studies in a paper bag for years until he broke down and purchased a real briefcase. It must run in the family as now his little nephew, all of three years of age, can't leave the house without his paper bag with all his "stuff" in it. Seriously though, I wouldn't recommend a paper grocery bag, but something just as simplistic could suffice. An old cloth book bag, an old briefcase, how about a shoe box, or a cigar box. The size of your kit case is just plainly decided upon how much stuff you want to carry.
Let's look further.
ToolTime
You need tools to make your flies, unless of course, you tie with out a vise or bobbin. Basic tools need not take up much room, and shouldn't for that matter. Leave room in your kit for the most important stuff, hooks and materials. All of the tools listed below fit into a legal letter-sized zippered cloth pouch I have. Tools don't take up much room. The basic tools you might want to consider:
- Vise. I pack the same one I use at home, a Renzetti Traveler. Look for something that can break down into a few pieces or is small enough from the git-go. A C-clamp model is preferred versus a model with a heavy base. Avoid adding too much weight to your kit, you just may want to pack it in your vest (or a portion there-of) for a day-long pack into God's Country.
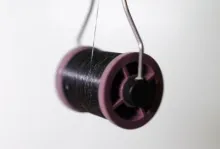
- Thread Bobbin. Just one small one will do, nothing fancy.
- Bodkin Needle. Again, a needle is a needle, nothing fancy. Tyers Hint: Slip a small piece of cork on the end to prevent the needle form sticking through your kit, and, as you are reaching in for something, to prevent a nasty little surprise.
- Hackle Pliers. I have some with rubber tips to grasp the material better, but they are bulky-big on the tips. I have some that could pick a single fiber from a strand of peacock plume, but they tend to sear or break materials. Your choice, there are lots of styles on the market. It doesn't hurt to carry more than one. Take two, they're small.
- Scissors. Generally, I suggest affording the best pair one could muster up the coinage for, but some time ago, I fell into the disposition that one should only pack what one is willing to lose. Then, I had a change of heart. Why should I construct my tying kit of inferior tools, why should I not be able to tie with the same quality gadgets as what I have at home? So now I pack quality scissors. I do suggest one tidbit, however. Pack the ones with micro-serrated edges. You will tie in the most awkward of spots at times, and having a pair of blades that will assist you in grasping the materials as it cuts could be a blessing. Remember, you will not be at your tying bench where you have the comfort of performing precise "fly-surgery"...with no wind.
- Head Cement. I have found that "Dave's Fleximent" is about my all around favorite. I have
thinned it out somewhat so that it can be applied in micro-amounts. Another suggestion may be to carry clear-coat fingernail polish. It makes great shiny finishes on fly-heads and is a quality fixient for applying to turkey feather shell backs such as on the hare's ear nymph. Mark Kettlesen, one of the finest salmon fly tyers I have seen, buys two bottles of Sally Hansen's Hard As Nails. He empties half of one and fills the bottle with mineral spirits, leaving the other bottle at full strength. It thins the fixient and makes for a fine pre-coat to the full-strength variety. It also soaks into the thread wraps better.
The rest of the gadgets mentioned are only extra goodies you may want to consider packing. They sure as heck make
tying easier, but aren't always used for every situation.
- Dubbing Twister
- Velcro Dubbing Teaser
- A Pair of Needle-Nosed Pliers to De-barb Hooks
- A Toothbrush
- A Razor blade. Used to trim spun deer hair or other material where a precise cut is required. Refer to my suggestion on how to travel with razor blades in your tying kit, later in this this article.
- A Hair stacker. This tool isn't used too frequently for the flies you would tie from a portable tying kit, however, if you own a small one, you may want to pack it along. It could come in handy if you need to stack hair for a Elk Hair Caddis or the like. I will always pack a small brass one given to me by Mr. George Cik. It's a beautiful little thing, made with precise care and works like a charm.
In case you don't know, George is an extremely inventive & creative tyer. His tools match his craftiness at
the tying table. One of his more well known tool creations is used by most all deer-hair tyers, "The Brassie". It's a tool I use every time when I sit to tie a few packed deer-hair patterns.
Material Possessions
FUR
- A Section of Hare's Mask
- Squirrel Tail
- White Calf Tail
- Zonker Strips (center cut rabbit strips: black, brown, natural, olive, rust)
- Natural Deer Hair - Long for spinning and short for hair wings like a caddis or compara-dun.
- Natural and Bleached Elk Hair
FEATHERS
- Fine Quality Necks, or a selection of different sized feathers plucked & matched according to size (grizzly, furnace, black, white, dun)
- Pheasant Tail Feathers
- Partridge or Quail back feathers
- Marabou (black, brown, olive, white)
- Peacock Herl
- Turkey Tail Feathers
- Goose Biots (black, brown, olive, rust)
MISCELLANEOUS CRAFT MATERIAL
- Gold Tinsel (oval, flat, twisted rope)
- Brass & Copper Bead heads, & lead dumb-bell eyes, varied sizes
- Red yarn
- Krystal Flash (pearlescent)
- Brass & Copper Wire, a few different sizes
- Scud Back, or any substitute flexible rubber-plastic material (olive, brown, clear)
- Antron yarn (cream, brown, tan, rust, olive)
- Pearlesent mylar
OTHER "NICE-E-TIES", BUT NOT "NECESSITIES"
- Larvae Lace (black, brown, clear)
- Rainy's Float foam or the craft foam mention above
- Wood Duck or substitute
- Guinea feathers
- Turkey Flats
- Micro-fibettes
- CDC
DUBBING MIXES
I could create a spin-off article solely devoted to dubbing and blends (& probably will someday) but I will keep to the basics for purposes of this essay. One can carry many dubbing blends, varieties, colors, and the like, however, there are a few mixtures that are well worth the space in your kit. If you can only carry one container, consider SLF. SLF comes in a rainbow of endless colors and a myriad of consistencies. From heavier fibers for large bodied salmon flies to micro-thin fibers that dub onto a size 22 hook with ease, SLF could easily be a tier's only choice for dubbing. If you wish to carry other dubbings, consider colored mixtures including rabbit fur dubbing & squirrel fur dubbing. Rabbit and squirrel are too hard to beat when it comes to natural fur dubbings.
Natural Colors
- Black
- Brown
- Rust
- Olive
- Cream
- Near-White
- Grey
- Caddis Larvae Green
- Pale Yellow
- Dark Green
Spectrum Colors
- Red
- Orange
- Blue
- Yellow
- Pink
- Green
- Purple
With the above colors of dubbing, you can custom blend almost any shade or variant needed on the stream or while
traveling. It really isn't necessary to travel with your whole dubbing collection when just a few basic shades are required. Even the above list may be over-doing it slightly!
TYING THREAD COLORS
Generally, spools of size 6 & 8 will do the trick. Phil Strobel suggests picking your favorite 2 colors and
consider the rest extras, packing them only if you have room.
Common Tying Thread Colors To Pack
- Olive
- Brown
- Black
- White
- Cream
- Red
- Grey
HOOKS
This is another area where I could follow a tangent to never-never-land. Suffice it to say that an assortment of dry fly, wet fly, scud, and streamer hooks to suite your pattern choices should be packed. I use a Tiemco Hook Organizer to store and index all my hooks. All I have to do is pick it up from my tying bench and put it in my tying kit. I have seen others use small stackable containers or old film canisters.
Gadget Boy
I have collected a couple ideas and have adapted them to my tying habits.
- A combo- material brush/dubbing teaser/hook sharpener/bodkin. Sharpener: Glue emory paper on the flat handle
of a toothbrush. Dubbing Teaser: Glue the hook-side of Velcro to the backside of the toothbrush head. Bodkin: Drill a hole in the end of the handle, insert a sturdy darning needle. Epoxy in place. - A Safe Razorblade Caddy. Take one of those flat, flexible pizza-shop magnets from your refrigerator and cut it in half. Place your razor blades between the two magnet halves. The magnetic surfaces keep those pesky razor blades from disappearing in your tying kit and causing havoc with your fingers.
- White Foam Surface. I recently have stumbled across the sheet craft foam used in hopper and ant patterns as being a great surface for the traveling tying kit. I have cut a white, 11 x 17 inch sheet in half and now use it for a matte under my tying vise. Being white, it provides a perfect non-glare bright, backdrop to tie against and once you have finished your fly, you can stick it in the foam surface so the wind doesn't blow it away or you don't brush it off onto the ground, making it hard to locate. It's also very flexible, so you can fold it up and pack it away in your kit without taking up too much space.
By the way, the white craft foam can be had for a mere $0.79 cents per sheet at any local craft store and comes in many bright and earth-tone colors. It also makes an adequate fly box foam replacement when you're in a pinch. There could be considered a downside to the white tying foam, it packs a lot of static. I personally don't mind static, as it aids in holding materials in front of me as I tie, (especially outdoors), however, when it comes time to clean-up, one may not appeal to the "sticky" nature of the static. It's your call.
Invest In Baggies
This how-to article would not be complete without discussing the packaging, storing and quantities of the materials you choose to pack with you. Without a doubt, zip-loc baggies are the most useful, convenient, and inexpensive of storage devices. Be sure to buy the ones that have the little white patch of white so that you can write on the baggy, indicating the contents inside. I know, some of you are thinking, "the baggy is see-thru, why would you want to write the contents on the outside?" If you're extra-finicky, you will probably have your feathers separated and sorted by size ahead of time, so by writing the sizes of hackle feathers on the outside of the baggy takes the guesswork out later.
WRAP-UP
Finally, you don't need to pack a heck of alot of each material. Think of it this way: an average tyer can kick
out 6-8 flies per hour. If you tie for one hour on stream and one hour in the hotel room each day you are on a trip, the equates to only 12-16 flies per day. On a five day trip, that equals 60-80 flies for the whole trip. Figure how much material you would need for 12 flies per day. It isn't much, so don't get greedy on your material quantities. Generally, cutting your fur patches in half, leaving one at home and one in your tying kit works well. Plus, you'll always have some of your material at your tying bench without robbing your tying kit. Same goes for feathers and craft material. Take just a small portion of each material for your kit. Generally, most materials can be easily portioned off without damaging the quality of the originally material. Below are some simple rules to follow when completing your tying kit:
- Store hooks in a small, hard-plastic, compartmentalized and secure container, like a midge fly-box. Label the
outside of the box indicating the hook size and style. The last thing you want are hooks
escaping in the innards of your kit. - Select prime feathers from your necks in sizes 10-18. Store them in baggies. Whole necks take up too much room in a kit.
- What you put in your kit, leave in your kit. When it comes time to quickly pack for a trip, you won't need to
scurry around looking for materials. - Replenish the materials once you use them.
- Don't take from your tying kit to supply your tying bench. Always treat your bench as the supply depot.
- Pack material to tie no more than two-dozen flies per day.
- When wondering whether or not you have all the material you need, think of your favorite 12 patterns or so, then be sure pack those materials. Add in extra materials for those flies if you plan to fish them frequently.
- Log in to post comments



thanks very interest
thanks very interesting and helpful