
When stacking materials it is important to consider it as consisting of more than just one process. There are several steps involved: material selection, cleaning and preparing, selecting the right tool and performing the stacking process itself.
When stacking materials it is important to consider it as consisting of more than just one process. There are several steps involved: material selection, cleaning and preparing, selecting the right tool and performing the stacking process itself.
By optimizing each step the sometimes frustrating task of stacking fly tying materials can routinely become a success.
In this article we will cover each step and try to indicate places where a little investment in time can give you much better results.
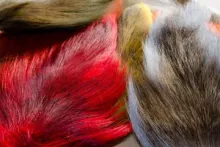
As hair is the most commonly stacked material and knowledge of the material is eminent in any kind of fly tying, we will start with a small introduction to hair.

If you want even collars and wings you have to learn to understand and control hair stacking.
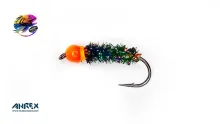
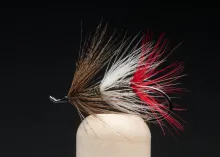
Muddler Minnow tied by Steven Fernandez.
Understanding
Stacking is a method of evening the alignment of various hairs, feather parts, or perhaps other linear fly tying materials. This rearrangement may be done with like or unlike materials. Most hair types that are stacked come from animals that collectively are referred to as ruminant mammals, or, simply put, those that chew their cud.
These include
- The Cervidae family - deer, elk and moose
- The Bovidae family - cow, ox, sheep, goat, and antelope
Though numerous materials are commonly stacked other than hair from these family groups (i.e., feather barbs, rodent guard hairs, etc.,) the preparation and application of the ruminant animals covers most of the problems that the fly tier will encounter.
Scales
All hairs have "scales" on the outer surface of their shafts. These scales are so unique from one animal to another that the Federal Bureau of Investigation (among other organizations) uses them for scientific identification of animal species that have relationship to an investigation.
As each hair shaft grows out of its hair follicle, these plate-like structures are laid down on the outer cortex of the shaft in particular patterns. I recommend that you add to your library Fly Tying Methods by Darrel Martin (ISBN 0-941130-40-1.) Among the wonders found in this book are microphotographs of a variety of tying materials that aid greatly in understanding why they do what they do. Note pages 75 and 76 where the scales on beaver and whitetail deer are shown. The difference between the two animal's scales is impressive. Beaver hair has somewhat random plates wrapped about the shaft. Deer hair scales look like fish scales, and lay on the hair from root end to tip essentially as a fish's scales lay on it from head to tail. (Note the illustration.) Why are they there? It is thought that perhaps the scales help to protect the skin from foreign matter. Since scales bevel away from the hair shaft in a direction toward the tip, this arrangement would hinder dirt from working down toward the skin. For dirt that did manage to get down to the skin, the scales would help to migrate it toward the hair tips and off of the animal.

Scanning electron micrograph of a hair showing the scales. The tip of the hair is upwards in the picture.
To prove to yourself that scales are present, hold a single, clean Mule Deer hair between the thumb and index fingers of both hands. Under equal pressure, but not sufficient to break the hair, slide your fingers holding the hair away from one another. You will note that the hair remains with the fingers holding the root end. When demonstrating this many fly tiers have suggested it occurred because of the "hair taper" or "hair hardness near the tip." They are then instructed to trim off the hair tip past any visible taper and repeat the process. They discover that the hair still comes free in the direction of the now trimmed tip, not the root end. This graphically demonstrates the presence and direction of the scales. Here is another experiment that allows you to listen to the scales! Hold another clean Mule Deer hair firmly by the tip adjacent your ear. Slide thumb and index fingers of the free hand fairly gently over the hair of the scales toward the root end of the hair, "going against the grain." You will be able to hear the squeak of the scales as your fingers catch against them. If your reverse the hair end for end and repeat the process, there will be silence as your fingers slide over the scales in a direction of no resistance.
If the point of this article is to discuss stacking hair, why waste time discussing scales? Scales have interplay in various aspects of fly tying. For example the reason that natural fur felts is a combination of three factors:
- scales
- structure of the fibers (ribbon-like and soft versus round and ridged)
- denier (weight for a given length) or simply put, hair diameter
Realizing that this is an article about hair stacking, not dubbing the question is still remains: why waste time discussing scales? (I just couldn't resist throwing the dubbing stuff in!) Scales on hair provide numerous disadvantages and few advantages for the fly tier. More will be discussed with specific materials, but one item is appropriate to mention here. A reason, but not necessarily "the" reason, that some hair, even after cleaning, is difficult to stack (i.e., bucktail, calf) is because the existence and direction of scales on the hair is not taken into account. The resistance of individual hair's scales against adjacent hairs slows the stacking process. To verify this take a clump of clean bucktail and attempt to stack it. After 2 or 3 taps with the stacker observe your results. The hair will be moderately stacked, but likely not terribly even. Now take that same bunch of hair and invert the direction it is to be placed in the stacker. If you choose mess the bunch up a bit so that the root ends are definitely misaligned and then restack. After 2 or 3 taps take a look. The root ends will be just as even as they were when you first trimmed them from the hide. Why did the hairs slide easily against themselves in the direction of the root ends but not as easily in the direction of the tips? A major contributor is scales.
Stackers
I have a preference for closed end stackers. Years ago I purchased a "Laggie's Stacker" made by Jordan Lagman of Southern California. Since then I have tried numerous other stackers such as those originally made by Ed Gausdale and others that are collectively referred to as "open end stackers." Justification for the open end stacker as I understand it is:
- the tips go into the fluted end first and
- there is no limitation to the length of the hair.
I find difficulty with naturally uneven hair (i.e.,bucktail, elk neck and body) when putting the tips first into the stacker. I prefer the root end first approach since the one thing I know I will always have, at least initially, is a straight cut across the root ends of the hair. This even hair is easier to put into the stacker from the bottom of the top tube rather than from the flared end. With the closed end stacker there is no flared end, so obviously everything has to go in the bottom, thus the open end stacker has no advantage here. But isn't there a problem with stacking hair too long to fit in a closed end stacker? I have not had a problem since I never worry about stacking hair longer than my stacker will hold. If I want such hair to be evened for perhaps a large saltwater fly, I simply "hand stack." (More on this process) With such flies there is generally no reason to stack the hair perfectly even. If such hair was stacked in an open end stacker the hair would fly across the room since it would have to be vigorously pounded to even begin to stack most hair of this length against the direction of the scales.

Stackers:
closed model(left)
and open end model (right).
The dotted lines indicate how deep the top part will go into the bottom.
There is no perfect stacker, but there are some improvements that could be included to make the process more efficient. The most useable stacker for me would meet the following criteria:
- It would be made of a material that would resist static
- It would be made of hexagonal stock or something similar so that it would not roll off my tying table
- It would be closed end, not open end.
- It would be bored out of single pieces of stock for both the top and the bottom tubes.
I have a poor quality closed end stacker made from tubular aluminum. Each end was closed by pressing in a round disk of aluminum. The fit is quite good, but not good enough. Hair tips will often catch in the very narrow gap between the wall and the end cap of the bottom tube. When the top tube is removed, the single hair or more that occasionally is captured unstacks the rest of the bunch. Very frustrating! - It would have an adjustment for the distance that the top tube approaches the inside floor of the bottom tube. There is a problem associated with stacking very short hair such as Blessed Bok and Mouse Deer: the clump being stacked will often fall out just as the stacker is opened. The reason for this is simply that the distance between the floor of the bottom tube and the lowest point that the top tube enters the bottom tube is greater than half of the overall length of the clump being stacked. The principle of a lever and fulcrum prevails. As the top tube is removed, the weight of the hair extending beyond the end of the top tube is greater than what remains in the tube. Just like the fat kid outweighs the skinny kid, the tetter-totter goes down! An adjustable feature to allow the top tube to more closely approach the floor of the bottom tube would alleviate the problem. An adjustable stacker would allow the option of increasing the distance that the top tube approaches the floor of the bottom tube. For longer hair, this would allow the clump to extend further out the bottom of the top tube and be easier to grasp.
- The inside and outside diameters and overall length are not as critical as the aforementioned, but should be approximately .5" (14mm) inside diameter and 4.5" (115mm) overall length for reasons of balance, hand-fit, weight, and practicality. The floor must be absolutely flat and at 90 degrees to the vertical walls. The fit of the top tube into the bottom tube should be slightly sloppy. Otherwise when the top tube is pulled from the bottom tube a vacuum effect will unstack the hair. Also a slightly sloppy fit would expedite placement of the top tube into the bottom tube.
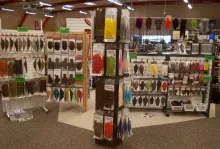
Besides the tremendous array of commercial hair stackers available, simple devices found around the home can serve as stackers. A straight edged narrow glass tube or bottle is fragile, but works well as long as the hair and bottle are clean. Tap the bottle so that the hair falls out against a flat surface such as a flattened palm, credit card, cardboard, or some other object that you can hold. (I have not been as successful when stacking against a table top or other stationary surface.) Aluminum or copper pipe also works well as a stacking tube. Some prefer to stack hair in spent brass ammunition cartridges, though I have not tried this. Plastic bottles (i.e., pill bottles, Chap Stick tubes, etc.) are not as desirable due to inevitable static problems. No matter what tool you use, if you live in an area of high humidity or are tying on the day a storm comes through, you will have static problems, most certainly with the hair and perhaps the tools as well. It is helpful to have a can of antistatic spray (the brand I use is safe, but avoid eye contact) to apply to hands, underfur comb, and stacker. I prefer not to spray the hair itself for fear of a residual scent or perhaps affecting the hair in some other way. Spraying is simpler and more effective than trying to rub cloths dryer anti-static sheets on your hands, comb, and stacker.
Stacking process
All stacking should be done with the stacker tilted off vertical. Hair that is stacked vertically will usually fall unevenly to the side of the stacker's top tube when the stacker is laid horizontally to remove the clump. If stacked at 60 degrees or less, during the process the hair will lay along the lower edge of the stacker. When laid horizontally to remove the hair it is all appropriately aligned along the lower edge. Initially stacking can begin with the stacker vertically if so desired, but always end with at least a few taps at 60 degrees or less. When I see someone vigorously pounding a stacker in a vertical position, it is often due to the tier attempting to stack too much hair or dirty hair that requires such treatment. Adequate amounts of clean hair do not require a firm hand.
When stacking any ruminant animal's hair, first remove the underfur as well as the shorter and smaller diameter hairs, for which I prefer to use a fine tooth comb. Make an initial stack. After the initial stack, remove the clump and hold it by the hair tips. Remove any remaining shorter and smaller diameter hairs that did not stack. Smaller diameter hair usually does not stack because it is physically lighter in weight than adjacent larger diameter hair, even when the hairs happen to be of similar length. Now trim the root ends to a uniform length of at least half again as long as you will ultimately need. Check for and remove damaged hair (i.e., broken tips, blood damage, etc.)
A problem may be encountered when removing unwanted hairs from the clump by their tips. Attempting to slide them out of the now even stack causes the scales to catch adjacent hairs' which unstacks a portion of the clump. When feasible always remove unwanted hairs by the cut ends so that the direction of the hair scales do not interplay with the hairs not being removed. This is appropriate when it is discovered that the clump is too large and needs to be reduced. Obviously this approach is not practical when only removing specific hairs such as those with broken tips. The only solution then is to be careful and remove only one or at most two hairs at a time. The more removed at once, the more likely the stacked clump will become uneven.
Next with hairs that are now almost uniform in diameter and weight as well as length, with a more gentle hand restack the hair at 45 degrees or less; less being preferable. Move the stacker to a horizontal position without rotating the barrel of the stacker. Rotating it will roll the now carefully aligned hairs and very likely misalign them. Now slide the bottom tube away from the top tube. At this point the hair is essentially even. If it is not even enough, remove the clump, trim the root ends evenly one more time (do not trim too short for the fly being tied) and make a final, gentle stack. Now you should have very even hair, but it may be somewhat fanned out across the lower curve of the inside of the top tube.
To remove the stacked clump, first, if necessary, carefully gather the hair into a more compact bundle. If removed as a loose bundle the clump will be fanned to a point that it is difficult to work with. Examples of flies that may require such an application include the Royal Wulff, Elk Hair Caddis, and Comparadun. Then again there are some flies that in application require the hair to be broadly fanned side to side, such as with hair "stacked" on top or perhaps beneath a deer hair bass bug. (Here "stacking" has reference to overlaying hair clumps of different colors on top of one another in order to achieve a banding of colors different above from those below such as with a bass bug frog or the head of a Whitlock Sculpin.) Here the fanned clump in the stacker will be removed as it is to retain the splayed arrangement of the hairs. This "stacked" hair on the bass bug is applied over a wide area where that with flies such as the Elk Hair Caddis, etc. the hair is applied over a narrow area. Be sure to pull the clump out of the stacker with the hand that will ultimately hold the hair when it is tied in. Any switching of hands is likely to unstack the clump.
Deer, Elk, and Moose hair
Stacking hair from animals of the Cervidae family often presents a unique problem. These animal's hairs are usually unidirectionally curved to lay on the animal. (All such animals have swirls of hair over their bodies, but for our purposes we will consider it unidirectionally curved for the amount required in a single fly.) Once stacked, these curved hairs have a mind all their own: some hair will lay along the edge of the stacker, some will point right, some will point left, and some will point up. Because of the multi-direction of the tips the hair may be misaligned as the clump is removed from the stacker. Special handling is called for.
If possible, select hair to be stacked that only has a moderate curve. The more profound the curve, the more difficult to stack. Stack according to the description under the subheading, Stacking, to the point of removing the hair from the stacker to be applied to the fly. Now we must deal with the multidirectional curvature of the individual hairs. With the clump extending just out of the bottom of the top tube, gently roll the hair between your thumb and index fingers allowing the hairs to align. With the hair still in the top tube, make a final stack against the palm of your hand, a 3"x5" file card, or some similar surface that you can hold up to the bottom of the top tube. (I prefer to use the palm of my hand.) This evens the hair once again, but now with a uniform curve. (Note the illustration.) After aligning the tips by hand into a uniform curve, you can attempt to restack with the top tube once again in the bottom tube, but the results are usually not satisfactory. The more extreme the natural curve in the hair, the more fruitless the effort will be.
With curved hair there are other considerations. Perhaps in your fly's application it does not matter what direction the hair takes on the finished fly. Perhaps a tidy curve is not even appropriate. Perhaps you don't care. If such is the case there is no need to worry about rearranging the tips into an even, natural curve, but extra care must be taken when removing the multidirectional clump from the stacker to avoid misaligning it. Perhaps the hair that fits your need is so curved that it demands some adjusting of the tips. With such hair the process described above resolves the problem. There is, though, another quick but temporary solution for solving the curved hair problem. After cutting the clump from the skin and before stacking, bend the curve out of the hair with your fingers. This bending/straightening process expedites stacking immensely. Initially the hair will look straight on the fly, but once the fly is exposed to steam, humidity, or water, the natural curve of each hair will once again return, and in whatever direction they ended up being tied in at.
Calf Tail and Bucktail Hair
When selecting bucktails and calf tails, it is wise to comb potential purchases to better evaluate hair quality. A matted tail that looks useless on first observation may be just what you are after once combed. Also be sure to comb the tails to untangle the hair before as well as after washing and drying. Finally, comb the hair once again at the tying table just before use. Combing allows the hairs to separate from one another for improved cleaning, drying, and selection of the clump. It also loosens up the clump so that the hairs are more free to stack.
Calf tail and most bucktail hair is crinkled in cross section creating wavy hair. Some tails will have straighter hair than others. Bucktails can sometimes have very straight hair. Some calf tails will have such curly hair that they are useless. (Hair straightening products used on human hair can help, but use with caution since they are caustic enough to actually damage the hairs, particularly near their tips.) Some tails, especially calf, may have as many as five fairly distance weights and lengths of hair in the same clump chosen to stack.
This means that most of the hair is wasted in the process of removing the shorter hairs prior to stacking since these shorter hairs simply do not have the bulk necessary to allow them to align with the others. Thus another reason to choose hair carefully in the fly shop before purchase. Also realize that there is no tail grown that will serve the needs of all flies. Select material that will serve specific purposes and/or fly sizes. Look for a wave in the hair that fits your needs, adequate length (sometimes hair too long is as useless as hair too short,) color (natural white calf and bucktail is often dull, but can be dyed fluorescent white,) reasonably even with unbroken tips, and does not smell horrible (some especially greasy skins begin to rot over time.)
Cleaning bucktail and calf tail is critical; particularly the former. The process for this is covered under the subheading, Cleaning Hair, but needs to be emphasized once again. Without cleaning, any hair that has a wavy configuration will not stack well or perhaps at all.
The process of stacking both bucktail and calf tail (as well as calf body) is quite similar. First of all, comb the section of the tail that will be used. After selecting and cutting out the clump, comb it both at the base (to remove the shorter, lighter weight hairs) and then, while holding the hair by the root ends, comb the tips. By cleaning the hair you have removed the problem that dirt contributes, but you still have the scales to deal with as well as the more visible problem of the waves in the hair. Combing loosens the hair fibers from one another allowing them to slide more freely. Hand stack the hair a bit, comb once again, cut the root ends evenly to help balance the hair's weight, and place the hair in the stacker. Make the first few taps vertically (to allow more room for each curly hair to move.) Take the hair out, trim the root ends, and return to the stacker. This time turn the stacker to the more conventional plane of 60 degrees and tap a few times. Check the stack and trim the root ends one more time. Now make a final, more gentle series of taps with the stacker at 45 degrees or less. Remove the bottom tube and check to see that the hairs are adequately evened. If so, remove the clump with the hand that it will be applied to the hook with. There may be some need for compacting of the bundle, but often nothing is required since wavy hair tends to cling to adjacent hair.
Hand Stacking
To hand stack hair such as calf and bucktail that is fine in diameter and wavy, the process is simply a matter of removing a few hairs at a time from the tip end of the clump, realigning them, and then removing some from the root end and realigning them. Start with the very longest hairs in the clump by carefully sliding out a dozen or so hairs by their tips, and then laying them back onto the main bulk of the clump. (It
must be an accepted risk that no matter how careful you are, with the scales to your disadvantage, some hairs ill be pulled out of alignment as the few hairs are removed.) Repeat this again, and again, until the only hairs that are not aligned are shorter hairs. Now hold the hair clump firmly by the extreme tips and slide all the shorter hairs out by the root ends. (Since the scales are to your advantage, they remove easily.)
Overlay them onto the clump aligning the longest of these shorter hairs with the longest hair in the main body of the clump. Repeat this process until eventually by working first with the longest hairs and then with the remaining progressively shorter hairs you have a reasonably even clump. Once I have begun to stack the shorter hairs from the root end of the clump, I find the process easier if I occasionally trim the longest hairs at their root ends so that the whole clump is more balanced.
Straighter hair is fairly easy to hand stack as well. Using clean hair, remove all the underfur as well as any shorter, smaller diameter hairs. Form a square opening between your fingers by placing the tips of your thumb, index, middle, and ring finger tips together. (For smaller clumps of hair use just thumb, index, and middle fingers.) With your hand held horizontally, lay the hair into the opening between your fingers. Next lift up your hand to an almost vertical position and allow the hair to slide between your fingers onto the flattened palm of your other hand. Bounce the hand maintaining the clump loosely and lightly allowing it to tap up and down on the surface of your flat palm. It is quite surprising what quality of stack can be accomplished with this technique.
Uneven stacking
Some flies require a slight unevenness to their tips. Consider the following from among several methods available:
- Choose hair that is adequately even on the skin. It may not need to be stacked at all.
- With hair of rather dramatically different length but similar diameter, stop after an initial, brief stacking.
- Stack the hair with the stacker vertically up to the final stack. When the stacker is laid horizontally to remove the clump, the hair will slightly misalign.
- After final stacking, rotate the stacker one revolution and then remove the clump. The more horizontal to inverted the stacker during this rotation the more misaligned the hair will be.
- After removing the stacked hair, roll the clump slightly between the fingers holding it. Another similar approach, but a bit more tricky is to push/pull your fingers holding the hair very slightly in opposite directions.
- Simply handling the hair will misalign it. Swapping the stacked clump from one hand to the other once or twice should do the job.
Cleaning hair
Regrettably little attention is paid to cleaning of materials used in fly tying. Students from material preparation classes that I have taught often come back weeks or months later with tales of how improved their tying has become now that they wash, dry and properly store their materials. In actuality their tying has not necessarily improved, but rather the materials they work with are now more manageable, thus making tying easier.
It is especially important to have clean hair if it is to be stacked. Hair that has dirt and natural oil present will not stack evenly without a great deal of hair stacker pounding and fiddling. By comparison clean hair is a pleasure to work with. When hair arrives in the hands of the fly tier, with the exception of tanned hides, you can be assured that little has been done to clean the natural dirt and oil from the hair. Assume that all hair is dirty until you do something about it. The dirt and oil combined act like glue holding each hair to the next. The amount of dirt becomes apparent after handling several pieces of hide and then looking at your hands. Pet a horse out in a pasture sometime and then take a look at your hands. Washing off the oil and dirt will improve each hair's ability to slide independently when stacked.


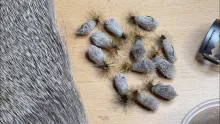
The same patch of material before (left) and after (right) a few seconds in the steam ray from a boiling kettle.
The simple process of washing hair with skin attached requires dish washing liquid, hot water, some towels, and a drying rack (optional). Soak the hair in hot, soapy water for at least 30 minutes with periodic agitation. Avoid washing in water hotter than hot tap water [140 degrees F maximum] to avoid skin shrinkage as well as possible damage to the hair or, for that matter, to your hands! Rinse completely, remove as much water as possible by compressing in an absorbent towel, and air dry. Never dry hair or feathers attached to skin in a microwave oven. It will cook the skin and shrink it dramatically. Somehow I suspect it is not terribly beneficial to the hair or feathers either.
As the piece dries, the wet skin will curl unless it is periodically hand stretched or dried between some sort of screen above and below that holds the piece(s) flat. Old oven racks or wood frames covered with chicken wire work quite well. A frame below and above with some weight to hold everything in place while allowing ventilation will speed the process. It may take a few days for the hair to completely dry. If the wire leaves depressions in the hair, simply steam them out. Drying a hard, less absorbent hair such as calf tail can be accomplished with a blow dryer, but the skin still must air dry for a period of a few days.
Perhaps the best example of a hair perceived to be difficult to stack is bucktail. Bucktail is really quite easy to stack when properly prepared. More on the actual process of stacking later, but in regard to cleaning, there are few materials that are more oily and thus dirty than bucktails, or perhaps more difficult to clean. It has been suggested that the ultimate degreaser is Ammonia. Stir approximately one cup of ammonia into a gallon of water. Soak the material in this solution outside for a few hours. Rinse thoroughly, wash in dish washing liquid, and rinse thoroughly again. To make the tail more useable at the tying bench, now is the time to do some trimming while the skin is still wet and pliable. First turn the tail skin side up. Using a scalpel or single edge razor blade, remove any residual fat at the tail's base. Next cut carefully through just the skin (avoid cutting the hair) along the light/dark line of skin on either side of the tail. The light skin holds the white hair and the dark skin holds the brown hair. On dyed tails the same light/dark applies, but may be less visible with darker colors such as purple and of course black.
The three pieces you end up with will increase the usefulness of the tail since there is no longer a concern of mixing brown with white hair. This also expedites the drying process. If curling is a concern, use drying racks.
Note: Even with the most careful cutting, some of the brown hair will cross over into the white and vise versa. A few moments with a pair of scissors now or after it has dried will save a great deal of effort later.

Selecting hair
ll flare, consider softer hair such as deer body, elk body, and antelope. But the application is the determinant factor. For example the same piece of hair will not react the same on a #12 Elk Hair Caddis as it does on a #18 Elk Hair Caddis.
Using the same piece of hair, that point on the hair tied down for a #12 is softer than that point tied down on a #18, and thus the wing on the #12 will flair more than the wing on the #18. Also a more buoyant part of the hair is in use on the #12 where that the less buoyant part of the hair is all that is left for the #18. The solution would be to select, in this case, a softer, more buoyant hair for the #18.
The physical shape of hair to stack is important as well. In a #12 Royal Wulff calf tail is very appropriate. By comparison a #16 Royal Wulff may dictate straighter, more even tipped calf tail, or perhaps calf body. For a #20 or smaller Royal Wulff an entirely different material such as African Goat may be the choice. Seemingly for smaller flies bucktail or perhaps deer should be considered, but in fact both lack the curl usually associated with this fly, and more importantly they taper too gradually to give necessary bulk to the wing. The goat tapers more quickly near the tip and has a slight bit of curl similar to calf body. Another example is a small (#20 and smaller) Comparadun. Instead of deer hair consider using antelope for the wing. Here, also, the taper of deer hair is too gradual and leaves little material for visibility or floatation while having too much bulk at the tie-in point where you least want it. By contrast antelope tapers abruptly right at the tip, at the tie-in point compresses well due to the internal structure of the hair, is more buoyant, and is surprisingly durable in such short lengths.
Deer hair that is slightly wavy down the shaft of the hair can generally be counted on to flare more readily than deer hair that is straight; both being of similar length and diameter. Also the dark tips on deer hair are harder than the lighter colored portion of the hair shaft. The longer the dark tip, the greater length of harder hair. In other words, given two pieces of deer hair, one with long, dark tips and one with short, if it is desired to make a non-flaring tail, the likely choice would be the longer tipped hair. If it is desired to flair the hair at the tie-in point, the likely choice would be the shorter tipped hair.
Refereces
For a great deal more information on choosing hair of the Cervidae family, read Christopher Helm's article "Understanding Deer Hair" in American Angler, Volume 18, Number 2 (March/April 1995.) Mr. Helm is one of the most knowledgeable fly tiers around when it comes to such hair.
Other relevant articles on this site:
- Tips for selecting deer hair by Chris Helm
- Tying muddlers By Martin Joergensen
- Hard Hair Wings By Martin Joergensen
Read more about tying techniques and material handling in the Tie Better section.

- Log in to post comments


Laggie Hair Stacker
I treasure your detailed analyses of our hobby. I've have Googled my fingers off searching for a link to the "Laggie stacker" but no joy. Is Jordan Lagman still making them and if so, can you provide a link?
Many Thanks
I have read your art
I have read your article,which is very interesting,which I itend to try.But can you give me information and advice on"dyeing",I would like to try the fluorescent white,can you tell me where I get this dye,or what to use and how to use it,any information would be greatfully received,thanks. Yours, W M.
My head hurts after
My head hurts after that
This is excellent re
This is excellent reference material. Would it be possible for some one to write some pieces on how to make the best use of something like a hare mask, wood duck skin, etc.?