
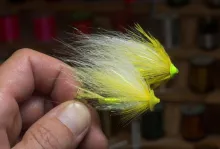
Here are some general tips on composing a Scandinavian style salmon tube fly - and a bunch of flies to inspire. Learn some basic methods and you can experiment wildly and still get some beautiful flies.


The salmon season is well on its way here in Denmark, and a lot of people are tying salmon flies for their fishing. We've had some tremendous Atlantic salmon fishing in Denmark the last few years - this year being no different. The quantity and size of fish is steadily bringing Denmark into the world class of Atlantic salmon destinations.
A lot of fish are caught on well known salmon flies; local flies as well as Scandinavian and internationally recognized patterns, but we also see a ton of new flies, built over the same basic foundation, often tied as tubes and almost exclusively featuring hair wings either zonker style or tied as more traditional hair wings.
Danish-Scandinavian tradition
My good friend Ken, known from the many flies he tied for this site, recently moved a lot closer to the best Danish salmon rivers, and in spite of having boxes and boxes full of meticulously tied salmon flies on hooks as well as tubes, he has of course produced another batch of neat salmon flies for this season. He posted some pictures on our private fishing site, which we use for reports, pictures, planning and such, and I thought I'd bring them on to you as an inspiration for your tying. At the same time Ken and I compiled a small lecture on constructing salmon flies on a tube.
Ken's flies are both adapted from well known patterns as well as well as some that were built "from scratch". Most of them are tied in a Danish/Scandinavian tradition using hair wings and cones and being fairly compact, some might even say fat. The idea is that these flies will move water and have some materials that work well in the current or when the flies are just moving across on a traditional downstream swing or when they are stripped or jerked back actively.


Parts of a fly
The flies are built over a common template, which consists of a number of elements.
Use these elements and get their proportions right, and you are almost certain to get something that looks OK. You can mix colors, select different materials and vary the "extras" like cones, discs, flash, rubber legs and such, but if you adhere to the general rules you will get a harmonic fly, which will also work well in the water.
Whether it will catch fish or not is another question. The fly will do its work, but finding the fish and presenting the fly is your job.
Finding the fish and presenting the fly is your job.
The components
These flies all combine a number of "modules" or components, which are tied in much the same way on all flies. You can exclude most of them, and still get a pretty neat fly. I would say that a tube, a wing, a hackle and a cone is a minimum, but omit the hackle and the cone, and you still have a fly. Can you say Sunray Shadow?
From the rear:
Hook. Choose as you please. Small eye is important, but single, double or treble depends on temper and rules.
Junction tube. A piece of soft tube that slips over the main tube and guides the hook. Often this is brightly colored as an integral part of the color scheme in the fly. At other times it's just neutral.
Tube(s). We need at least one tube, sometimes two. The tube can be selected depending on the color of the fly.
Tag/tail. Many patterns incorporate a tail and a tag.
Body/rib/body hackle Again depending on pattern and mood. Tinsels, dubbing, braids and much else is available. All these elements can be omitted.
Weight. You can have a weight in the center of the fly. Bare or covered with materials. I also sometimes refer to these as rear tubes.
Underwing(s). The first wing sits right in front of the body.
Separating hackle(s). This first hackle is wound right in front of the underwing.
Repeat. You can add more underwing sections and hackles 1-2-3 of each depending on fly size, color choice and temper.
Main wing. The largest wing section and sometimes the only one.
Overwing. Herl, flash, topping or whatever you fancy.
Front hackle. The last hackle that finishes the fly in the front.
Cheeks. Jungle cock or nothing! No artificial substitutes, please!
Head/cone/disc. Closing off the fly, pressing back materials and adding weight and/or bulk in front.

Two diameters
There's a general confusion amongst many tyers about the dual diameter tubes or compound tubes that are used for many Scandinavian tube flies, and for a good reason... it is confusing! The last few years has seen a wealth of different brands and models of tubes for this type of tying, there are a number of different ways of obtaining what we want.
Let me first sketch what it actually is we want to achieve.
We want to have a tube body on our fly. Covered with material - dubbing, tinsel, rib, hackle - or simply bare as it's seen in quite a lot of flies. I have covered the virtues of tube flies before.
We want a compact "thorax" where all hackles and wing sections are tied in.
We want to finish with a cone or a disc. For balance, for weight, for turbulence - and for a nice look to our fly.
This is obtained by tying on two different thicknesses of tube: large diameter to the rear and small in the front. In many cases the fly is actually tied almost exclusively on the thin tube. Sometimes the larger tube is covered with materials, but oftentimes it's left bare.


Inner and outer tube
Most tubing is available in at least two diameters where one will fit snugly inside the other. Many brands have a whole range of diameters, which can be combined so that you can get different overall tube diameters with the different tubes acting as inner tube on larger flies and outer tube on smaller ones.
Unfortunately these are rarely interchangeable between brands, and staying with one brand or having a colossal selection of all brands seems to be the way to ensure that you have inner and outer tube that combines.
You want the inner tube to fit as tightly as possible inside the outer with no air between them.
You slip a longer inner tube inside a shorter outer one as we will describe later. Some tyers use glue to secure the tubes. I never glue, but either burn a collar or cut the outer tube at an angle, and use thread and materials to secure the connection.
The compound tube
Some brands have compound tubes where the inner and outer tube are combined into one piece that needs no assembly or gluing. The compound tubes are simply one piece with two diameters.
Mount in in the vice, tie your fly, trim, add a cone, melt and you are done. This process is described in detail later.
Systems like the Pro Tube System have an enormous selection of components that all fit together: tubes, weights, hook holders, cones and discs. These are built as a system with uniform and consistent measures making the combinations almost endless, but the selection also overwhelming at times.


Bare, colored tube
Most flies, whether they are tied on a hook or an a tube, have a body built up with tying materials. A lot of tube flies have no such body.
The number of colors and different materials available as tubes makes it easy to get a nice body on your fly by simply selecting the finish you want and leaving the tube bare.
Select the color you want, leave the ticker rear part of the tube bare and tie on a thinner tube in front of it and you have a bright body. Many tubes a semi-translucent, and you can add a different color inner tube to get some eye catching combinations.
Add a bright tag to a dull colored tube body by using a colored junction tube to hold the hook.
All you then need is a wing and a hackle, and you can have a neat fly.
Constructing a tube fly
All this leads to the main course: tying a nice salmon fly on a tube. This is the really simple way of going about it, and the foundation for numerous variations:

- Cut a short piece of large diameter tube. 1½-2½ centimeters or about half an inch to an inch is suitable. Too long will give too much clearance to the hook. Too short will make it difficult to get a nicely proportioned fly. Remember that a junction tube will extend the body.
- If you are using a rear tube for weight, subtract the length of this tube from the overall length of the outer tube.
- Cut a slightly longer piece of inner tube. This must fit snugly inside the outer tube.
- Slip it through the larger tube and melt a collar on the back end of the thin tube, which is then pulled tightly against the rear end of the outer tube.
- You can add some superglue to the inner tube before pulling it tight for an extra tight fit.
- You can also cut the outer tube at an angle, and not let the inner tube go all the way through it... or combine as you please.
- If you use a compound tube like a Pro Tube, simply start below.
- Mount the tube on a suitable needle in a vice. The thin part (the protruding inner tube) will become the front of the fly.
- If you want to use a rear tube as a body weight, now is the time to slip it onto the inner tube.
- Start your thread on the thin tube and form a foundation. Keep everything tight and close to the front end of the large diameter tube.
- Cut a small bunch of Arctic fox or similar voluminous hair.
- Remove guard hairs completely or hand stack them to get an even, dense bunch of hairs.
- Cut the butts to get a short wing and tie it in right in front of the body.
- Prepare a hackle. Large, soft hackles do well on these flies.
- Remove the fluff and first barbs to get to the desired barb length.
- Tie it in, curved side forward right over the skin strip.
- Wrap the hackle in 3-4 close turns.
- Tie down and trim.
- Cut a short zonker strip. About 1 - 2½ centimeter or about 3/8 - 1 inch will do depending on the fur. There's usually quite a lot of hair on even a short piece.
- Some tyers prefer to taper their strips to give a broad base and a narrow tip. I usually don't taper my strips.
- Tie in the strip as close to the rear tube as possible.
- Tie in a few straws of smooth flash as a topping.
- Prepare a second hackle, and tie it as the first.
- Whip finish, cut thread and varnish or glue.
- While the varnish or glue is still wet, slip a cone over the thin tube and press onto the materials.
- Cut the tube about 2-3 millimeters or about 1/8 of an inch away from the cone and melt a collar to keep it in place.

Variations and optional additions can be:
- Tag, tail and a ribbed body tied on the thicker rear tube.
- You can also add a small ball of dubbing to lift and support the first wing and hackle.
- The first hair wing is sometimes exchanged with a short, tapered zonker strip tied in skin side up.
- On larger and longer flies, the wing/hackle elements can be separated by wider sections of dubbing, flash chenille or other materials.
Compact
One trick to get these flies to look good is to keep the hackle/wing section very compact. You almost tie the hackle/flash/wing/hackle right on top of the base of first wing, at least wrapping the hackle on the base of the wing and keeping things very close together. You want the fly to appear as if this main section of the fly springs from the same point almost inside the cone.
In the same manner, you want no traditional head on the fly, but just a few finishing wraps, which hold the final hackle and maybe the jungle cock cheeks. These wraps should all be covered by the cone or disc, which should ideally press back on the materials and leave no gap between the cone and the front of the fly.
One trick to get these flies to look good is to keep the hackle/wing section very compact
Preparation
Select the tube you want to tie on. Go for a colored outer tube and simply leave out the body of the fly, letting the color of the tube shine through. Don't cut the outer tube too long. An inch is a long tube, and 1½ centimeters or slightly more than half an inch is mostly enough. Cut the inner tube depending on the method you use - longer if you want the inner tube to go all the way through the outer one.
You can cut the outer tube at an angle, and tie on the connection point between the two or you can cut it off straight and tie on the thin tube right in front of the large tube. Both methods will secure the connection and give you some support for the first wing, which can lean against the edge of the large tube to create lift and volume.


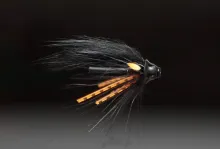
Example 1 - The Bag Fly
A simple Black And Green tube fly using a minimal number of materials, but the technique with two wings and two hackles. The wing is a combination of a traditional hair wing underwing and a zonker overwing. The fly has no body - or rather the body is the raw, uncovered tube.
|
|
|
|
|
|
|
|
|
|
|
|
|
|
|
|
|
|
|
|
|
|
|
|
|


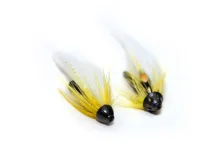
Example 2 - Dr. Statham
Named after the notoriously clumsy doctor from the UK TV series Green Wing. Again a simple fly built over the same template as the Bag Fly above, but with a significantly different result. I use long, soft hackle to add volume to the fly, and again the body is simply the bare outer tube.
|
|
|
|
|
|
|
|
|
|
|
|
|
|
|
|
|
|
|
|
|
|
|
|
|


Variations
For more volume and more colors, you can simply make two wing/hackle sections using loose hair for the first wing section or sections and hair or a zonker strip for the top wing. Again: keep things compact and tight. If you use hair wings only in stead of the zonker strip, you can even fit three sections into very little space in front of the thick tube. Start with the smallest bunch to the rear and increase bunch size and hair length as you move forward. Add flash inside the wing and alternate with a few turns of hackle.
Tying the wing in sections alternating with hackle and very close to the rear tube will press its base out and up, creating the characteristic "fat" front profile of these flies.
But iIf you want the wing to sit lower over the rear tube, you can cut the outer tube off at an angle in stead of perpendicular. Tie on the "open" side of the tube covering the lower "tip" of the large tube with tying thread.
The cut off tube will most likely be covered by the hackle, but you can of course add some dubbing to cover what could appear as a clumsy, naked underside of the fly. Even a small clump of dubbing will help conceal the tube and also support the hackle and the wing.
Alternatively you can equip the fly with a full dubbed body, rib, hackle, tail and what you please.


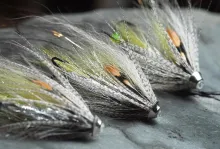
Canadian Tube Flies. gff/>
Proportions
One of the main differences between the Scandinavian style tube flies and many Canadian and US tubes for salmon and steelhead is the size and proportions: The flies here are simply much smaller and much more compact, sometimes bordering on the "fat".
If you go to Iceland or look at flies for summer fishing, you will find even smaller and more compact flies.
A generous use of furry materials such as rabbit zonker strips and Arctic fox, racoon and dense rodent fur like mink and nutria leads to a special style of wings and flies that have a lot of volume and movement.
Hackles are also chosen for softness and mobility and large rooster feathers (saltwater style), schlappen feathers, soft hen feathers and ostrich hackle is often seen, while the ever present marabou seen in a lot steelhead flies is fairly rare. Some tyers use heron or spey-style hackle, but that is generally the closest we get to marabou. Skinny and spiky Chinese rooster necks and saddles are avoided and straight and stiff hair like bucktail is also very rare.
The flies are seldom long and bodies are often formed by just the closely placed wing sections and hackles.
The flies are easy to tie with few steps once you have the general concept. They are very hassle free to fish, light enough to cast but heavy enough to get down. The flies are no match for a floating line on a light twohand rod.
Up to you
This article has tried to describe the general template for a Scandinavian style salmon fly, and I have deliberately not listed any materials or specific patterns. This is a style of fly that lends itself very well to some improvisation.
Play with colors, tube styles, weights, cone shapes, odd materials. As you can see from Ken's flies and those of Icelandic guide Nils Jorgensen, there's a surprising degree of freedom in spite of the fairly well defined style and limited number of elements.
There's a surprising degree of freedom in spite of the fairly well defined style and limited number of elements
Adapt this to your local water or copy color schemes from well known salmon flies, and you will get some really fishy and efficient flies.


Many more tubes
We have a whole lot of tubes built over this template on GFF
- Black Ghost Tube (article)
- Spider NJ (article)
- Raven NJ (article)
- PET Blue NJ (article)
- Très Bien (article)
- The Dirty White (article)
- The Overtaker (article)
- Chinese White (article)
And of course our large tube fly theme covering styles. tubes, tools and ressources and a whole lot of other articles about tubes.

- Log in to post comments

This is a marvelous
This is a marvelous site and despite tying tubes for many years it is always good to see the fresh ideas on here. On another very related subject can anyone help with some information about which areas to fish for Salmon and Sea Trout in Denmark? Not too expensive and where I don;t have to spend my days driving instead of fishing. Somewhere within reach of Copenhagen
May I just say thank
May I just say thank you so much for putting this all together to help a novice such as myself. I can only describe my relief as being "BRILLIANT" that I have found such an informative page.
I did try to make flies on the hook but for some reason I find this method much, much, more appealing.
Thankyou again.
It is very , very much appreciated.
Kind regards
Jon
Jan, The substanc
Jan,
The substance is from Loon and is called UV Fly Paint. It's available in three colors, and can be cured with a UV lamp or simply by leaving it in the sun.
The small lump will both act as a colorful strike point and keep the wing and tail from getting jammed into the hook, where it can sometimes get stuck. Simply add the substance to a number of hooks and let them dry/cure and you have them to use on all your tube flies.
Martin
Martin & Ken,
on
Martin & Ken,
on some flies or better hooks you use some red or green waxy looking colour as a biting spot, what are you using for making them? Thanks in advance.
Jan
Martin,
your answ
Martin,
your answer doesn't confuse me, on the contrary, you gave some answers and/or advices I was hoping to get:
- tie some nice looking flies, go fish and see what happens!
- I have often simply chosen flies that I like and that "seemed right".....
My question intended, that I like the Sunray Shadow style a little bit more - it's only a question of taste for me and I really love shrimp flies on double or single hooks.
So your answer will really help me to fish "my" flies with more faith and so the danger of thinking "did I tie the right ones?" will hopefully be diminished.
Thanks for that.
Jan
Jan, No question
Jan,
No question is too basic, and yes there is a difference... but like with all other aspects of fly tying and fly fishing, it's subtle and personal and maybe without real consequence when you fish!
The right fly style is the one that works (duh!).
The Sunrays work well in almost all waters all over the world - Iceland, Russia, Norway, Sweden, Denmark, Canada.
The smaller flies also work in Iceland. Clear water and sometimes spooky fish call for weapons of a smaller caliber.
In the Danish and Swedish waters, which are often quite peaty and dark, people tend to select bushier and darker, brown, red, burnt orange and black flies while anglers in other places like the UK, Ireland and Scotland often select slimmer and brighter flies while the Norwegian and Russian preference is often larger. Colors are important I think, because the visibility of the fly relies on its color in comparison the the water color. In clear water all flies are easily seen, and people seem to go down in size. At night people select dark flies, often black - and large and bushy.
My personal experience is slightly offbeat, and depends on how limited my number of salmon fishing trips has been. I still have a notion that it's like with most other types of fishing: if the fish are biting, the fly choice isn't really that important.
Getting the fly to fish right is much more critical, fishing in the right depth, the presentation, not spooking the fish, the swing, fishing up- or downstream can have a much larger impact on your success than selecting exactly the right fly. Size can matter, and so can color as already mentioned and to some extent weight, but the exact style - slim, bushy, mobile, stiff - doesn't seem to me to play a really large role. I have often simply chosen flies that I like and that "seemed right" based on my own feeble logic and managed to produce fish, and at other times followed tradition and guide's advice and been skunked.
Unfortunately experience and routine is something that comes with... experience and routine, which equals hours on the water, and those of us that can't get enough hours will either have to listen to the locals or take the long shot and guess our way. The latter has often worked for me. Fish aren't that wise, and a somewhat skilled angler should be able to get them to bite - if they are in the mood.
The basic message is probably: tie some nice looking flies, go fish and see what happens!
Hope this long reply doesn't confuse more than it explains. Other more skilled salmon anglers might be able to chip in with more "reality based" answers.
Martin
Martin,
that's a
Martin,
that's a really fine article, thanks for it!
I have a question about using different tube fly styles: is there a general difference in using tube flies in the style you describe here and the ones like Sunray shadow and the many variants of it (e.g. the very nice flies of Nils Joergensen - Migo NJ....). Could a salmon fisherman 'live' with flies in only one of these styles? Or are there big differences in using the flater winged Sunray shadow derivates against that Danish style tubes?
I hope my questions are not to basic for this comment field.
Best regards
Jan