One key to durability in flies is to prepare a bit before starting - and choosing the right hook, thread and materials
|
|
|
|
|
|
You can simply select a hook, thread and materials according to the pattern you're tying and start in one end. This will most likely lead to a nice fly, which might even be a durable one. But thinking ahead a bit, will increase your odds of ending up with a fly that lasts.
Before you tie
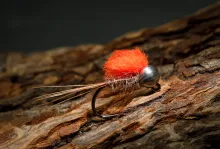
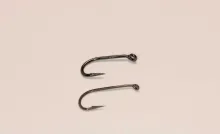
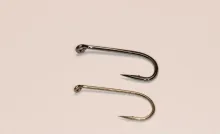
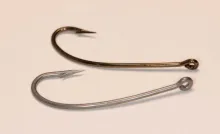
Selecting a hook
Hooks rust! Even stainless steel hooks fished in freshwater will eventually tarnish and deserve some attention. And even flies fished exclusively in freshwater will eventually succumb to the power of oxidation and slowly stain or rust and even disintegrate. The thinner the hook and the less it's been prepared for this fate, the bigger the risk of it weakening and breaking.
So selecting a hook with durability in mind is the first step to a long lasting fly.
In some case the hook choice might be given: a dainty dry fly cannot be tied on a large hook made from heavy wire. And these small hooks are rarely available in any kind of protected material. They are mostly just raw steel, but might be surface treated to be black, dark grey, brown or even bright bordering on chromed. In this case you choose what you need for the fly in question, and keep with the remaining advice in these articles.
Other hooks like larger nymph, wet or dry fly and salmon/steelhead and streamer hooks are often available in a larger selection of materials and surface treatments. Some are more durable than others, and even though many promise a certain degree of resistance against rust, only few actually keep that promise. Some don't promise anything at all, and still hold up very well, even in saltwater. Once we move into the salt, rust - and therefore hook choice - suddenly plays a very important role. Unless you want to break out a set of new flies every time you go out, you'll want to pick salt and rust resistant hooks as often as possible.
Hook treatment
Since your hook is going into water and most hooks aren't stainless, the prime danger when it comes to hooks is rust. Even though you might not fish saltwater, rust is still a threat. Saltwater anglers of course know of rust all too well, but fishing in the freshwater doesn't mean that rust isn't an issue. Salt will speed up the process, but isn't needed for rust to form.
Stainless is one way to battle rust, but not all hooks are available in stainless. Stainless steel is also known to be more brittle than non-stainless and are more prone to break because of that, so many anglers shy away from it.
Certain hook treatments can have some anti-stain effect on the steel and some hooks rust way less than others, but essentially rust or some kind of oxidation will eventually be a problem almost no matter what hooks you use.
Visible rust is pretty obvious on a hook. It will mostly be visible on the hook bend and on the point itself where it can make the hook dull and rough, reducing its ability to do what it should: hook something.
But invisible rust is the real enemy here. Rust on the hook shank under the materials is treacherous. The hook may look pristine and you tie it on your tippet. But the rust sticks out its ugly head when you hook the fish of your life, break if off and get back half a fly with obvious rust under the materials.

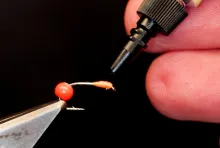
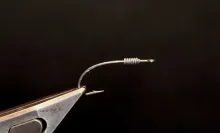
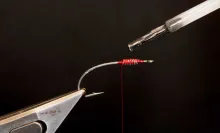
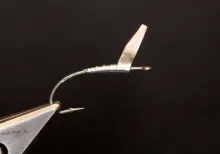
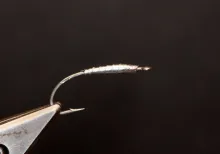
You can fight the problem by treating the hooks before tying, and a simple layer of varnish on the shank can do wonders and increase the hook life significantly.
Simply mount a handful of hooks in a block of cork, foam or wood and varnish the shanks from right behind the eye to the hook bend with a thin and uniform layer of clear varnish. Let them dry thoroughly before tying.
The varnish has other advantages, mainly that the first layer of thread and materials will bite into the varnish, which is soft compared to the steel, and make the materials much less likely to turn or slide on the hook.
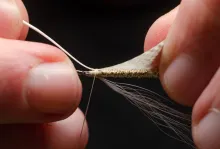
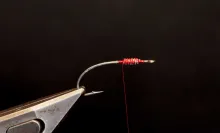
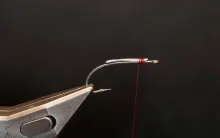
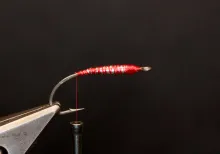
Selecting a thread
The next step in the quest for durability is selecting a thread and laying down the first wraps.
A strong thread can potentially make a stronger fly, but if the thread at the same time becomes significantly thicker, it can be a high price to pay. Some strong threads of the GSP type are also very smooth, with the result that they won't grab the materials as firmly as a polyester or nylon thread, which has a rough surface. Monofilament nylon is of course also extremely smooth.
Overall, the breaking strength of a thread isn't necessarily directly linked to the durability of the finished fly. A very strong thread applied loosely yields a weak fly. On the other hand, if used right, a thin and fairly fragile thread can give you a surprisingly durable fly.
So choose the thread that suits your fly in size, shape, color and tying techniques, and don't choose too thick. If you have a choice, do use the strongest thread you can find, but as long as it's not brittle and your tying style doesn't require a very strong thread, don't put too much emphasis of thread strength.
Simply apply some of the tricks in the coming articles, and your fly will become much more durable, even with a “weaker” thread.
The next article in this series will cover thread selection in more detail, and go into how you can utilize that thread in the best way.
There's much more on thread in the article: Fly Tying Thread Blues.


A good bobbin holder
Having a good bobbin holder is essential. It’s both important for the pleasure of tying, but also important because a bad one can weaken the thread by fraying it. This can lead to the thread breaking while you tie, which is both annoying and will potentially weaken your fly, because thread tension will be loose, and materials can shift and completely come off.
The good bobbin holder also allows the best thread control, letting you apply the maximum force on the thread without it breaking or the spool slipping in the holder. Adjust your bobbin holder to “very tight”, meaning that you need to apply a fair amount of force to pull thread off the bobbin. This will ensure a constant and high thread tension, and secure your materials optimally. When wrapping the thread, don’t have too long a distance between the tip of the bobbin holder and the fly. This will often lead to loose wraps, and we don’t want loose wraps!
So make sure you have a good bobbin holder – or more than one, actually – before you tie. More on bobbin holders for fly tying.
The next chapter in this series will focus solely on applying thread in the best possible way to get good looking and durable flies.

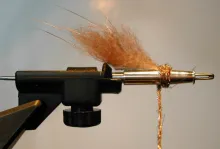
Adding weight
Quite a few patterns call for weight in the form of foil, wire or beads. A few have eyes, which are in most cases tied in late in the process and are covered in a separate chapter.
But as a general rule, no matter what kind of weight you add, you want it to be close to the hook shank and not on the outside of materials or even on the outside of too much thread.
The problem is that weight has inertia and will try to move during a cast, and the looser the weight is on the hook, the larger the risk that it will shift, rotate or even come completely loose. So wire wraps, lead foil or heavy eyes and beads will need to be secured in a manner that at best absolutely fuses it to the hook shank.
|
|
|
|
|
|
|
|
|
|
|
|
For weight under the materials, this means tying it in as one of the first things, before adding anything else, even thread in most cases. Wire and foil can be tied in in two basic ways: wrapped and tied along the shank. You can consider using a bit of super glue or varnish before wrapping to get it to sit, and some foils even have an adhesive side. But as always: in most cases, tightly wrapped thread is the way to get it to sit. Keep the thread wraps fairly open (but tight!) and go at angles rather than perpendicular to the shank. Once wrapped, you can add further varnish or glue on top, which will seep down between the wraps and secure the weight even more.
In the case that the weight is used to shape the fly, like tying in shaped foil flat to form a foundation for a flattened body, glue or LCR may be the only way to get it to fasten without being crushed under the tension of the thread, but as always, it’s thread that’s your safest bet to get it to stick.
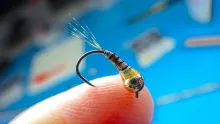
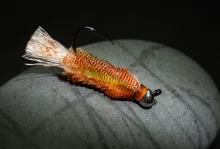
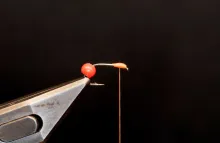
Securing beads
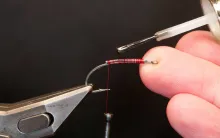
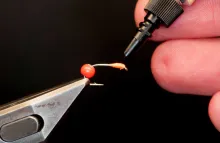
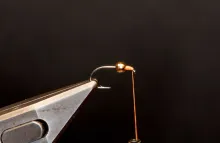
Beads or cones are a whole different game. Most beads and cones slip over the hook point up the shaft and sit close behind the hook eye. In order for them to be able to pass the barb and the hook bend, they mostly have oversize holes and many are even countersunk and some beads are slotted. That means that once they are in place, they are loose. A lot of tyers solve this with glue, and I often do the same thing, since beads are notoriously prone to moving down the hook shank in the cast if they don’t sit really well.
But I mostly combine glue or varnish with a thread base. I simply slide the bead over the hook point and mount the hook in the vise. Then I start the thread just behind the hook eye, and form a small cylinder the length of the bead. I slide the bead up and over the cylinder and check it for fit, remove it and add another layer of thread if it’s loose. I keep doing that until the bead fits snugly over the thread. Then I whip finish, add some thin varnish or superglue, and then press the bead over the wet thread. If the bead is countersunk or slotted, I even add some extra varnish or glue in the rear of the bead once it’s in position.
|
|
|
|
|
|
|
|


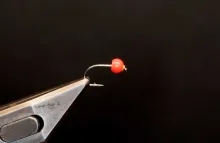
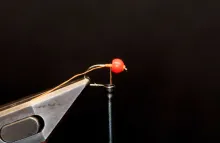
After that, it’s allowed to set or dry, and I can then finish the fly on the hook shank behind it. In most cases I even build a thread dam in the rear when I start the thread again, giving it an extra obstacle, should the bead or cone come loose and want to move.
|
|
|
|

Hand picked for this article


- Log in to post comments