US fisherman and fly tyer George Grant came up with a type of nymph where both body and hackle uses special techniques.

George Grant (1906-2008) began fishing the Big Hole River in 1925, and tied flies as a semi professional fly tyer for over 40 years. He wrote many articles in fly fishing magazines, and two books: “The art of weaving hair hackles for trout flies”, 1971 and “Montana Trout Flies”, 1981.
As an active environmentalist, already in the 60’s, he saw the necessity of preserving the integrity of the rivers, especially his beloved Big Hole, and was promotor of the creation of a special commission for this cause.
Inspired by an idea by Franz Pott (Missoula, Montana) about flies with body and hackles woven, Grant patented his method in 1939, and adapted it to the tying of his stoneflies.
The tying style of George Grant differs significantly from other nymphs tied in his time, and from most of those tied today too! The method and the materials used were so radically different from the usual, that many people did not understand them.
The hair woven to form a hackle used for the stonefly was chosen to be used in rivers with strong currents, where the woven hackle hair would not be flattened over the body, giving the nymph a more realistic and lifelike look.

The preparation and tying of the stonefly will be divided in two distinct phases: hackle and body.
Vise setup
The thread legs must be well aligned, without twisting; the knot to the left will serve as a block and as starting point. The thread I used is what’s usually used for rod building.

The custom tool
The tweezers are very useful. This little tool will help measure and protect the hair tips perfectly, so that they can maintain a constant length. A thin copper plate is soldered or glued to one jaw of a set of hackle pliers.


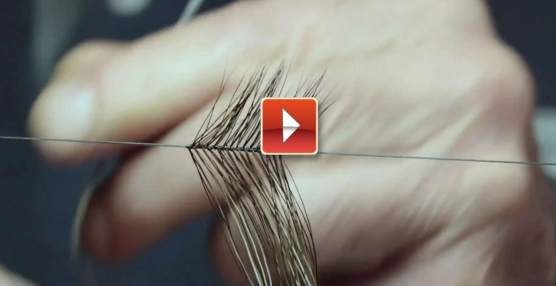
Simulation with Dacron
This is a simplification of the weaving steps, showing the way the hairs are knotted to the threads.


Preparing the hair
Whereas Grant used a great variety of hair, such as badger, black ox, skunk, elk, deer or others, out of convenience, and because of easy availability, I will use only moose mane hair.
Select the hair, removing the broken ones, and those without a tip, eventually sorting the different shades of color. The length of the hair must ideally be 6 centimeters or about 2½” at least.


Hair with glue
Divide the hair in bunches of 3-6 individual hairs, even the tips, and hold them tight with pincers or your fingers. Prepare some glue (dense and elastic) and glue the butts of the hair bunch about ½ cm or 1/4”. Let them dry. This can be a long and tedious process, but it will make the weaving process much easier.
The bunches of hair are now ready for the weaving. Even the butts of the hair bunches with your scissors if necessary.

A woven hair hackle for a medium stonefly will be 2-2,5 cm or about 1" in length. You clip off the butts using a pair of scissors before wrapping the hackle.
Materials used
Hook: Long Shank sizes 10/8/6
Thread: UTC 70 and 140; nano silk 50D
Rib: Vinyl Rib D Medium Clear UTC
Tail: Porcupine quills
Back Feather: Jungle cock
Hackle: Woven moose hair

Picture 1: Tail and bump
Tie the tail in the usual way, with a length not over half the hook shank length. Then create a small conical tapered “bump” that will be the starting point for the oval rib.

Picture 2: Rib
Secure the vinyl rib under the shank, with the flat side towards the hook, and placing it against the bump made before. Make sure that it lays on its side, and wrap it toward yourself, positioning it correctly, and tightening it well. In the original dressing oval nylon was used for the body, but oval vinyl rib is much easier to use.

Picture 3: Pins
Once the underbody is formed, tie a pin on each side, head forward, slightly upward. It’s preferable that these pins are about half the body length, and they might need to be cut before tying them in.
Try to taper the front part of the body, to avoid an excessive step towards the bare the hook shank, but without covering the pin's heads.

Picture 4: Closeup of the pins

Picture 5: Shape of the body completed

Picture 6: Feather and rib
Place a jungle cock feather over the completed underbody, and start wrapping the vinyl rib from the rear, proceeding in tight turns, checking, especially during the first turns, that the feather remains in place.

Picture 7: Body completed
Tie down and cut the vinyl rib close to the pins’ heads. A drop of superglue can help.

Picture 8: Hackle
Trim the butts to be shorter than the tips. Using a strong thread, tie in the woven hair hackle. If the transition between the body and the hook shank is too steep, taper it with some turns of tying thread. Wrap the hackle in the usual way, folding it like a feather hackle.

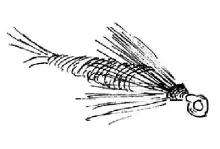
Picture 9: The nymph is finished

Hand picked for this article
- Log in to post comments