I have been making my own intruder shanks from straight hair pins for a while, and they are easy to make, inexpensive and work really well.

During the recent Danish Fly Festival I was tying intruders, and using both store bought shanks as well as some home made ones.
The ones I make myself stirred some attention. Most intruder tyers know that the shanks aren’t exactly cheap, and shelling out money for both shanks and hooks, contributes significantly to the price of the single fly. So most were interested in my methods of producing my own shanks.
I have covered
the wire bending before and also demonstrated that technique at the festival, but it was another method that got the most attention: using hair pins.
Back when I started tying intruders I was experimenting with all the kinds of pre-bent wire I could find, like cotter pins and hair pins. The hair pins proved by far to be the best foundation for DIY shanks. They are made from good steel, they have straight legs, they are typically coated and essentially stainless, the curve in the bend is perfect as a starting point for a shank, and you can easily bend them and form a nice and useful, lightweight shank. With this method I also get shanks with no rear eye, a thing I have no need for. Many shanks have eyes in both ends, and can double as shanks for articulated flies. The perpendicular rear eye also serves as a holding point for vises that can't rotate. I have a vise that rotates and when I tie articulated flies, I use the shanks made for the purpose. So I consider it an advantage not having a rear eye.
Sparked by the interest
at the Fly Festival I decided to cover the process a little more in depth, enabling other tyers to get the proper pins and get good results when making shanks themselves.


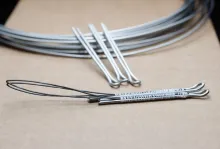
You need the right hair pins
for the project, and finding them can be quite a task, because just searching for hair pins online will give you a wealth of all kinds of colorful plastic thingys with My Little Pony, cute cats, flowers and all such things.
What you are looking for is straight, simple, long hair pins with no added extras.
These go under various names, but the most common are Kirby Grips (or even Kirbigrips), Kirby Pins, Plain Hair Pins, Bun Pins, Roller Pins or combinations thereof. Searching for these terms will reduce the selection, but may still include some pins which are useless for the purpose. Many will be asymmetrical and some will have one or two "bumpy", waved or crinkly legs, shaped so to improve grip and create waves in the hair, but also making them useless to us. Some will also be made from flat wire, another no-go.

We need symmetrical,
straight, long pins made from round wire. If you are searching online, use image search to get visual confirmation on the proper kind.
Once you find the shape make sure you get the longest possible pins you can find, like 2.5 or 3 inches. You can often get them in various colors, black being the most common, but gold, silver, copper and brown also being available.
I have opted for the black ones because they are coated, leaving them very resistant to rust. The shanks you get are quite lightweight, and if you need heavier DIY shanks you need to make them from wire and get a hold of some sturdier wire.
You can find these pins
online and in brick and mortar shops, but it's not always easy to locate the right type in a useful quantity. Often they are sold 12 or 24 at a time, which will typically be too few if you want to start a DIY shank production. A package with 100 or even 500 will secure you an ample supply as well as a good price. These boxes can sometimes be found on eBay and Amazon, but are also found in shops that cater to beauty and hair salons. Not all will sell to individuals, but some do. Prices vary, but expect to pay about 10-20 USD or the same amount in Euros for 500 pins. This still brings your finished shanks into a price range far below what commercially available shanks cost.
Once the pins
are in the house, they need a little work before they can be used for flies. The process is quite simple, and can in principle be none with your fingers, but having a fine, round-nosed or needle nosed set of pliers makes it much easier – and less painful…
You can see
on the pictures and in the video how to do, but the explanation in text goes something like this.


- Bend the legs on the pin so that they cross. (2 in the image) The purpose is to close the bend to a suitable diameter for an eye. Look at a commercial shank or a salmon hook to find a template.
- Make sure that the head – the drop shaped loop formed – is flat in relation to the legs.
- Now poke one tip of the pliers into the eye and grab the outside on one side of the eye.
- Straighten the leg you have grabbed, making a small bend right behind the eye.
- Move the pliers to the other side and do the same with the other leg.
- Make sure the eye is centered in relation to the legs (3 in the image).
- The legs should end up parallel, close to each other (4 in the image).
- You can now trim the legs to a suitable length for your shank (5 in the image).
- If you are tying on a non-rotary vise, consider bending one leg perpendicular to the eye to allow it to sit properly in the vise. You will cut off this leg once the fly is done.
- If you want an up eye on your shank, bend the eye now using the pliers.
- You are ready to tie.
- I can recommend doing a handful while you are at it, using the first one (or the best one) as a template. You tend to get a grip after doing a couple and will make the shanks more consistent when doing several in a row.

Using looper pliers
These pliers are designed to make loops on wire, and are widely used in jewelry making, and - although expensive - fairly easy to find in DIY jewelry and hobby stores.
The pliers will bend and cut the wire to form consistent eyes and are very easy to use. With a little dexterity they can also be used to form bent back loops on shanks, and will make the production of hair pin shanks much easier. You can see on the video linked below how it's done.
You can put a bent wire - like a hair pin - into the pliers in such a way that they aren't trimmed, but the pliers simply bend the legs tightly together and form a very neat eye. By pressing the legs together in the horizontal plane with your fingers, you can ensure that they stay parallel and form a nice and immediately useful shank.

Hand picked for this article
- Log in to post comments