
Framed flies can be pieces of art - both the flies and the framing. But creating your own framed flies is not that difficult. Follow these instructions and frame your first fly with few tools and few demands on routine and skill. You can develop it into art later.

Most fly fishers and fly tyers know them: the beautiful frames or shadow boxes with flies, which we see at shows, in shops and on auctions in clubs or charities. Framing flies can be workmanship beyond the reach of the average tyer. But luckily less can do for most of us. This article describes how to frame a fly or two without having extended woodworking skills or a large, advanced workshop, but also expands on the subject for the framer who wants to develop his or her skills.
Not museum grade
Real frame-makers will build everything from scratch, creating the wooden frame from a mold, making the shadow box, cutting the matte, cutting glass and making the additional parts needed to make the whole frame. On top of that they go to great lengths to select the right materials and glues in order to make the frame and flies last for decades.
I will not make a case of compromising on these important matters for "real" framing work, but since the ambitions here are a not quite as high, I will show you some shortcuts, which will let you obtain some great results, but which may not be anywhere near museum grade.


Pre-made frame
My first shortcut is on the frame itself. Rather than building a shadow box from scratch, I use a finished frame of some commonly available type. These can be bought in many craft or artist's shops and I have even found several nice and inexpensive frames in the local super market.
There are some important points to observe when choosing a frame, and I will cover them later.
Apart from the frame you may need some wood to create a shadow box. This will depend on the construction of the frame and the size of the fly and other objects you want to mount. More on that later too.
Some flyshops sell complete frames or shadow boxes with everything prepared and room for one or several flies, a fly and a photo or some other constellation. If you acquire such a kit, all you need to do is the final step: to mount the fly.
Pre-made matte
The matte is the single hardest part to make (not counting the frame, which we buy), and will require some work, a bit of routine and skill plus special tools - and maybe a bit of luck to boot. If you decide to make it yourself that is, because your frame might already have a suitable matte, and if that is not the case, you can buy or order a matte that fits your frame.
More on mattes and matte cutting later.
Tools
Before we start the real process of making a framed fly, there are a few essentials and nice-to-haves that I will cover. Even though the frame is finished, there can be a bit of woodwork to do depending on whether you select wood or a material as foamboard (aka Foam Core or Coreboard) for the spacers.
For the wood you will need a small, fine-toothed hacksaw or a real miter saw. A convenient alternative is a miter cutting hand shear, which allows you to easily cut wood pieces at the necessary 45 degrees angle. For the Coreboard you use a sharp knife and a metal ruler.
For the mounting of the fly you might need a dubbing needle or some other needle to punch little holes and a cutter or a pair of scissors to cut and trim wire.
If you choose to use screws or nails for the completion, a suitable screwdriver or a small hammer will be needed.
A sharp knife or scalpel can be convenient if you work with wood as can a bit of fine sandpaper and almost any kind of woodworking will call for a ruler and a pencil.

Matte cutter
Apart from that you will need a matte cutter if you want to cut your own mattes.
These come in many different shapes and sizes. I have personally used the smallest and least expensive model and now know how to master that. But in hindsight I would probably have selected a more advanced model with guiding rails and maybe even one, which could cut circles and ovals.
Since this is a dogma project, I will refer to the simple handheld model that can cut straight lines and no more. Matte cutters are widely available in craft and art stores.
I won't recommend cutting mattes with a handheld knife. The mattes needs to be delicately finished, and cutting thick carton with a knife is usually not something done with elegance. So get a matte cutter.
Glue and tape
Selecting glue and tape for your framing work should not be left to picking up whatever you have or can find in the local supermarket.
If you want your frame to last and your flies to stay fresh in color and appearance, the compounds that you put inside the frame must be free of particularly acid. Other harmful substances such as thinners or dilutants can severely affect your fly and other elements inside the frame, especially over a decade or more.
I have used hot melt glue for most of my framing work, and that has worked out very fine. The glue is easy to work with, fast "drying" and long lasting. Glue sticks of the better quality are an alternative worth considering, but they are not quite as durable.
When it comes to using adhesive tape, you may also want to use something that stays sticky without becoming more or less fluid or gooey. On one side it must not dry out, but on the other hand some types of tape are known to become very sticky over the years. Some of the better 3M Scotch tapes have this ability.
Wax and natural rubber (rubber arabicum) can be used too as can glue based on animal or vegetable starch, but for our purpose modern glues and tapes will do.
What the pros say
The National Library of Australia has some very good points about tapes and glues that are harmless and suited for long time storage.
They mention UHU glue sticks as a very good adhesive, and "magic" acrylic tape as a useful, but permanent solution. They also have a recipe for rice or wheat starch paste, which I hereby convey for the really enthusiastic and concerned.
Starch Paste Recipe
Put one tablespoon of wheat starch into a small microwave-safe bowl and add 5 tablespoons distilled water. Microwave on High in a 650W oven for 20 seconds, remove and stir thoroughly with plastic or wooden spoon. Repeat about 4 times until the paste is thick and translucent. Let paste stand to cool, then force it through a plastic sieve and store in a plastic container in the refrigerator. To use, dilute the paste with water. This makes a small amount for immediate use. It will keep for a few days in the fridge.
Cardboard
You will need quite a lot of cardboard to cut mattes and create backgrounds. Some of this might come with your frame, but again the nature of the cardboard can affect the flies, images and other elements inside the frame. Most inexpensive cardboard contains acid, and that will most likely discolor the contents of your frame. So if you want the finished work to last, you will need to go shopping for acid-free cardboard.
Such cardboard is slightly more expensive than ordinary cardboard, but on the other hand it comes in some great qualities and colors.
If you cut mattes you should show particular interest in board with a white core and a colored liner. This board often comes in some colors perfectly suited for flies and will give a beautiful effect when it's cut at an angle, revealing the white core as a rim.
Selecting a frame
When you go shopping for a frame for fly framing the one thing you want to look at is depth. You want a deep frame. Most - if not all - store-bought frames are made for pictures, and as you know pictures are quite flat.
Flies aren't...
Most flies have volume, and we want a frame that has room for the fly we're framing. Now, it is in most cases unlikely that you will find a frame deep enough for any fly, but make sure you have enough wood in the mold to cover the shadow box that we may build behind the frame.

Apart from that, you want a frame that can be disassembled and assembled easily, and you might want to select one that has a nice matte.
The last thing to consider is size. Do not select a frame that is too large. One thing is that the fly will seem mighty small in a large frame, and another obstacle is that it is more difficult to handle and fit materials for a large frame. Don't go over Letter or A4 format for your first projects. Later on you can increase frame size.
Other materials
This is a list of a few other odds and ends, which you might find useful to have nearby during the process.
- Thin copper wire
- Clear plastic tube or pearls
- Small nails and/or screws
- String, nylon or gallery wire
- Picture hangers
- Wooden dowels
- Cork pieces
The need for each item on this list depends on how you decide to construct your frame and hang it when it's done.

First frame

For your first dogma frame you will need:
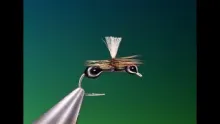
- A nice fly. Select a flat and not too small one.
- A frame with glass. Select a deep and not too large one.
- A matte (may come with the frame)
- Back (may come with the frame)
- Spacers - wood or Coreboard
- Stiff plastic tube
- Copper wire
- Hot melt glue or other glue
- Adhesive tape
- String for hanging (hanger may be part of the frame)
Split frame
The first step is to take the frame apart, and assess the individual parts. For the sake of simplicity I will refer to a "complete" frame with a precut matte and a back-plate, which can be used for our purpose.
Most frames are held together with a simple system of metal tongues that you bend down to hold the back in place.
Straighten these tongues and take the frame apart. It will most likely consist of the following parts:
- The wooden frame
- The glass
- A matte
- A backing paper or carton
- A back plate
We will be using all these parts for the first frame. Later on you can experiment with replacements.
The spacer frame
Unless you have managed to get a very deep frame, you will need to create a spacer frame behind the real frame. The purpose of the spacer is to create space between the front glass with the matte and the back plate.
I make these spacer frames from strips of wood. I make simple mitered frames, which I hot-melt glue to the back plate. I cut the miter with a miter cutter - a set of pliers, which I bought for close to nothing in a local hardware store. Since the wood we're working with is very thin it's easy to cut with the pliers, and the corners need not be very beautiful because they will wind up on the back side of the finished frame. You can of course use a miter box and a fine-toothed saw.
Measure the wood by holding it to the inside of the outer frame or using the back plate for a measure and mark the length with a pencil. Cut the four pieces and place them on the back plate, to ensure a rectangular assembly. Dab a small drop of glue on the end of each part and glue the frame together.
If you opt for Coreboard instead of wood, the process is much the same. You just cut with a knife, not a saw or pliers.


Background
For your first fly I recommend a simple background. If the back plate that came with the frame is some kind of wooden board, and the back paper really is paper and not carton (or isn't included at all), I recommend that you cut a background from cardboard of a suitable color. Use the frame's back plate as a measure and cut a piece of cardboard the exact same size.
The fly will be mounted on this cardboard.

Multi-fly frames
You can get a lot of frames with openings for more than one picture, and of course such a frame can be used for several flies too. You can also mount many flies within one opening in a frame. Projects like that can come out really nice, but before you get the routine, I recommend staying with one fly in one opening.
You can consider mounting a photo or a drawing in a second opening, and later on a second fly or something like dried plants, feathers, stones and other natural materials, which can make a double or triple frame look really snazzy.
Fly placement
Put this cardboard frame on a table and lay the fly on it. Put the frame with the matte inside it on top and try to judge the placement of the fly. You want the fly to sit centrally in the horizontal plane, but a bit above the center vertically. If you want a sign with the name of the fly and other details inside the matte opening, now is the time to take that into consideration.
Don't just blindly put the fly in the middle. Different flies have different visual balances, and flies with long tails, large hackles or high wings need to be placed asymmetrically in order to appear visually centered.


With the fly in place you can mark it's position. Set one little dot with a sharp pencil right under the rearmost part of the hook bend. This is where the first of our pegs will be placed.
Stick a small hole in the background, just exactly large enough to let a copper wire pass. Cut a short piece of copper wire - 10-12 centimeters or about 4-5". Pass both tag ends of this wire through a short, translucent pearl. The pearl just needs to be long enough to clear the fly from the background, but not so long that it will press the fly against the front glass.
Fly attachment
Put the hook point through the loop formed by the copper wire, and put both wire tags through the hole in the cardboard. Arrange the fly roughly as it will sit in the finished frame and pull the wire really tight, finally taping it down on the backside of the board.
Orient the fly as you finally want it and mark a spot right under the hook eye. Punch another small hole and thread another piece of copper wire through the hook eye, leading both tag ends through a second pearl and through the board. Tighten once more, and tape the second set of tags to the backside. With this done, the fly should sit tightly, but still be adjustable.
Assembling
When the fly is properly placed, it's time to assemble the frame. Start by putting all the parts together and check that everything is aligned and looks good.
Put the glass in the frame, and the matte behind that. Mount the spacer frame behind that and the back plate with the fly. Hold everything together with your hands and view it from the front.
If you are satisfied, it's time to fire up the glue gun, disassemble the whole thing and reassemble it again - this time with glue between the layers.
If things are as we anticipated you now have a finished frame.

Adding a backframe
Depending on taste and how elegant your spacer construction is made, and on the nature of the frame, you can consider making a "backframe", meaning an extension of the frame itself, but made so that it covers the gap that will be between the front frame and the wall if you hang the frame. This can also be made with wood and cardboard, and is essentially another set of spacers, but just more elegantly made, and deep enough to cover the spacers around the fly. You can also use this rear frame as the spacers for the fly, and simply let the wood in the rear frame create the needed distance between the matte and the backplate where the fly is mounted, omitting the need for an "inner spacer frame".
Bells and whistles
This first frame was on purpose made as a very simple construction with few extras. But if you feel confident you can consider several additions - or improvements if you will.
Signs
I have already mentioned a small sign with the name of the tyer and the fly, and maybe more information, as a nice addition.
There are several ways of doing this. Using an ordinary printer, you can print on acid free paper, colored carton or even gold- or silver-plated carton. The latter works best in a laser printer. Make sure you do not choose too thick a material. If you have a steady hand and a suitable handwriting, a hand written sign can be a great alternative. A signature from the tyer can also be a great addition. Make sure that the pen or pencil used for such hand written signs is permanent and light fast. High quality ink in a good old-fashioned pen or a modern tube pen is a good choice as is a soft pencil.
You can also go for an engraved sign made professionally in a brass plate or a similar material. Attach such a sign to the back plate with glue, small brass nails or small screws.
Several mattes
 can be developed into various types with little effort: a deeper frame (upper right), space between glass and matte (lower left) and double matte with a second spacer (lower right).")
Another option is more than one matte. This is a construction often used by professional frame-makers. The effect can be stunning and extremely beautiful, not least because the mattes are often cut in intricate patterns and blend many colors. Cutting such mattes is not for people with trembling hands.
Matte design
The matte itself can be decorated in different ways. The most obvious is to paint or to draw on the matte. Thin lines tracing the openings can accent the shape and add character. Framing the frame in this way can appear really elegant.
Another way of creating such accents is by cutting thin grooves in the matte. If you have selected a colored matte, cutting these grooves will reveal the white core of the cardboard and create nicely contrasting lines. Grooves in a uniformly white board will show themselves as discrete shadows, also lending a distinct elegance to the frame.
Several flies


Mounting several flies - either in the same opening as a fly plate or as a single fly in each of several openings - can help create some very appealing and impressing displays. Dozens of flies mounted together can create an overwhelming collection of flies. Selecting flies of the same size, type, style, color or tyer can emphasize series or themes.
Other objects
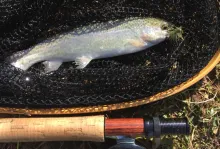
Photos, prints or drawings are an obvious supplement to the flies. They are easy to mount above or next to the fly or flies in a separate opening. A fly and a picture of the fish it caught is a perfect combination. Bas Verschoor's framed stamps and flies is a good example of a series of conceptually connected flies in combination with extra elements - in this case the stamps.
Other supplements could be feathers, dried leaves, pressed flowers and even three-dimensional objects like twigs, sand and even small stones.

- Log in to post comments

Great site, awesome
Great site, awesome information.
Looking to purchase a frame ready to accept flies (would like to mount flies my dad tied for his 60th birthday). Would love to make one, but don't have the time or skills to make it look good. Any ideas of where I can buy a frame ready for mounting? Thanks!
Jim,
You can use
Jim,
You can use one pearl in stead of two, but I usually prefer two because I can keep the copper wire free of the body and have it grab the eye and the shank, and it gives a better control because the flies can't rotate. But one pearl and a single holding point can work too.
Martin
Martin-- I have 16 m
Martin-- I have 16 miniature full dress feather wing Atlantic Salamon flys--is there any reason why I could not mount them in my shadow box by threading the cooper wire through a clear pearl or clear tube then around the middle of the hook shank?
thx Jim Hagar
ps RU related to Poul Jorgensen?
Alen,
For many fl
Alen,
For many flies you can use different approaches. Some frame makers simply make a large opening and arrange their flies in that - like here - others make an opening per fly, which is a lot of work and requires precision, but can be quite amazing as seen here in this frame with the flies from the Danish Fly Festival 1997.
Martin
Ok
I understand tha
Ok
I understand that you emphasize only a few together
But for example I wanted to do the Wolff series which is about a dozen
How would I go about
How would I go about mounting dozens in the same frame?
Martin,
I found t
Martin,
I found the BUGLE BEADS, thanks for the help. Once I knew they were bugle beads it was no trouble finding them. I think my first project came out great.
Dennis
Dennis,
Did some
Dennis,
Did some further research and dug out my bag. Look for Bugle Beads, and you will be on the right track.
Martin
Dennis,
I bought
Dennis,
I bought some in Michael's in the US many years ago, but here in Denmark any DIY jewelery or hobby store has something useful. I found a bag here with thin, clear cylinders of mixed lengths. Very practical.
Look for plastic straw beads.
Martin
I am having trouble
I am having trouble finding Clear plastic tubes or pearls, what type of store do you find these in? I have tried Lowe's (Hardware) and Hobby Lobby with no luck.
Roger,
No, I don'
Roger,
No, I don't do this commercially, and apart from a couple of frames, which I gave away, I still have all the ones I made. There are commercial framers out there who might help you. Try inquiring in your local flyshop or club and someone might be able to help you. Or give it a go yourself. It's pretty easy.
Martin
Martin, do you do cu
Martin, do you do custom orders?
Bob,
Call them do
Bob,
Call them dowels, pegs or whatever... they are essentially small pieces of cylindrical wood. I make my own from pieces of round wood, which I buy in craft or hobby stores. Places like Micheal's in the US or stores where you buy things for model building (planes, cars etc.) should be a good option. Buy the pegs by the foot in different suitable diameters and cut them using a sharp knife on a firm surface. Simply press the knife onto the peg and roll it while cutting. That will ensure a nice cut with no fraying.
Use some fine sandpaper to clean the ends when done, and you can produce dowels in any thickness and length you might fancy.
You can even vary the type of wood and use both fir or pine as well as more exotic hardwoods.
Hope this works out for you.
Martin
Greetings,
I have
Greetings,
I have done quite a bit of fly mounting using the tube method of attaching the flies. I now have a few flies to mount that I would like to use a wooden dowel as a post. In this small size, are they still called dowels? Would you be so kind as to tell me where you can find the very small dowels? What type store? Any assistance you can provide will be greatly appreciated.
Thank you,
Bob
Thank you for the de
Thank you for the detailed directions on how to mount flies. I have a series of flies that I wanted to display in a frame, but was unsure on how to go about it. I have no doubt that they will soon be mounted and on the wall before long.
This is a great! Any
This is a great! Anyone can make the perfect gift for a fly fishing buddy with simple tools.
Hi Martin its only b
Hi Martin its only because a very very dear friend who passed away last year was a fantastic salmon fly tier and mounted many many flies like this, its so easy and does not spoil the fly please let me know how you get on if you try this method take care
Jan,
I have tried
Jan,
I have tried a number of different methods for mounting flies, but not the one you describe.
Martin
have you tried mount
have you tried mounting trout and salmon flies with pushing a drawing pin through the back of the card then pushing a small piece of fine clear tube over the pin leaving enough to mount the fly pushing it through the tube.
I have been looking
I have been looking for a method to present flies that I tie. I will incorporate your suggestions with what I am already doing. Thank you.
A very interesting p
A very interesting page on the topic of framing flies.
An addict :-)
Realy cool idea :)
Realy cool idea :)
Great tutorial from
Great tutorial from someone that does a lot of matting and framing. Shadow box frames, pre-cut mats, backing boards and even pre cut plexiglass are available from a number of different online suppliers which would make the job even easier.